- +4527976587
- mail@worldofshortgame.com


Articles

4 Reasons Why Your Short Game Doesn’t Improve, and How To Fix It
Stop Wasting Your Time!
4 reasons why your Short Game doesn’t improve, and how to fix it

Have you ever spend 20 minutes on the Short Game area, with a bucket of balls, hitting for the same flag, over and over again, and probably only moving your feet more than a meter/yard when you needed to go pick up the balls?
I’m sorry to tell you, but the truth is that you just wasted 20 minutes of your life.
Why? Let me give you 4 examples:
1. How is golf played?
First reason for that you are basically wasting your time, and doesn’t improve your short game when practicing, is that you are hitting the same shot over and over again. Think about how golf is played ON THE COURSE:
You start of a hole, with a certain club, from a tee and a flat tee-box. Next shot will probably be with a different club. Third shot with a new club again, and so it follows. You will constantly face different lie, slopes, and other conditions.
So if this is how golf is played, different shots ALL THE TIME, why are we practicing the same shot over and over again?
Some would say that it is so we can better repeat that specific shot on the course. And yes I get the idea, but science has proven over and over again that you actually perform a lot better on the course, if variation is to be found in your practice.
A very good game to try out on the short game practice area to simulate how a round of golf is played would be to do the “27 shots challenge”. This game is made of 27 shots which form 9 holes, and you will get a score on each hole relative to par, just as when you playing on the course. You can find the drill in the Free E-book Top 3 Chipping Drills

2. Constant learning is the way to success
-What is 13 x 5?
Got it? Now:
-What is 13 x 5?
Do you have the answer? Let me ask you again:
-What is 13 x 5?
Okay, you probably figured out already the first time that the answer is 65. Your brain had to do some work to figure that out right? When the brain does work, its like going to the gym and lifting weights. It gets just a tiny bit better every time.
But what about the second time? How much work did your brain need to do then? Nothing right?
And the third time it was probably the same. This means that the second and third time your brain didn’t need to do any work, and therefore no learning took place. This is the same way it works when practicing your short game (and all other parts of the game as well).
So instead of hitting the same shot over and over again, you need to change something between every shot. New hole, new club, new trajectory, a new place to hit from. In this way, you are constantly challenging your brain, and by this, you are creating new learning. Otherwise you will be stuck in you old practice habits, and never improve your short game.
A very good way to make sure that this random element is a part of your future short game practice would be to try out the 27 shot challenge, which you can find through the free e-book called Top 3 Chipping Drills – click here to download for free
3. Are you “flowing”?

Do you now that feeling that when doing something specific, nothing else really matters at that moment? 100% of your attention is focused on that specific task, whether it is cooking dinner, playing computer or practicing your golf.
Players often refer to this mental state of mind as being “in the zone”. In the zone, optimal learning takes place, your skills are developed at maximum speed and you are spending your time as effective as possible.
The principle is called “flow”, and it describes a certain state of mind a player can reach when the challenge matches the skill level of the player.
Take a look at the chart below. The skill-level is at the x-axis, and the difficulty of the challenge is at the y-axis.
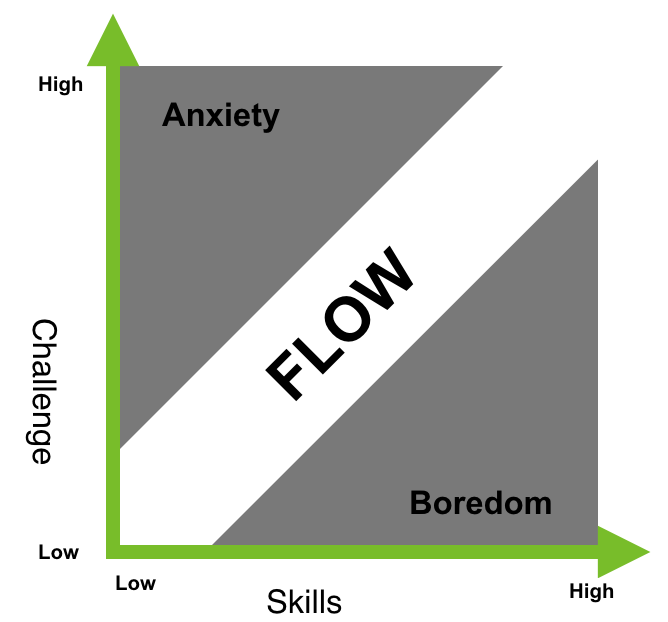
If the difficulty of the challenge is very low, and the player’s skill level is high, the player will be facing boredom.
If the difficulty of the challenge is very high, and the player’s skill level is very low, the player will be facing anxiety.
None of these feelings are very good when playing and practicing golf. No one wants to fell bored when practicing, because then its not really fun right? Neither wants anyone to feel anxiety because the challenge is so difficult that they fell useless.
This means that the way you practice must be well balanced according to the difficulty of the challenge you are facing, in order to enter the flow state of mind. It may not be easy because then the player will be bored. Neither must it be way to difficult, because that can break the player completely.
A very good drill to try would be the zone-climb, which can be found in the the Free E-book Top 3 Chipping Drills. This drill is constructed in a way that it automatically makes it more and more difficult the better you perform, which makes sure that you can enter the flow state of mind easily.
One last comment about the difficulty of the challenges:
I better like to make games and drills a little to difficult than to boring. I am a strong believer the practice should frustrate you, and sometimes you should be on the edge of breaking completing. In these situations you learn so much more about yourself, and hey, isn’t it exactly those feelings you sometimes get when you play?

4. Do you dare to face the consequence?
Another thing to consider: On EVERY shot in golf there is a consequence for hitting a bad shot, and a reward for hitting a good one, that’s a fact.
A bad shot can cause penalty strokes, or place the ball in a bad position for the next shot.
A good shot will place yourself in a good position for the next shot or maybe even finish up the hole with a good score.
So tell me, why are we practicing without a consequence? I think I know the answer: Because it feels nice and good.
And yes it does feel good to hit that same shot for the same flag for an hour, knowing that if you hit a bad shot, you can just hit a new one. But does it make you any better? Does it make you better when you are out on the course? I really don’t think so.
What you should do instead is practice in a way that brings along a reward and consequent for every shot you hit. The opportunities are endless for creating games and drills that do exactly this. One of my favorite games is the 9 shot challenge game. The goal is to complete all 9 holes, starting from hole 1 and moving up. Every time you succeed with the success-criteria on a hole, you can move on to the next hole, and by this, you are closing towards completing the game (reward). But if you fail a hole, you must go a hole back, and by this, you are further away from completing the game (consequence). The game can be found in the e-book 35 Short Game Drills and Games. You can also download the Free E-book Top 3 Chipping Drills as a good start.
How will you practice the next time?
That was 4 reasons for why your short game doesn’t improve. The next time you go to the short game area, remember the following things:
-Hit different shots ALL the time.
-Let there be a consequence for hitting a bad shot.
-Let there be a reward for a good shot.

What to do now?
If you feel a bit lost in the moment about what you specifically need to do the next time you are on the short game area, I strongly recommend you to download the free e-book Top 3 Chipping Drills right now. It’s completely free and provides you with 3 easy to do drills to get started with a better practice. If you want a complete guide on how to practice your short game probably, AND 35 of the best short game drills and games, you can buy the e-book 35 Short Game Drills and Games right here. It provides you with 35 well described, challenging and exciting games and drills you can go try the moment you buy the book. Some of them can actually be done in your garden at home.
3 Easy Steps to Master the Uphill Bunker Shot
3 Easy Steps to Master the Uphill Bunker Shot
Have you ever found yourself in the following scenario: Your ball has come to rest on a steep uphill slope in a greenside bunker. After trying to pull off the shot, you find your ball either on the other side of the green because you bladed the shot, or just in the lip of the bunker because you hit the sand to early. Don’t worry; you are not the only one.
In the following you will learn the 3 key factors for the uphill bunker shot. Pictures will guide you through the factors.
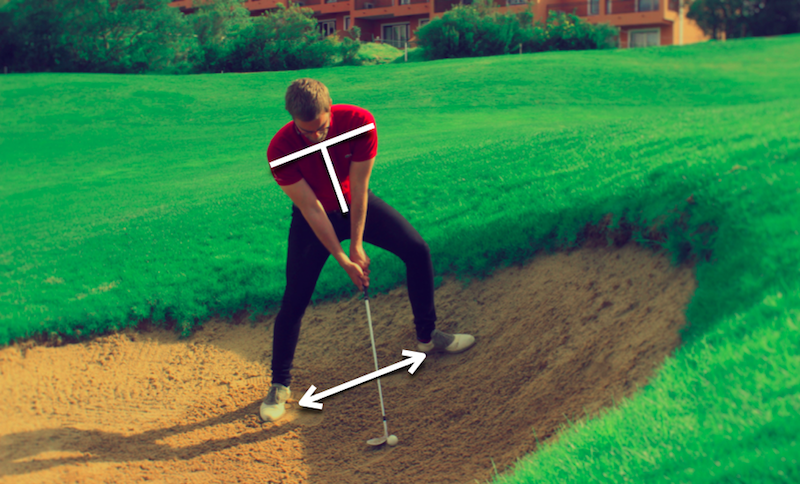
1. Start with the right setup
It may not come as a big surprise, but you need to change the setup for it to match the uphill slope the ball is located at. Here is what you need to do:
-You need a very wide stance in order to keep your balance.
-Tilt you upper body so your shoulders are more in line with the slope.
-Your weight is going to be a lot on the trail foot (back foot) because of the upper body tilt.
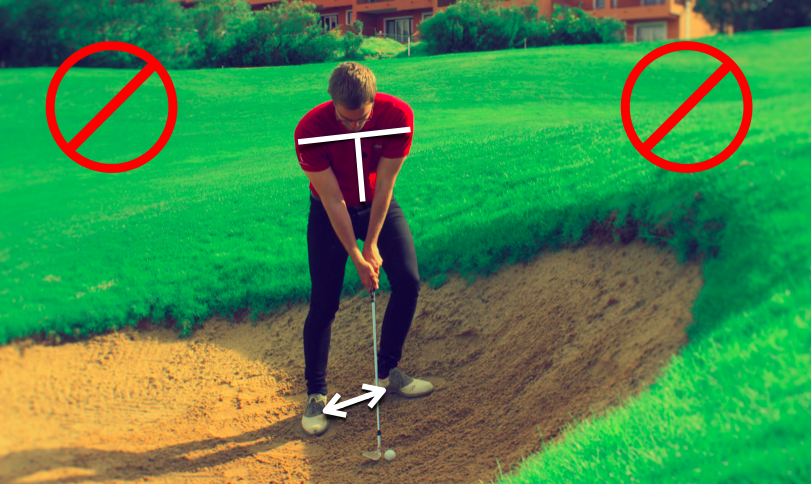
How NOT to setup for a uphill bunker shot:
You’ve just learned the basics of how to setup for an uphill bunker shot. I just quickly want to show you the most common mistakes people make in the setup for this shot:
-Setting up with a very narrow stance.
-Having their spine close to vertical.
-Leaning forward with the weight.
2. Keep the weight were it started
Now that you have placed yourself correctly in the setup, with the weight more on the back foot, it is very important that you KEEP the weight on the back foot. In almost every other shot, that you have to move the weight forward. And that is absolutely correct, just not with this specific shot.
Now you might be thinking:
Did he just said that I should keep my weight on the back foot?! And yes I did. By keeping the weight back, there is a greater chance of your shoulders keeping their tilt with the slope. Just look at the pictures below:
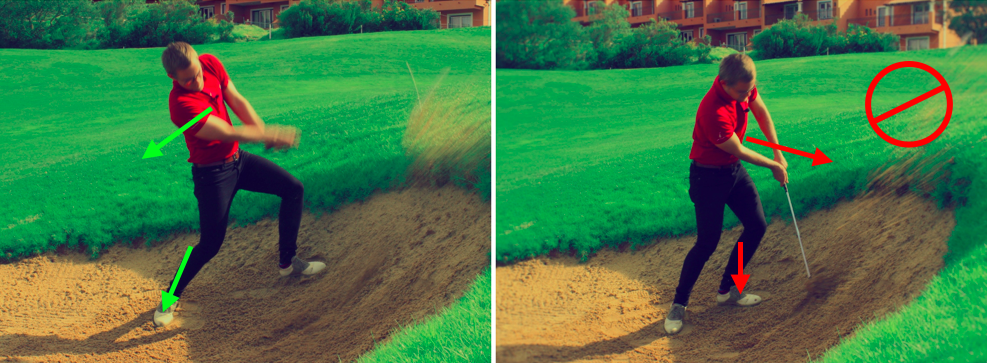
On the left picture you can clearly see how the upper body is tilted with the slope, just as we placed it at setup. On the right picture the weight has moved forward and the upper body is now tilted towards the hill. This will cause the club to smash into the hill and never make it any further than that. The margin for error is 0 when the club is swinging that hard into the sand/slope.
3. Swing along the slope
That was 2 out of 3 key factors when hitting uphill bunker shots. The third key is about how you swing the club. All that matters is that the club, when it hits the ball, must be swinging almost inline with the slope. Look at the picture below:
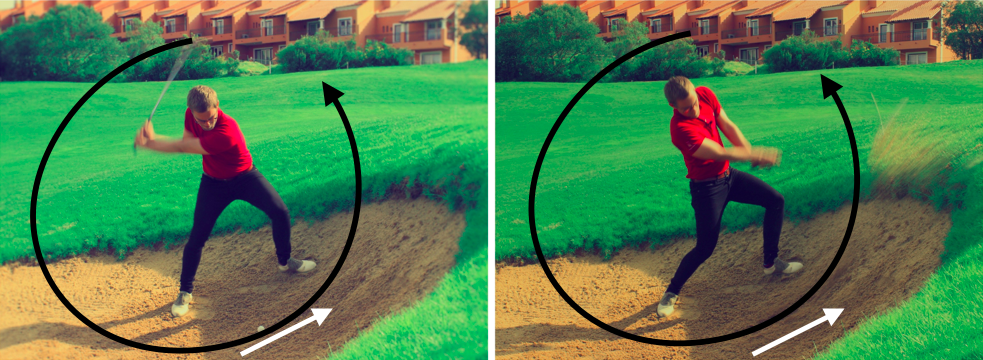
As you can see, the club is swinging up along the slope when the ball is hit, and this is the whole idea of this shot. By making the setup adjustments we did, and keeping our weight back, we increased the chances of the club swinging along the slope at impact.
Here is what to fell:
Here are a few other swing-feelings to try out to make this happen:
-In the downswing, fell like you are making a “wide”swing. This means swinging the club far away from yourself in the downswing.
-In the follow-through, you should do the opposite than in the downswing. You should make a very narrow swing. This means keeping your hands very close to your body, and maybe add some flexion in both of your arms.
Both of these swing-feelings should make the club head travel more up along the slope at impact.
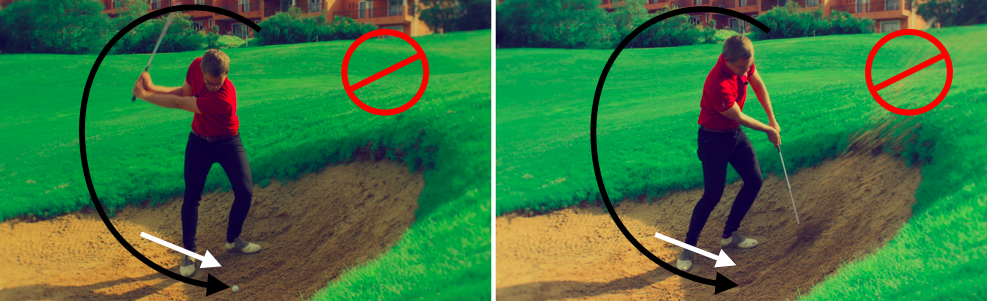
What NOT to do:
Way to many amateur players does the exact opposite than described above. They move their weight a lot forward in the downswing and they swing “narrow”down to the ball. This will cause the club head to smash into the hill of sand, and never make it any further. The margin for error when doing this is 0.
You need to practice this!
You have now learned the 3 key factors for uphill bunker shots. Unfortunately, it’s not enough only to read about it. The next time you are going to play a round of golf, try and arrive 30 minutes before you normally would do. Take some practice balls, go to the practice bunker, and try out the 3 above described things. Test them out, see how you like them, and find out which of the key factors you think is the most important for YOU! Good luck.
Do you need help with a standart bunker shot?
The above described shot is not the easiest to succeed with. Make sure you have your bunker-fundamentals in line (read the 15 most important bunker shot basics to check if you got it), before you start working on the uphill shot.
If you want to learn how to hit downhill bunkershots, you should read How to Master the Downhill Bunker Shot.
11 Golf Wedge Parts You Must Know
11 Golf Wedge Parts You Must Know
Do you know what bounce angle, the sole or the grind are, on a golf wedge? If not, keep on reading, and find out!
The golf wedge is designed in a very specific way, in order to help the player the most. In the following I will describe the different parts of a wedge, and what their function is.
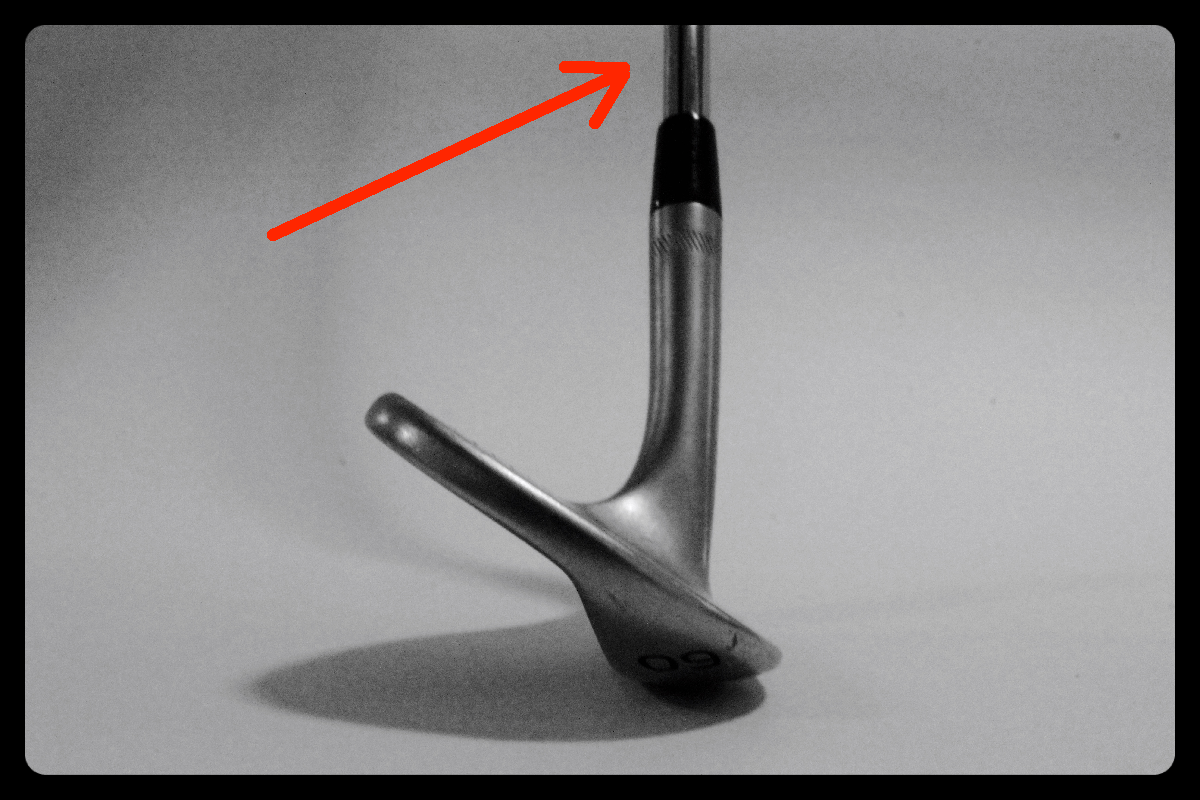
1. Shaft
The shaft is the part that connects your hands with the club head. The shaft may vary in the type (steel or graphite shaft), the length, the weight, stiffness (flex), and where the shaft flexes (kick point).
2. Ferrule
This is just the little black plastic piece that sits where the club head stops and the shaft starts. It has no function, but is simply a visual part of the club. Some club-builders offer ferrules in costume colors! 😉 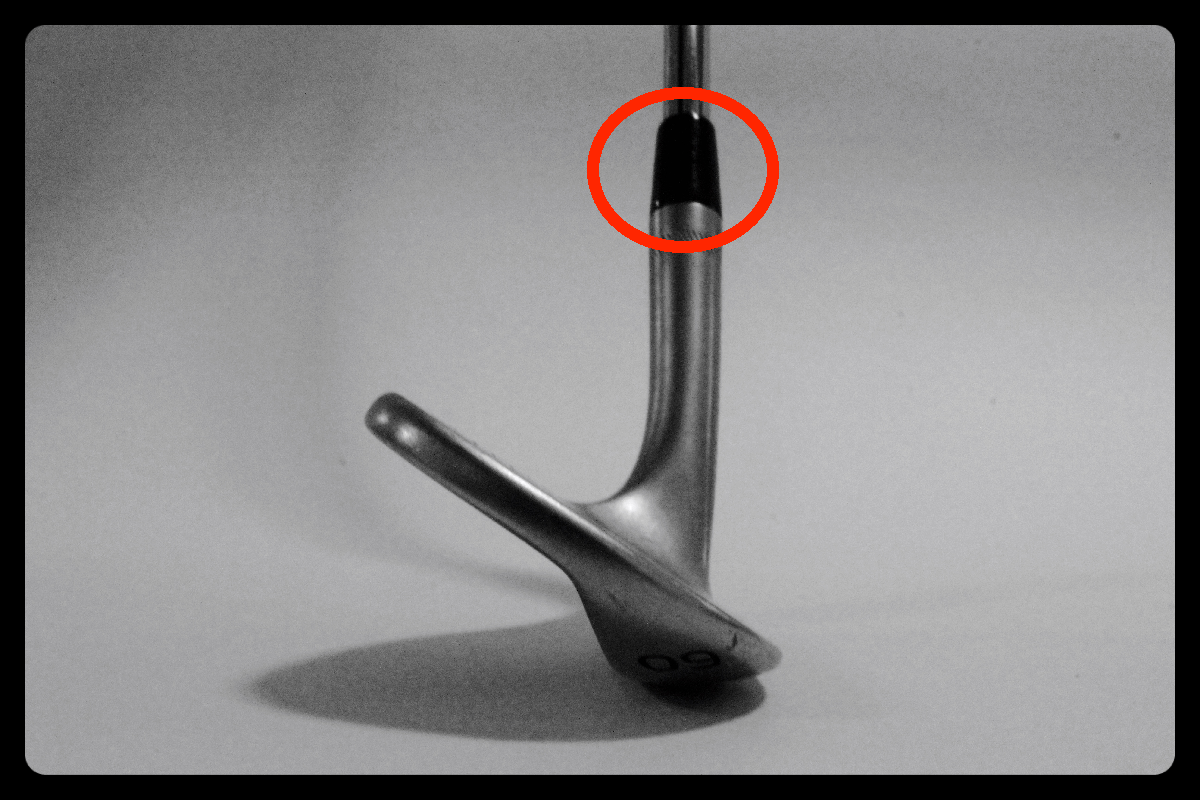
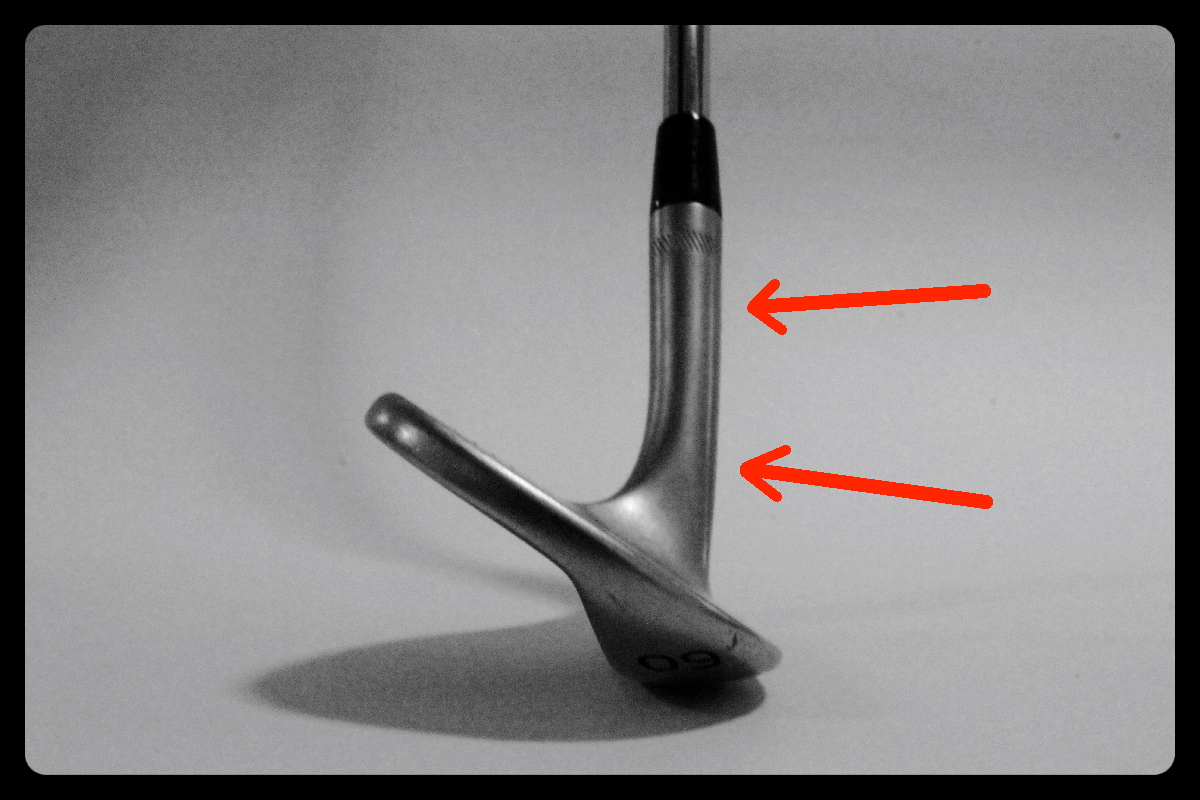
3. Hosel
This is the part of the club head wherein the shaft is mounted. This is the part of the club were the ball is strucked when hitting a shank. The companies behind wedges experiments with different hosel length, to change the clubs performance.
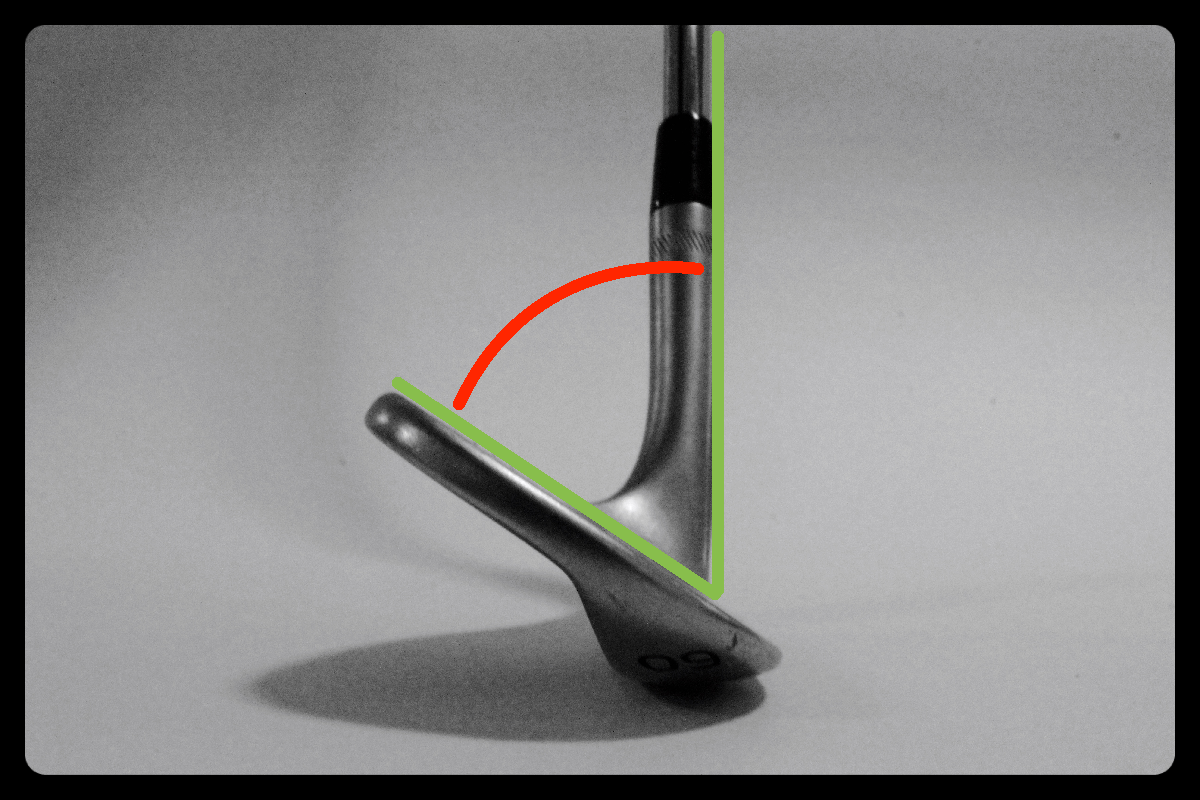
4. Loft
The loft on a wedge is the angle of the clubface relative to the shaft. The angle is measured when the shaft is vertical relative to a horizontal surface. This angle has an impact on how high and far you can hit the wedge.
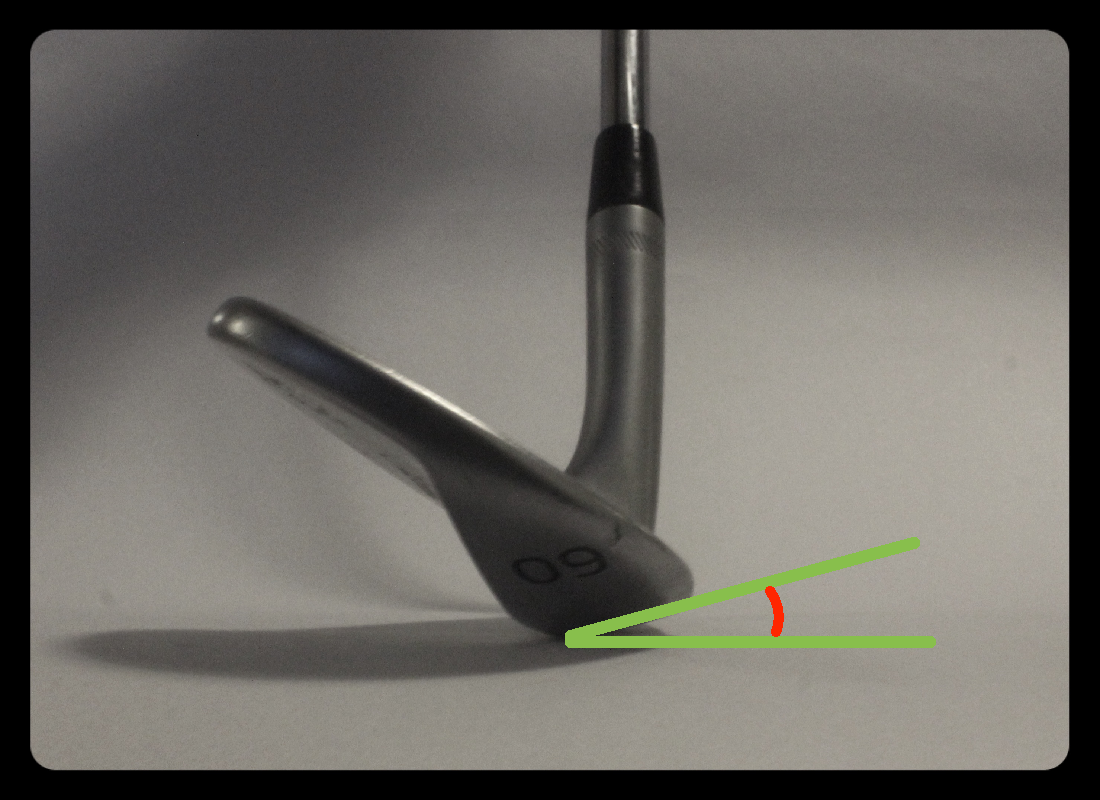
5. Lie
The lie angle of a wedge is the club head’s horizontal orientation relative to the shaft. The lie must fit every individual player because it has a huge importance to the direction of the shot.
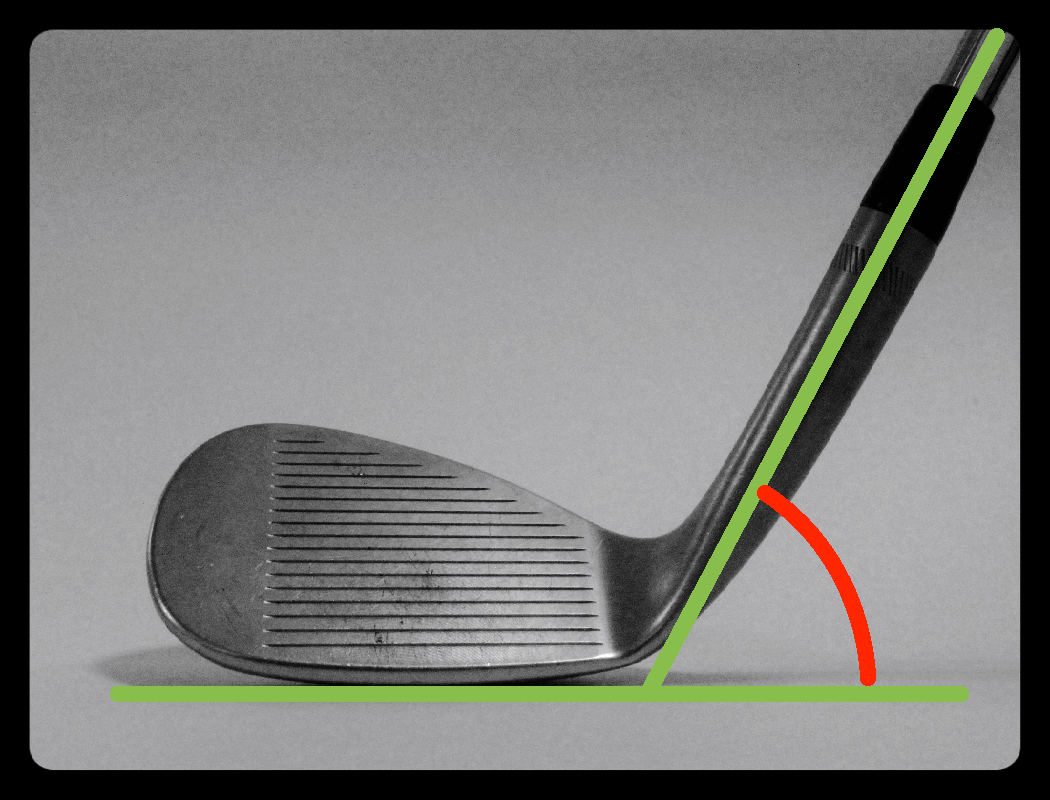
6. Bounce angle
Bounce is an angle every wedge has. This angle is measured when the shaft is vertical, and with the club head positioned on a horizontal surface. The angle between the horizontal surface and the leading edge (see below) is the bounce angle. This angle serves to prevent the club from digging into the ground or in the sand. It would be enormously difficult to get solid contact on a short game shot without this angle. 4-degree of bounce is very little, and 15 degrees bounce is very high compared with the wedges that are sold today.
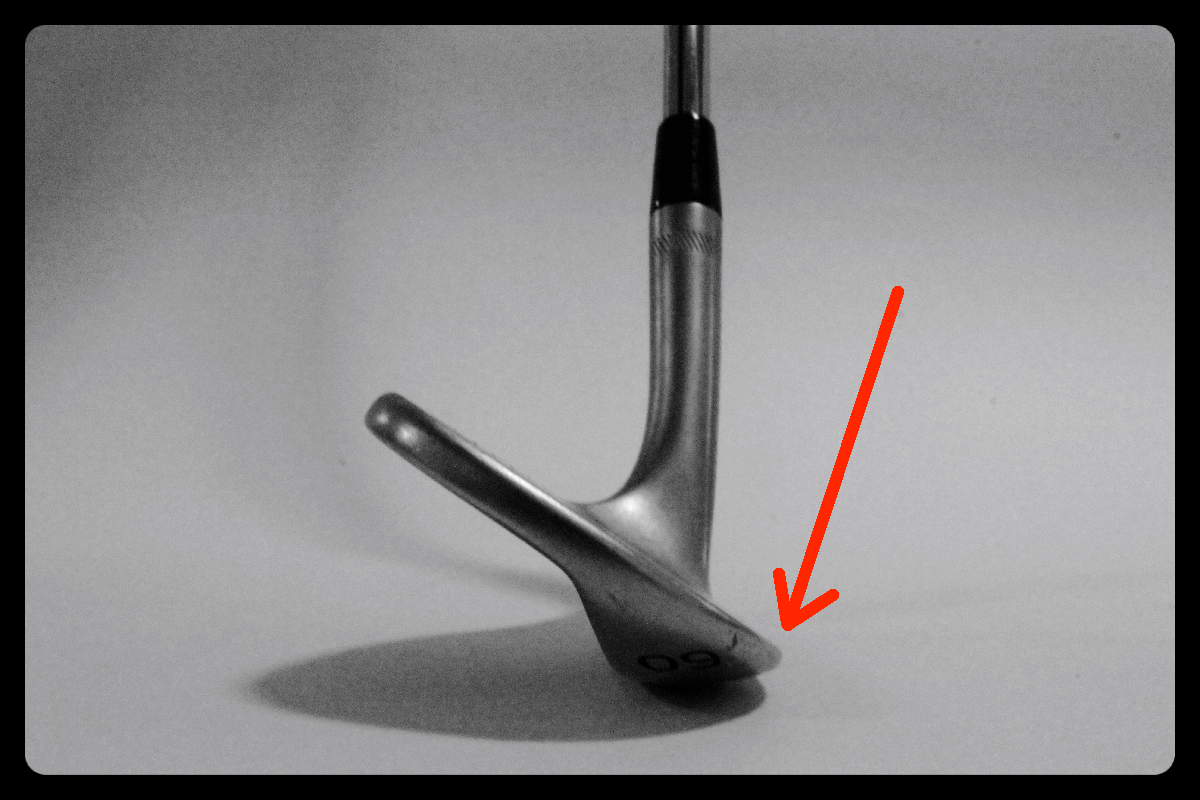
7. Leading edge
The leading edge of a wedge is the front and bottom edge of the clubface. This edge is very sharp on a wedge compared to longer irons and clubs. If the leading edge comes into contact with the ground to early, it increases the chance for the wedge to burrow into the ground, which will result in a shot that is way too short.
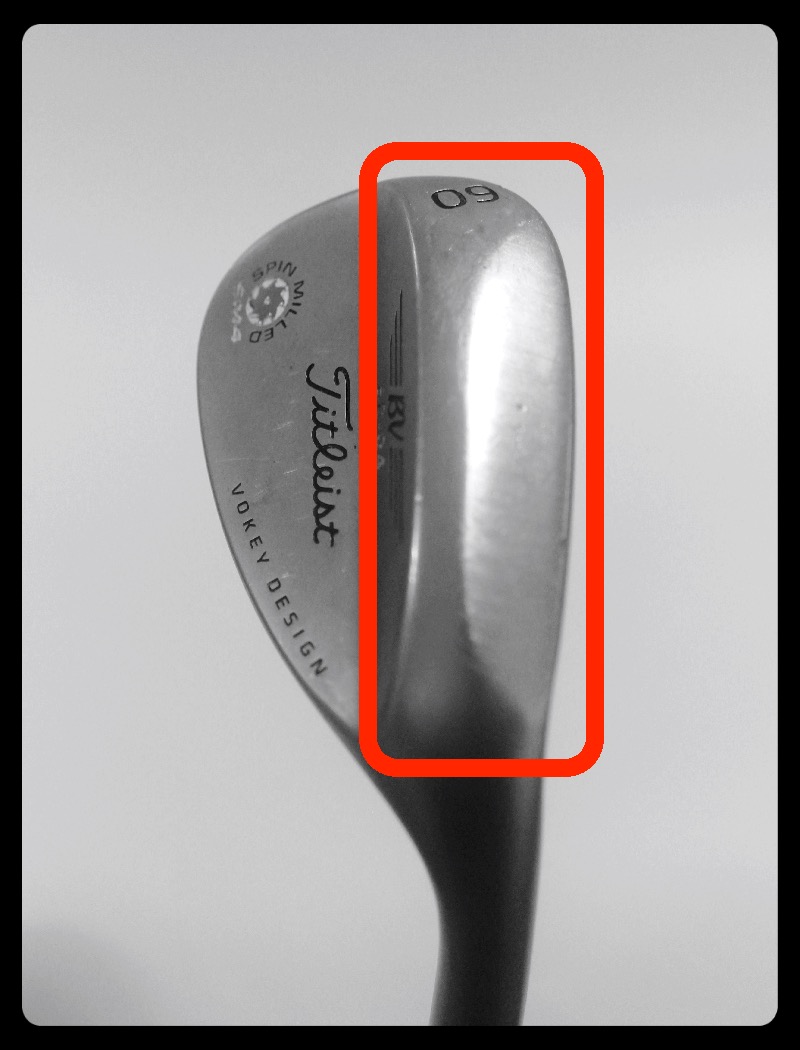
8. Sole
The sole of a wedge is the lower portion of the club head, located underneath the club head. This part of the club is essential in order to prevent the club from digging into the ground when the two meet. Imagine a wedge with a super narrow sole, it will have far greater tendency to burrow into the ground and get stuck than with a wider sole.
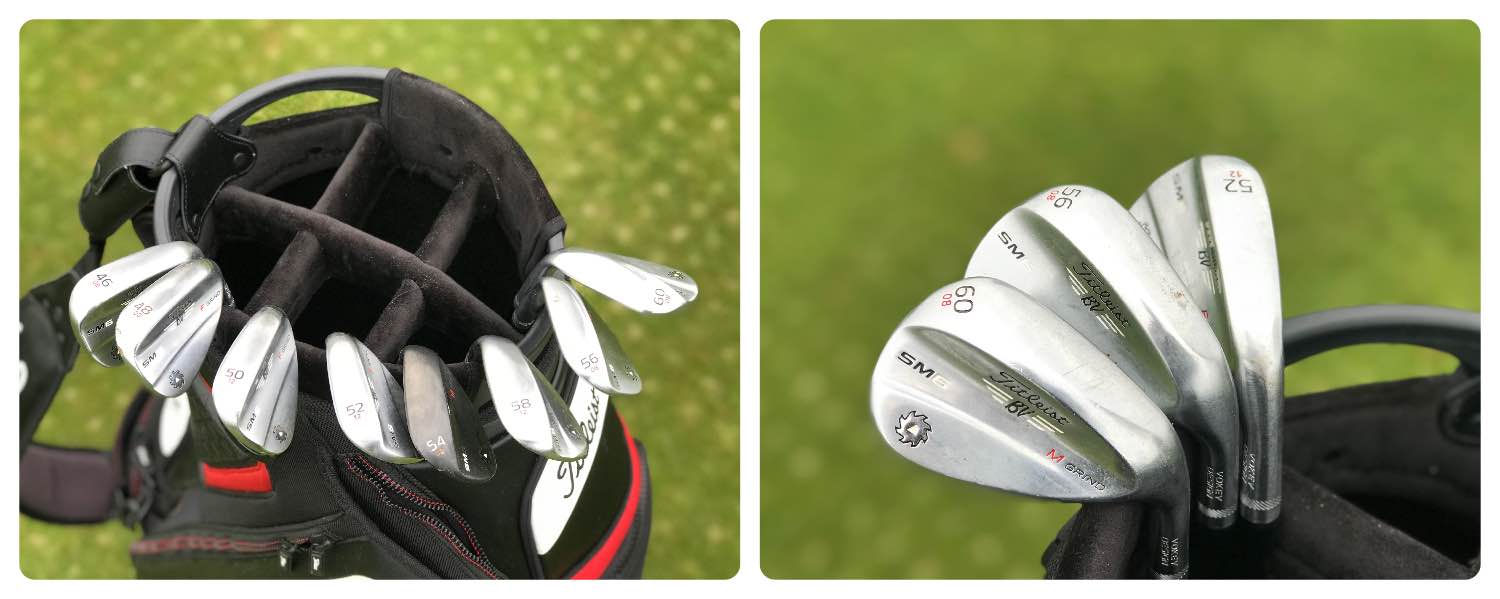
9. Grind
Grind is how the sole on the wedge is designed. It can be formed in different ways, it may be wide or narrow etc. On Titleist’s SM6 wedges there are L, S, K, M and F grind, each of which fits a different type of player, and also fits various types of course conditions.
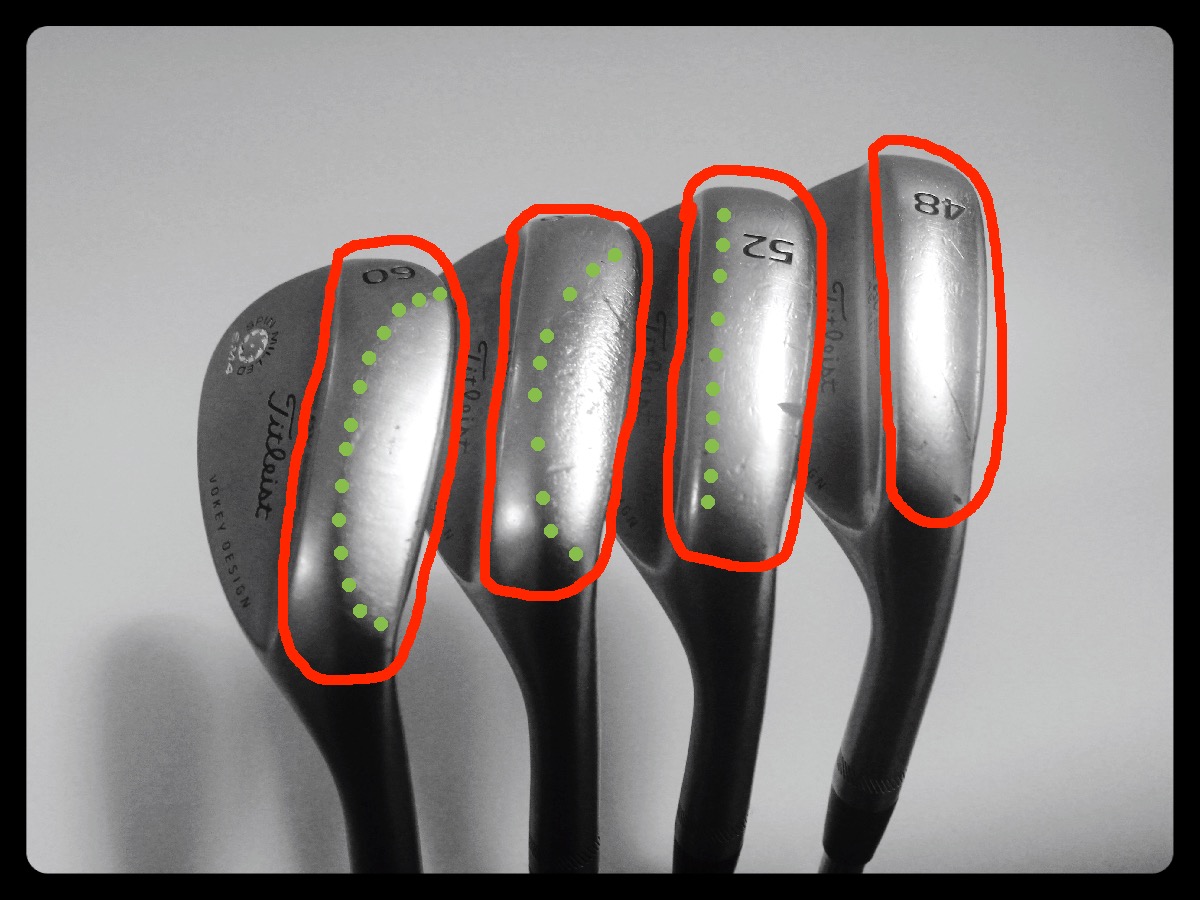
10. Grooves
The grooves on a golf club are located on the clubface, and are designed to create more backspin on the ball. Your sand-wedges grooves will typically be worn out earlier the the other wedges in your bag, because the sand in the bunkers is very hard on the grooves. Fresh groove is ABSOLUTELY ESSENTIAL in order to produce a decent amount of backspin.

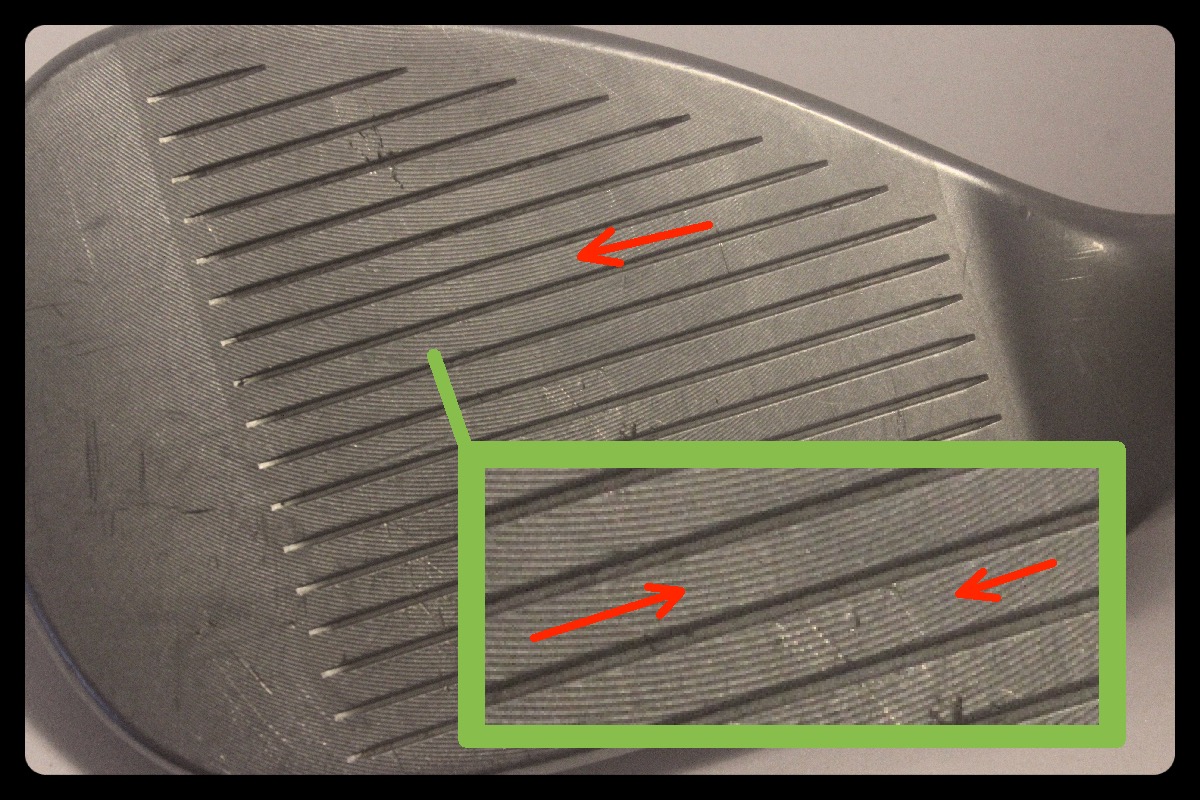
11. Milling
The milling on a wedge is the “mini grooves” across the clubface. These mini grooves are usually only seen on wedges. They are often designed in a curved shape, and can be difficult to see unless you look carefully.
Hopefully you have a little better understanding of what a golf wedge is made of now!
Now you just need to learn how to use it properly. Check out 9 Best Chipping Tips for Instant Better Performance Around the Green