- +4527976587
- mail@worldofshortgame.com


Blog

4 Reasons Why Your Short Game Doesn’t Improve, and How To Fix It
Stop Wasting Your Time!
4 reasons why your Short Game doesn’t improve, and how to fix it

Have you ever spend 20 minutes on the Short Game area, with a bucket of balls, hitting for the same flag, over and over again, and probably only moving your feet more than a meter/yard when you needed to go pick up the balls?
I’m sorry to tell you, but the truth is that you just wasted 20 minutes of your life.
Why? Let me give you 4 examples:
1. How is golf played?
First reason for that you are basically wasting your time, and doesn’t improve your short game when practicing, is that you are hitting the same shot over and over again. Think about how golf is played ON THE COURSE:
You start of a hole, with a certain club, from a tee and a flat tee-box. Next shot will probably be with a different club. Third shot with a new club again, and so it follows. You will constantly face different lie, slopes, and other conditions.
So if this is how golf is played, different shots ALL THE TIME, why are we practicing the same shot over and over again?
Some would say that it is so we can better repeat that specific shot on the course. And yes I get the idea, but science has proven over and over again that you actually perform a lot better on the course, if variation is to be found in your practice.
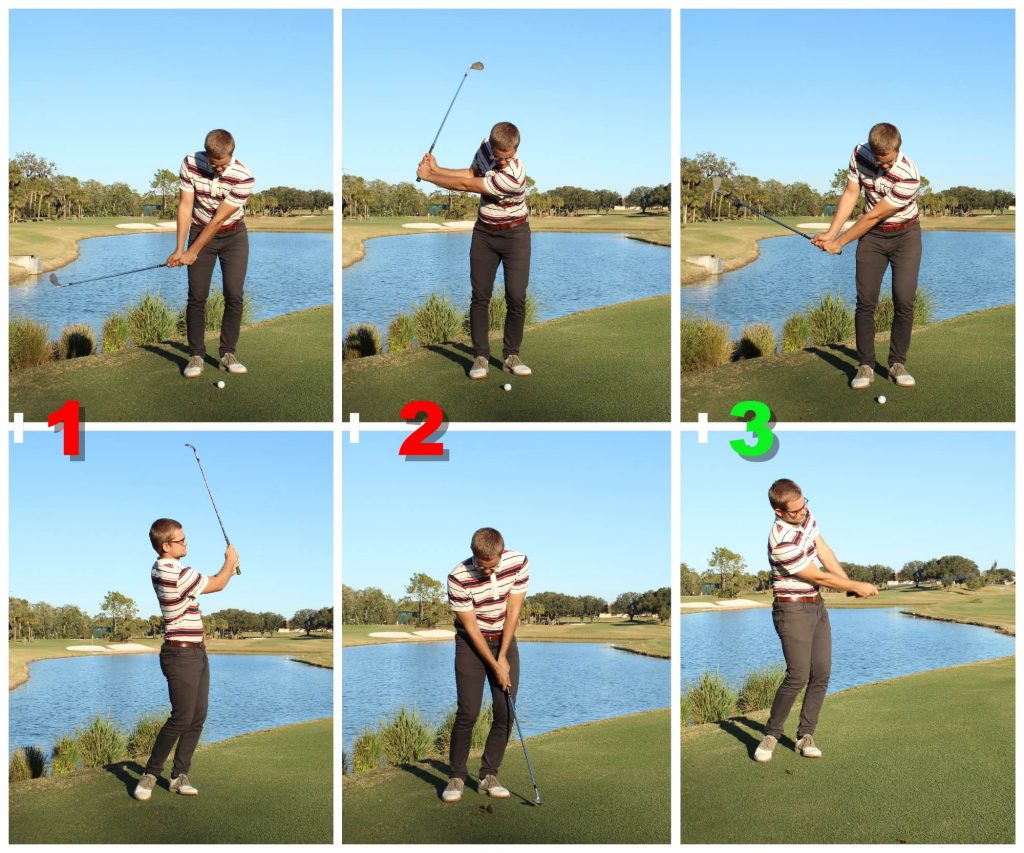
A very good game to try out on the short game practice area to simulate how a round of golf is played would be to do the “27 shots challenge”. This game is made of 27 shots which form 9 holes, and you will get a score on each hole relative to par, just as when you playing on the course. You can find the drill in the Free E-book Top 3 Chipping Drills

2. Constant learning is the way to success
-What is 13 x 5?
Got it? Now:
-What is 13 x 5?
Do you have the answer? Let me ask you again:
-What is 13 x 5?
Okay, you probably figured out already the first time that the answer is 65. Your brain had to do some work to figure that out right? When the brain does work, its like going to the gym and lifting weights. It gets just a tiny bit better every time.
But what about the second time? How much work did your brain need to do then? Nothing right?
And the third time it was probably the same. This means that the second and third time your brain didn’t need to do any work, and therefore no learning took place. This is the same way it works when practicing your short game (and all other parts of the game as well).
So instead of hitting the same shot over and over again, you need to change something between every shot. New hole, new club, new trajectory, a new place to hit from. In this way, you are constantly challenging your brain, and by this, you are creating new learning. Otherwise you will be stuck in you old practice habits, and never improve your short game.
A very good way to make sure that this random element is a part of your future short game practice would be to try out the 27 shot challenge, which you can find through the free e-book called Top 3 Chipping Drills – click here to download for free
3. Are you “flowing”?

Do you now that feeling that when doing something specific, nothing else really matters at that moment? 100% of your attention is focused on that specific task, whether it is cooking dinner, playing computer or practicing your golf.
Players often refer to this mental state of mind as being “in the zone”. In the zone, optimal learning takes place, your skills are developed at maximum speed and you are spending your time as effective as possible.
The principle is called “flow”, and it describes a certain state of mind a player can reach when the challenge matches the skill level of the player.
Take a look at the chart below. The skill-level is at the x-axis, and the difficulty of the challenge is at the y-axis.
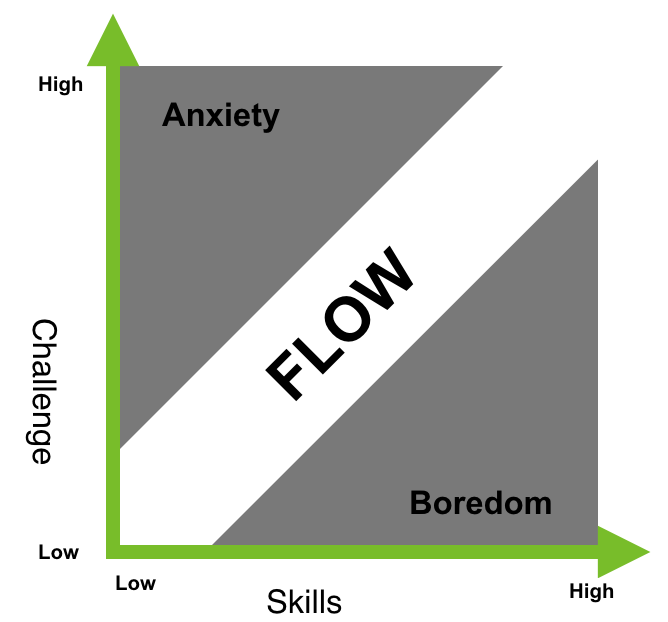
If the difficulty of the challenge is very low, and the player’s skill level is high, the player will be facing boredom.
If the difficulty of the challenge is very high, and the player’s skill level is very low, the player will be facing anxiety.
None of these feelings are very good when playing and practicing golf. No one wants to fell bored when practicing, because then its not really fun right? Neither wants anyone to feel anxiety because the challenge is so difficult that they fell useless.
This means that the way you practice must be well balanced according to the difficulty of the challenge you are facing, in order to enter the flow state of mind. It may not be easy because then the player will be bored. Neither must it be way to difficult, because that can break the player completely.
A very good drill to try would be the zone-climb, which can be found in the the Free E-book Top 3 Chipping Drills. This drill is constructed in a way that it automatically makes it more and more difficult the better you perform, which makes sure that you can enter the flow state of mind easily.
One last comment about the difficulty of the challenges:
I better like to make games and drills a little to difficult than to boring. I am a strong believer the practice should frustrate you, and sometimes you should be on the edge of breaking completing. In these situations you learn so much more about yourself, and hey, isn’t it exactly those feelings you sometimes get when you play?

4. Do you dare to face the consequence?
Another thing to consider: On EVERY shot in golf there is a consequence for hitting a bad shot, and a reward for hitting a good one, that’s a fact.
A bad shot can cause penalty strokes, or place the ball in a bad position for the next shot.
A good shot will place yourself in a good position for the next shot or maybe even finish up the hole with a good score.
So tell me, why are we practicing without a consequence? I think I know the answer: Because it feels nice and good.
And yes it does feel good to hit that same shot for the same flag for an hour, knowing that if you hit a bad shot, you can just hit a new one. But does it make you any better? Does it make you better when you are out on the course? I really don’t think so.
What you should do instead is practice in a way that brings along a reward and consequent for every shot you hit. The opportunities are endless for creating games and drills that do exactly this. One of my favorite games is the 9 shot challenge game. The goal is to complete all 9 holes, starting from hole 1 and moving up. Every time you succeed with the success-criteria on a hole, you can move on to the next hole, and by this, you are closing towards completing the game (reward). But if you fail a hole, you must go a hole back, and by this, you are further away from completing the game (consequence). The game can be found in the e-book 35 Short Game Drills and Games. You can also download the Free E-book Top 3 Chipping Drills as a good start.
How will you practice the next time?
That was 4 reasons for why your short game doesn’t improve. The next time you go to the short game area, remember the following things:
-Hit different shots ALL the time.
-Let there be a consequence for hitting a bad shot.
-Let there be a reward for a good shot.

What to do now?
If you feel a bit lost in the moment about what you specifically need to do the next time you are on the short game area, I strongly recommend you to download the free e-book Top 3 Chipping Drills right now. It’s completely free and provides you with 3 easy to do drills to get started with a better practice. If you want a complete guide on how to practice your short game probably, AND 35 of the best short game drills and games, you can buy the e-book 35 Short Game Drills and Games right here. It provides you with 35 well described, challenging and exciting games and drills you can go try the moment you buy the book. Some of them can actually be done in your garden at home.

3 Easy Steps to Master the Uphill Bunker Shot
3 Easy Steps to Master the Uphill Bunker Shot
Have you ever found yourself in the following scenario: Your ball has come to rest on a steep uphill slope in a greenside bunker. After trying to pull off the shot, you find your ball either on the other side of the green because you bladed the shot, or just in the lip of the bunker because you hit the sand to early. Don’t worry; you are not the only one.
In the following you will learn the 3 key factors for the uphill bunker shot. Pictures will guide you through the factors.
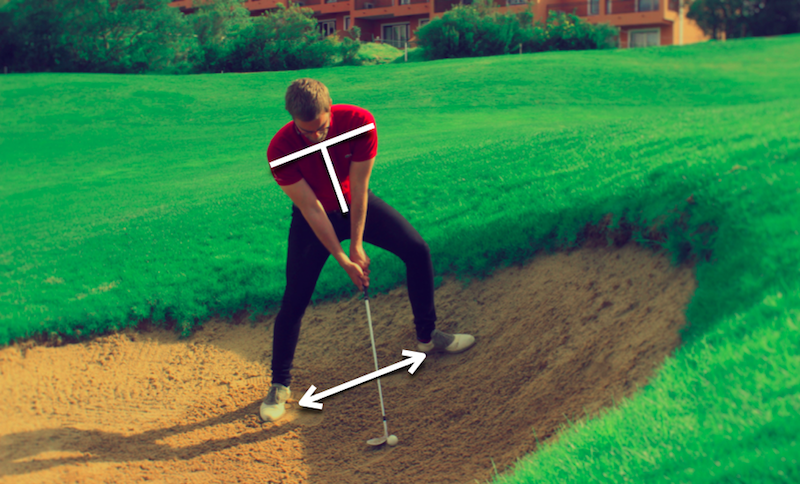
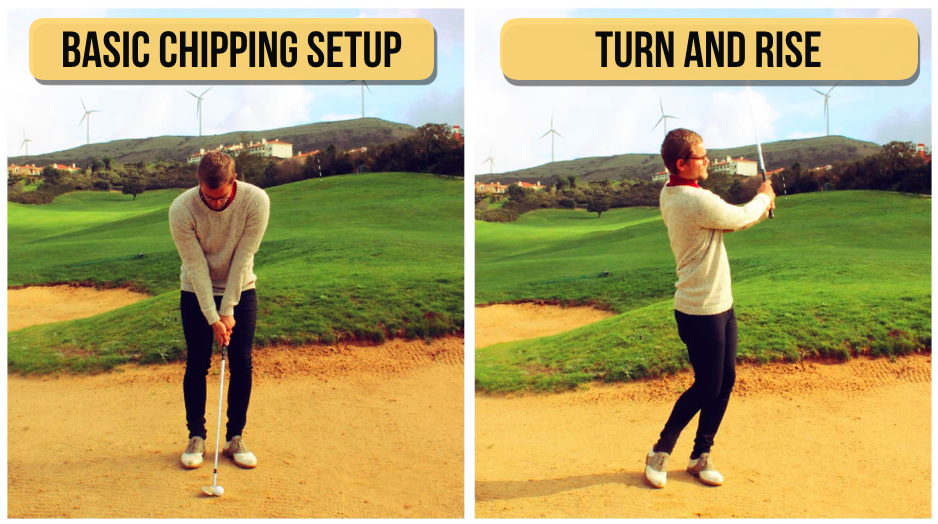
1. Start with the right setup
It may not come as a big surprise, but you need to change the setup for it to match the uphill slope the ball is located at. Here is what you need to do:
-You need a very wide stance in order to keep your balance.
-Tilt you upper body so your shoulders are more in line with the slope.
-Your weight is going to be a lot on the trail foot (back foot) because of the upper body tilt.
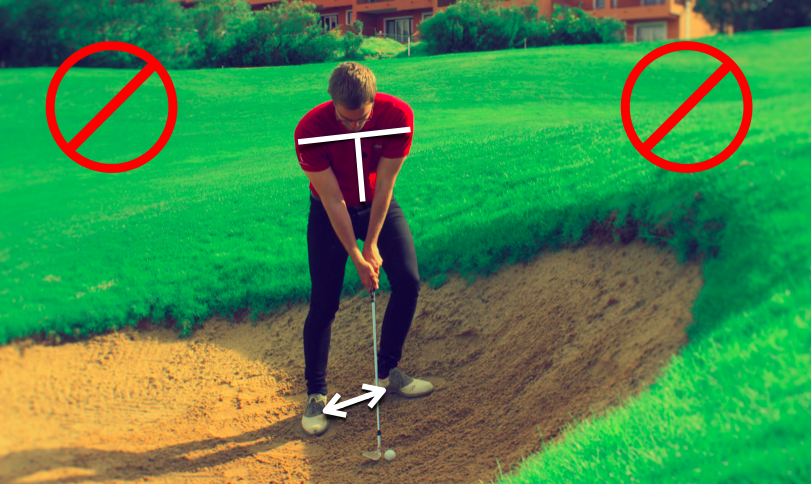
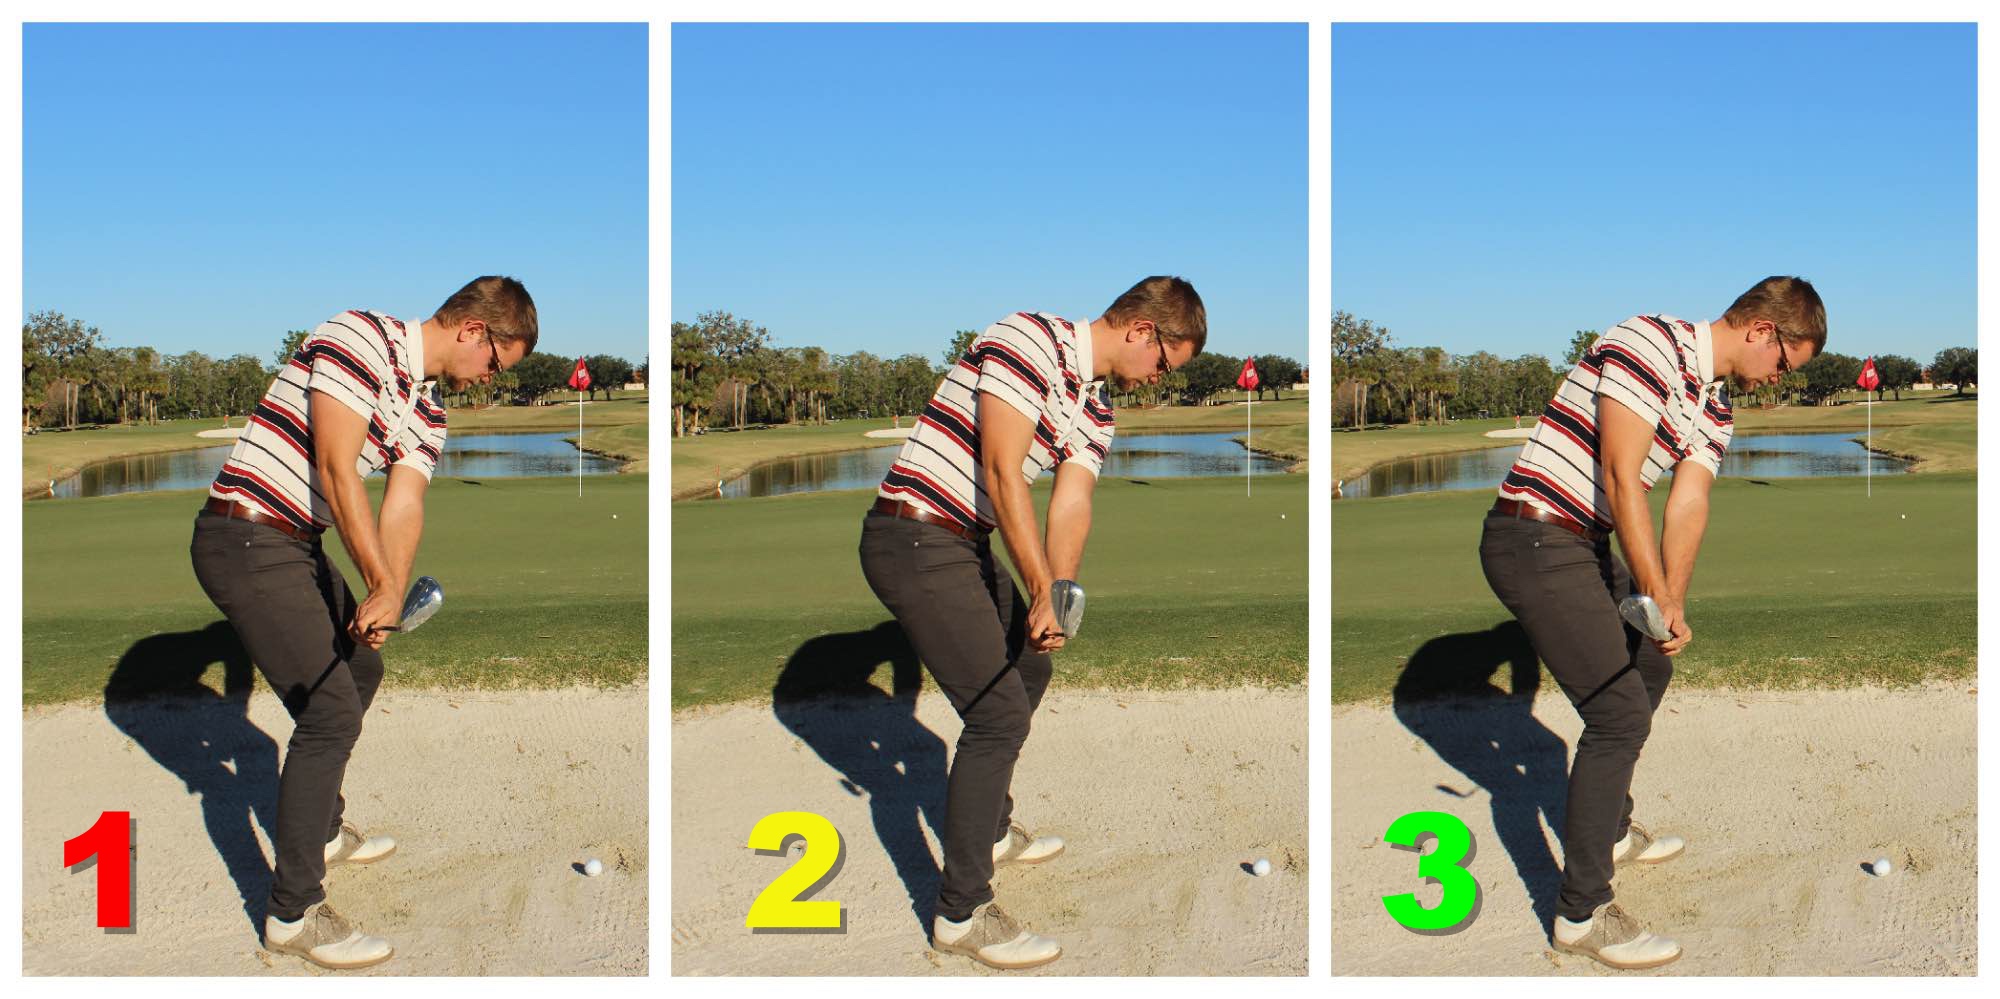
How NOT to setup for a uphill bunker shot:
You’ve just learned the basics of how to setup for an uphill bunker shot. I just quickly want to show you the most common mistakes people make in the setup for this shot:
-Setting up with a very narrow stance.
-Having their spine close to vertical.
-Leaning forward with the weight.
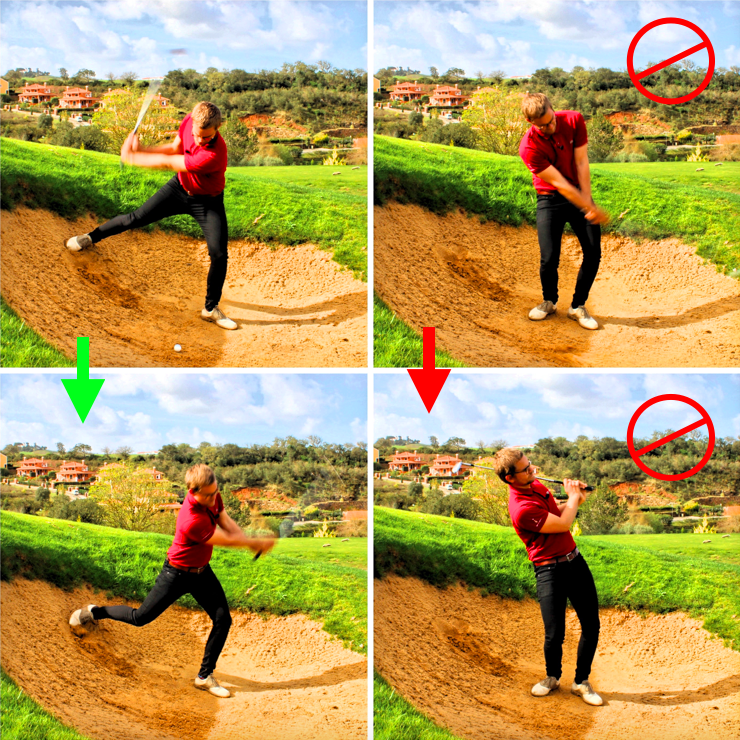
2. Keep the weight were it started
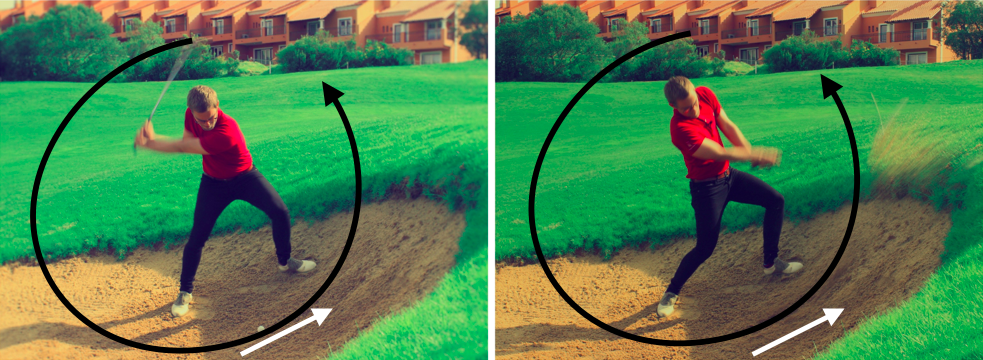
Now that you have placed yourself correctly in the setup, with the weight more on the back foot, it is very important that you KEEP the weight on the back foot. In almost every other shot, that you have to move the weight forward. And that is absolutely correct, just not with this specific shot.
Now you might be thinking:
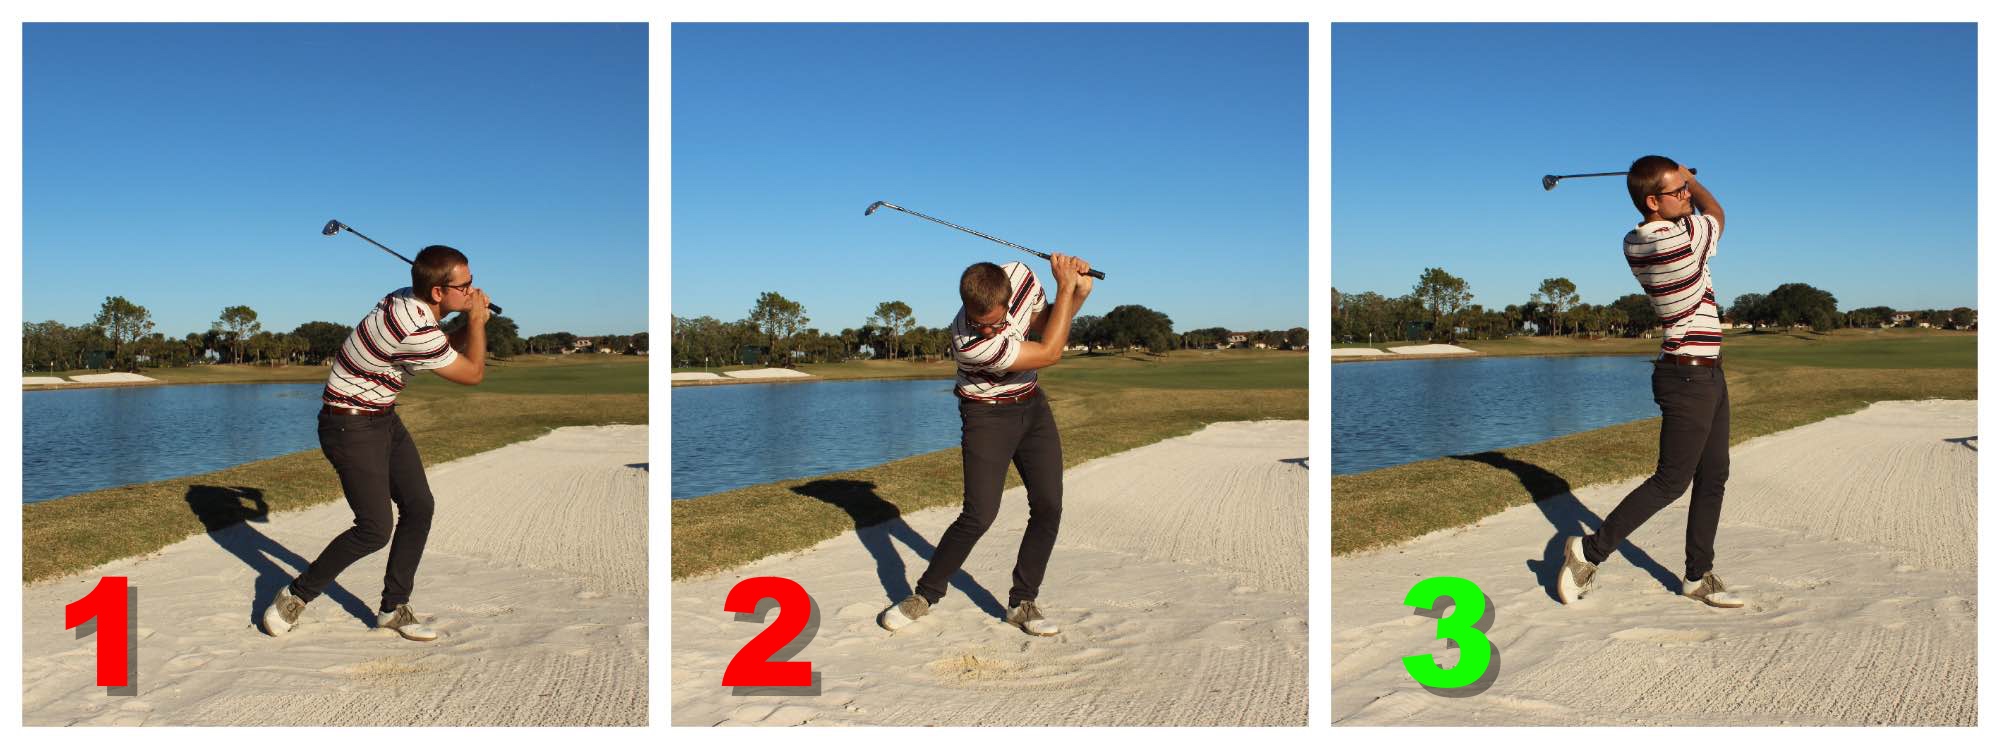
Did he just said that I should keep my weight on the back foot?! And yes I did. By keeping the weight back, there is a greater chance of your shoulders keeping their tilt with the slope. Just look at the pictures below:
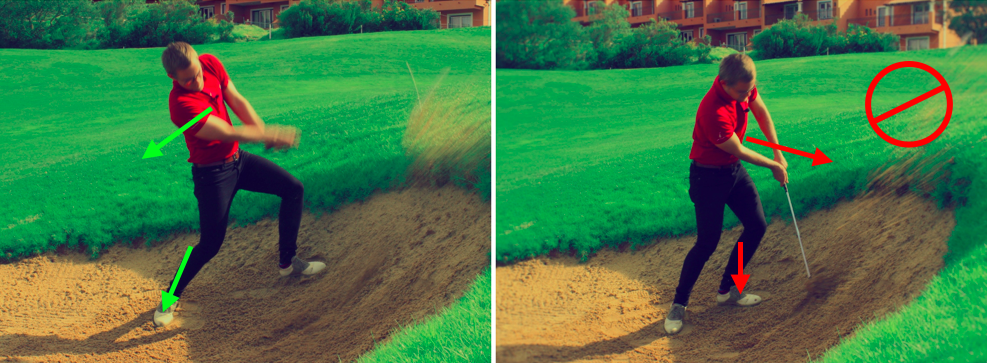
On the left picture you can clearly see how the upper body is tilted with the slope, just as we placed it at setup. On the right picture the weight has moved forward and the upper body is now tilted towards the hill. This will cause the club to smash into the hill and never make it any further than that. The margin for error is 0 when the club is swinging that hard into the sand/slope.
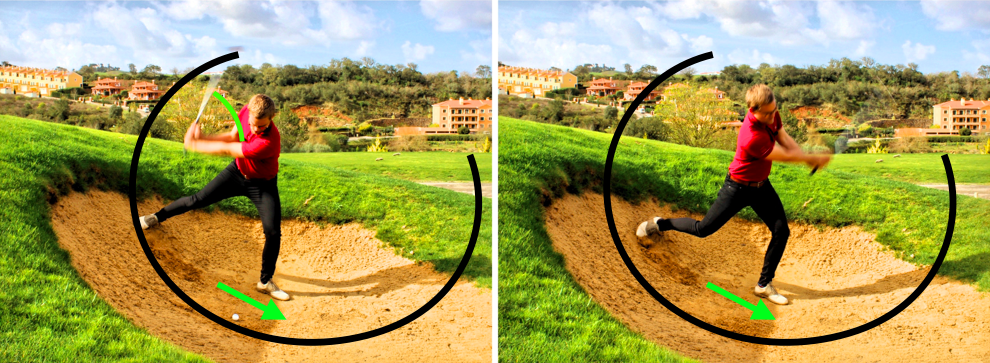
3. Swing along the slope
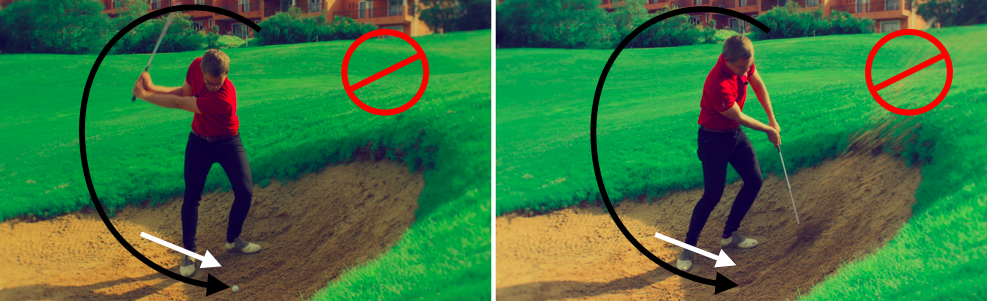
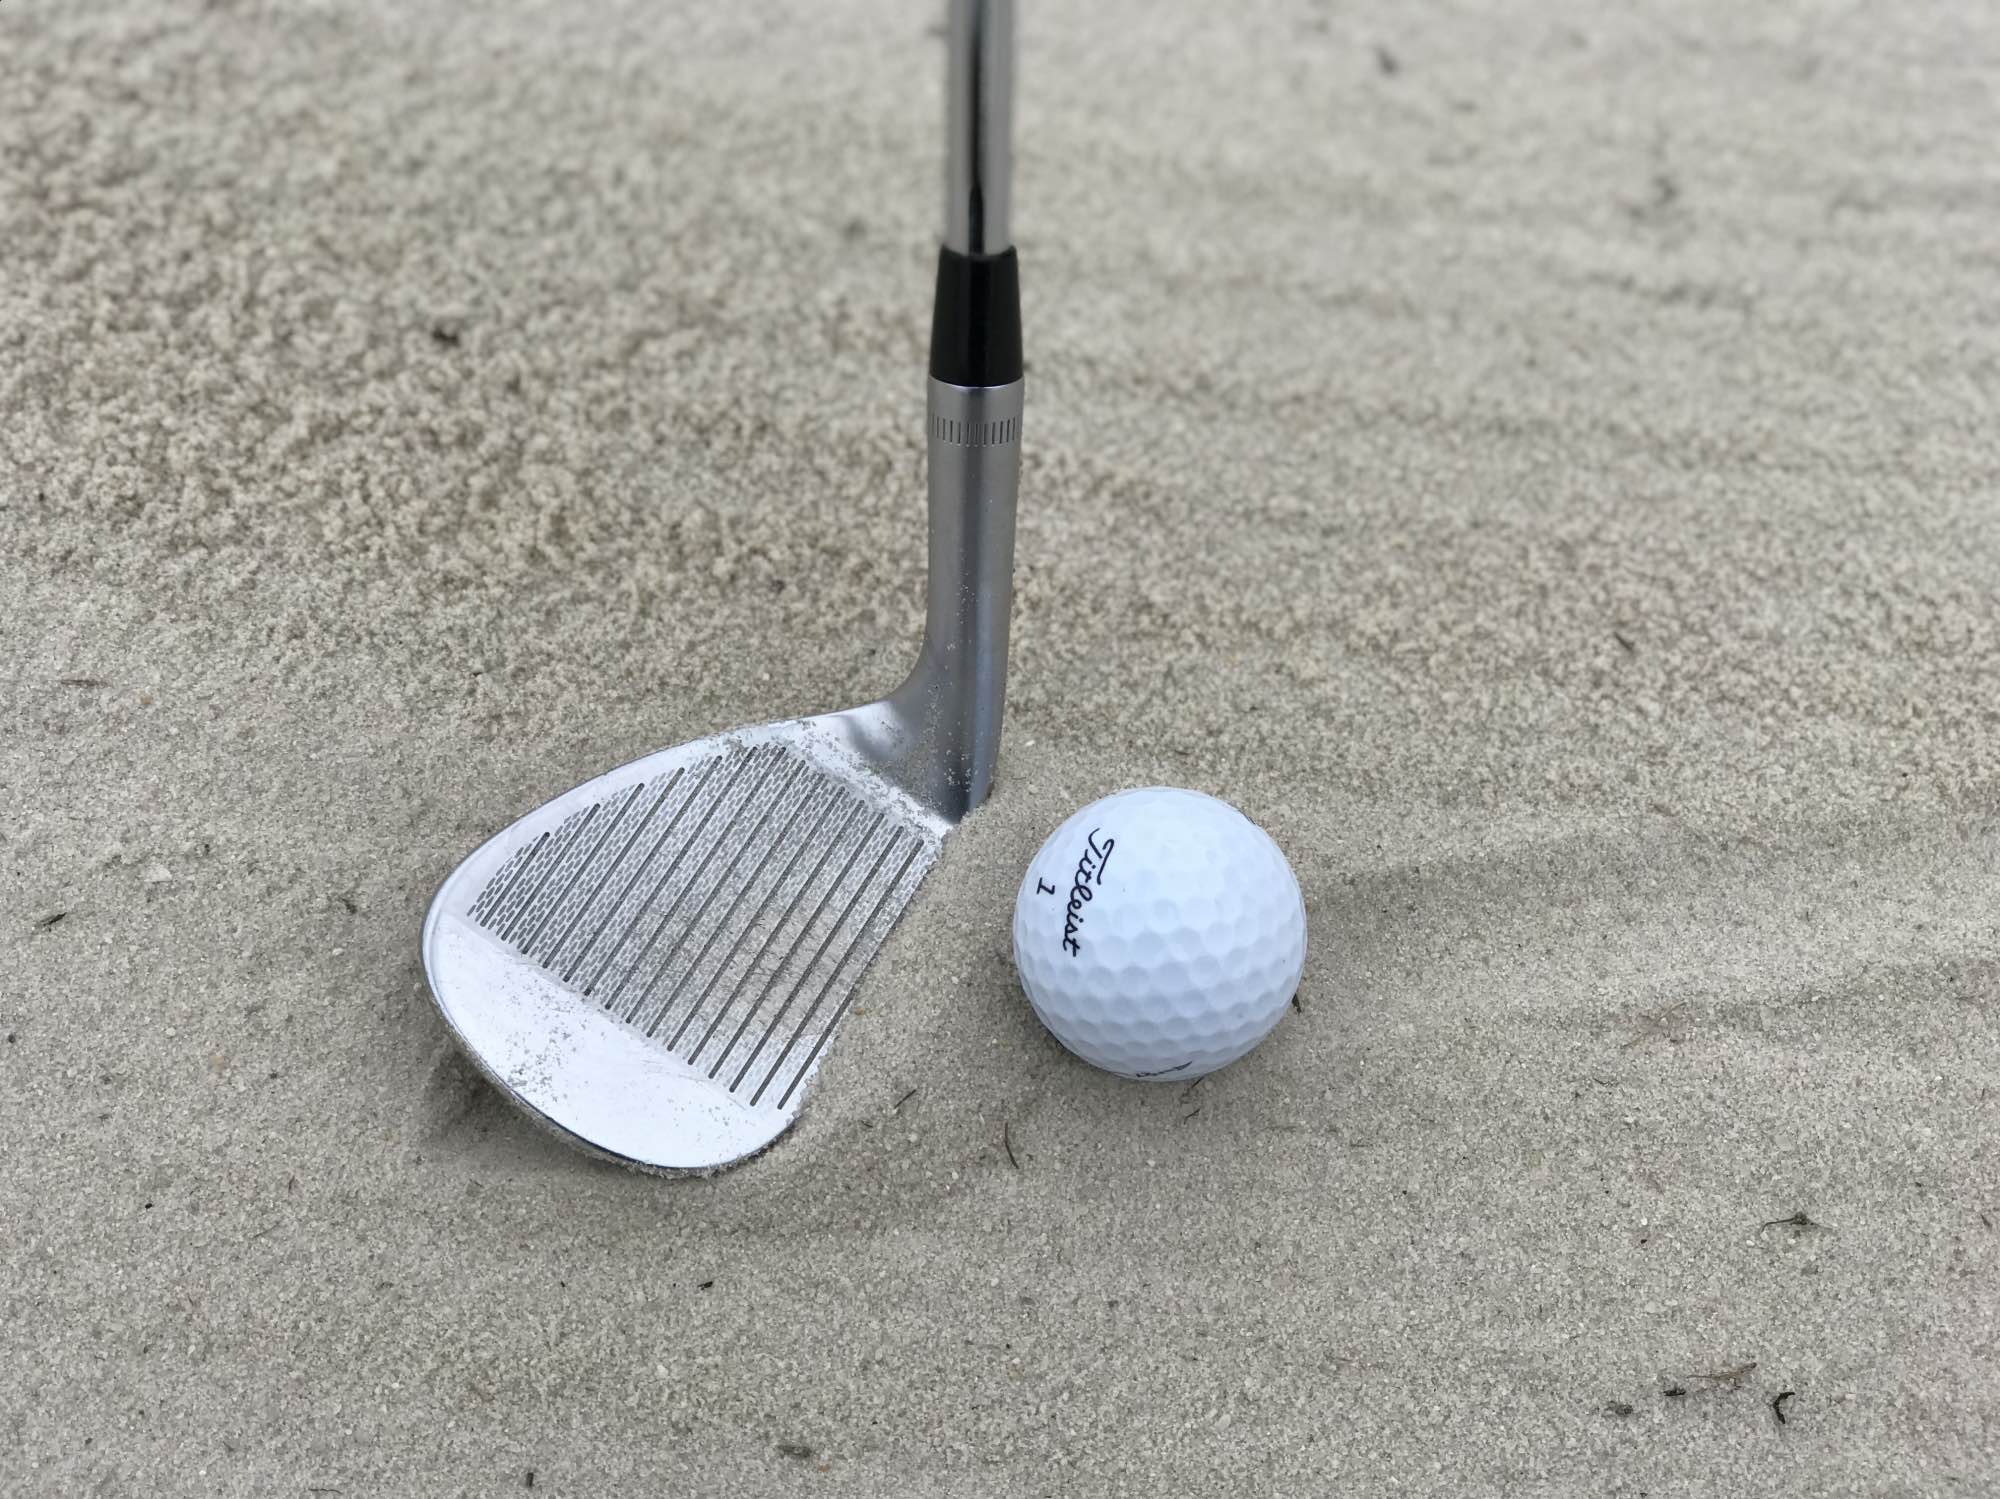
That was 2 out of 3 key factors when hitting uphill bunker shots. The third key is about how you swing the club. All that matters is that the club, when it hits the ball, must be swinging almost inline with the slope. Look at the picture below:
As you can see, the club is swinging up along the slope when the ball is hit, and this is the whole idea of this shot. By making the setup adjustments we did, and keeping our weight back, we increased the chances of the club swinging along the slope at impact.
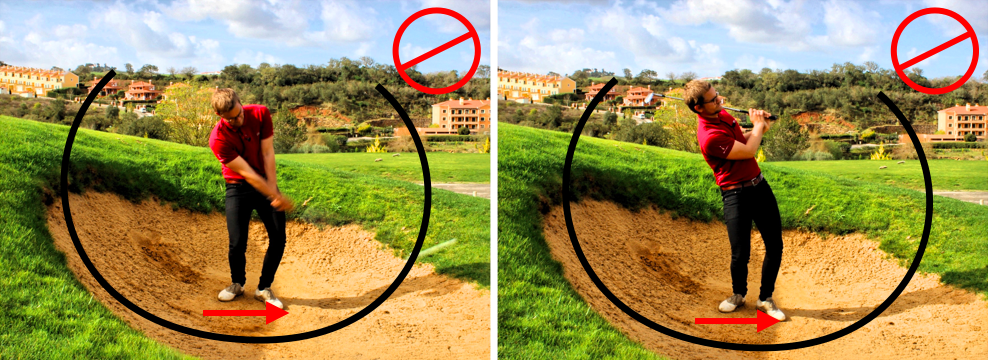
Here is what to fell:
Here are a few other swing-feelings to try out to make this happen:
-In the downswing, fell like you are making a “wide”swing. This means swinging the club far away from yourself in the downswing.
-In the follow-through, you should do the opposite than in the downswing. You should make a very narrow swing. This means keeping your hands very close to your body, and maybe add some flexion in both of your arms.
Both of these swing-feelings should make the club head travel more up along the slope at impact.
What NOT to do:
Way to many amateur players does the exact opposite than described above. They move their weight a lot forward in the downswing and they swing “narrow”down to the ball. This will cause the club head to smash into the hill of sand, and never make it any further. The margin for error when doing this is 0.
You need to practice this!
You have now learned the 3 key factors for uphill bunker shots. Unfortunately, it’s not enough only to read about it. The next time you are going to play a round of golf, try and arrive 30 minutes before you normally would do. Take some practice balls, go to the practice bunker, and try out the 3 above described things. Test them out, see how you like them, and find out which of the key factors you think is the most important for YOU! Good luck.
Do you need help with a standart bunker shot?
The above described shot is not the easiest to succeed with. Make sure you have your bunker-fundamentals in line (read the 15 most important bunker shot basics to check if you got it), before you start working on the uphill shot.
If you want to learn how to hit downhill bunkershots, you should read How to Master the Downhill Bunker Shot.

How to hit bunker shots from wet sand
How to hit bunker shots from wet sand
I think you will agree with me, when I say that bunker shots from wet sand (wet=hard and compressed) can be a tough shot to succeed with. Most of the time you might be blading it, but in the following I will teach you 2 very simple and easy to do solutions for this shot. One of the solutions will give you a nice high trajectory out of the wet and hard sand, the other solution will give you a lower flight.

We’ve got to know the issue to understand the solution
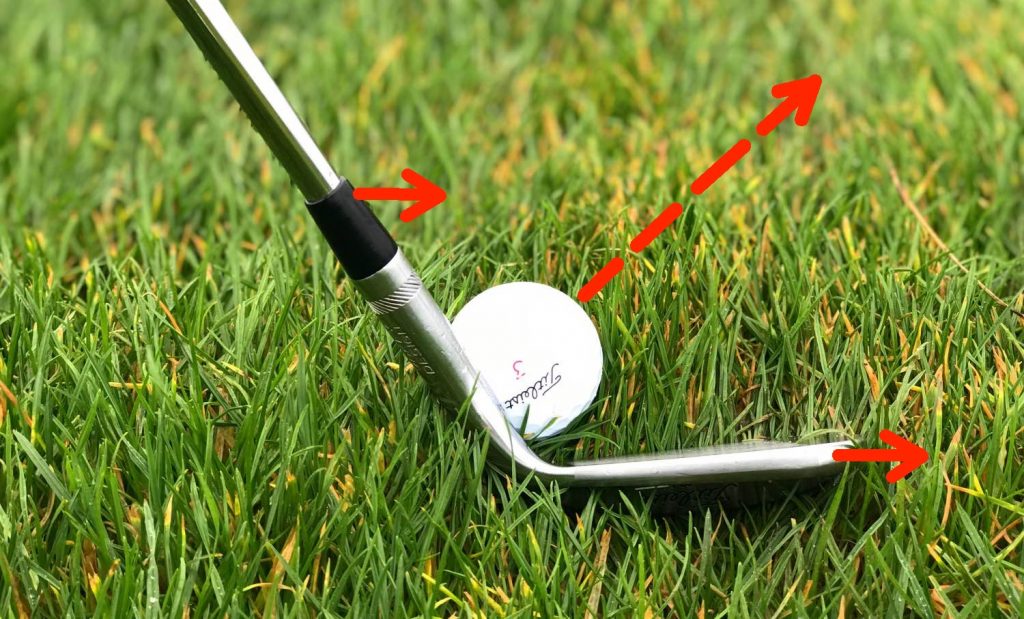
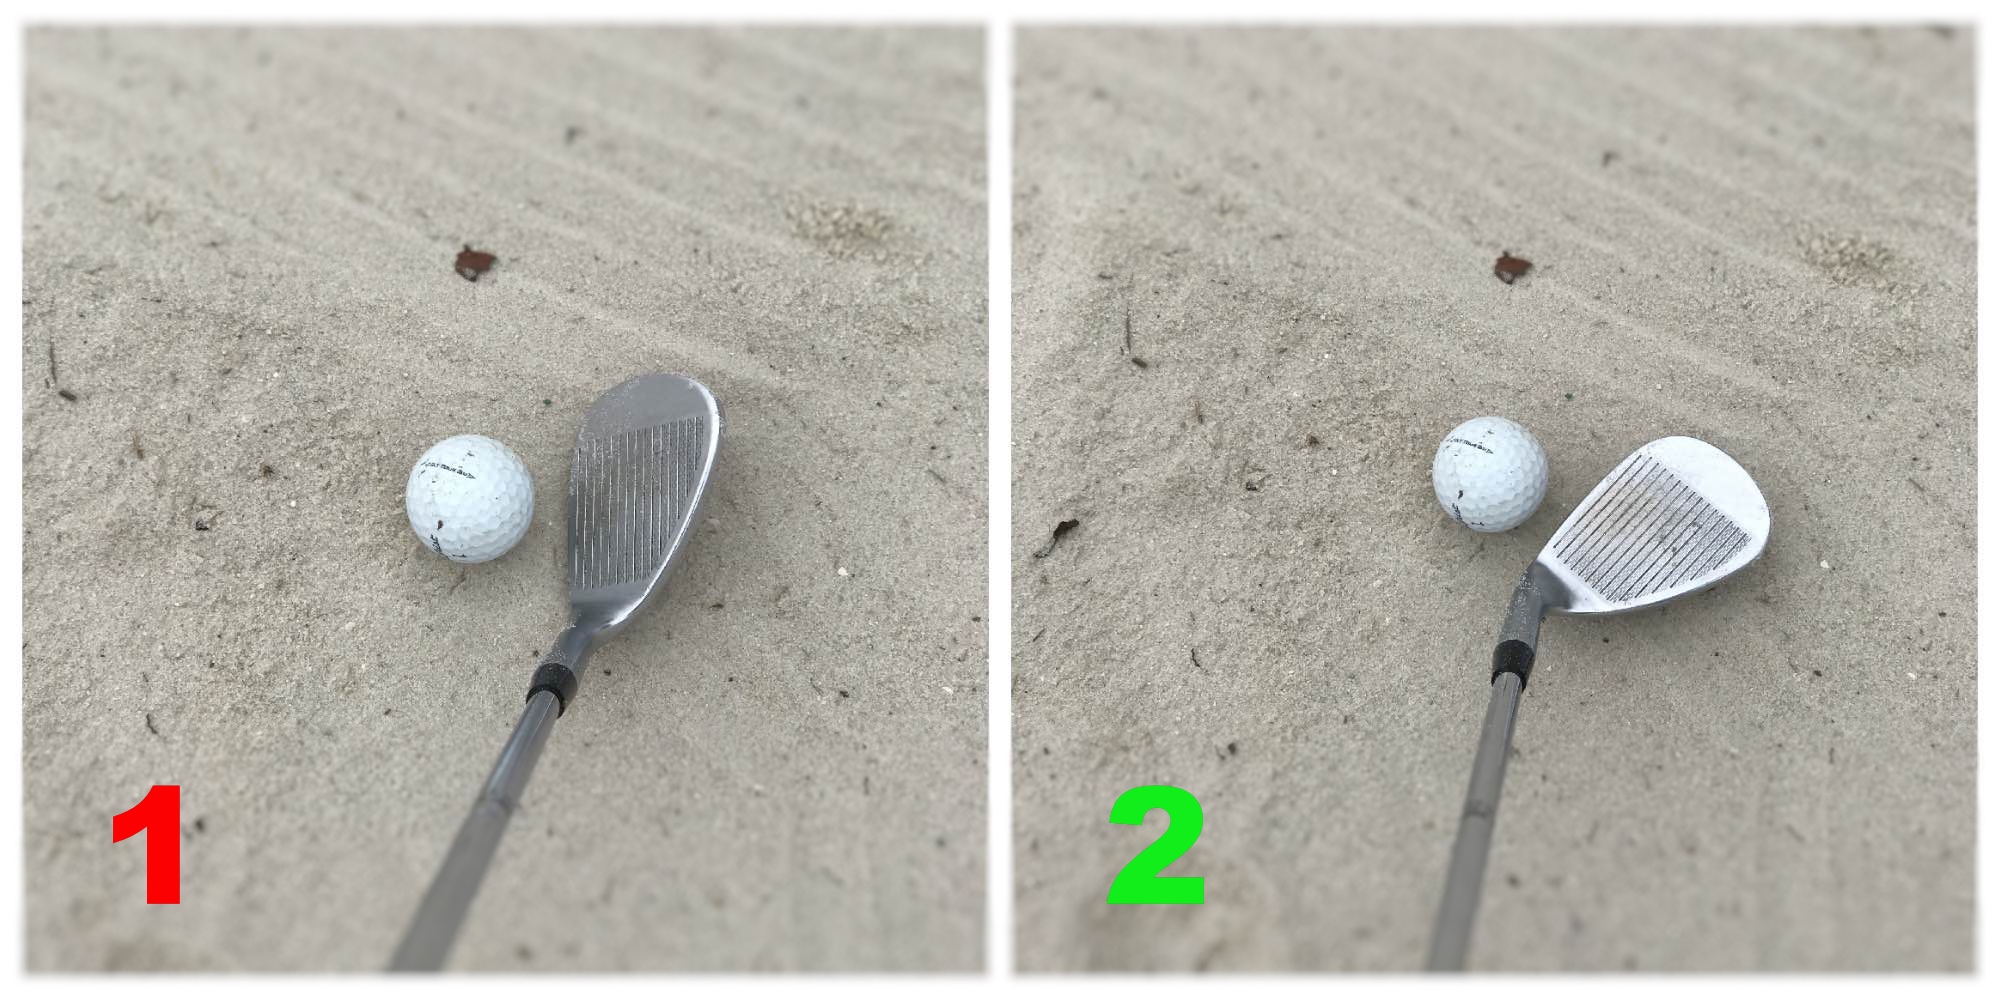
Before you learn the solution to this shot, you need to understand what the real problem is. Look at the picture below. The ball is located in a bunker with really wet AND by that also really hard sand.

If you place the clubhead as you normally would in a bunker with a very open clubface, look what has happened to the leading edge of the club. It is very close to the equator of the ball, and if no changes are made, this leading edge will probably never make it underneath the balls equator, which will result in the ball flying over the green. So the problem is to make sure that the leading edge of the club makes it underneath the balls equator.
2 simple solutions that you need to know
Luckily the solution is not that complicated. You have two choices, and each has its advantages and disadvantages. Which one you choose depends on the specific situation you face on the course, and also which solution you are most comfortable with. Both techniques does require wet AND hard/compressed sand. If the sand is wet and fluffy because somebody has raked the wet sand then these solutions will do you no good.
1. The powerful solution for higher shots
The first solution will result in a high trajectory out of the wet sand, which in some cases is to prefer in a greenside bunker, because of the pin position and green design. This solution does take a little bit of power and strength. Most men would be able to pull it of without problems, but it can be harder for some women.
This shot is played with an OPEN clubface at setup, which will give the high trajectory.
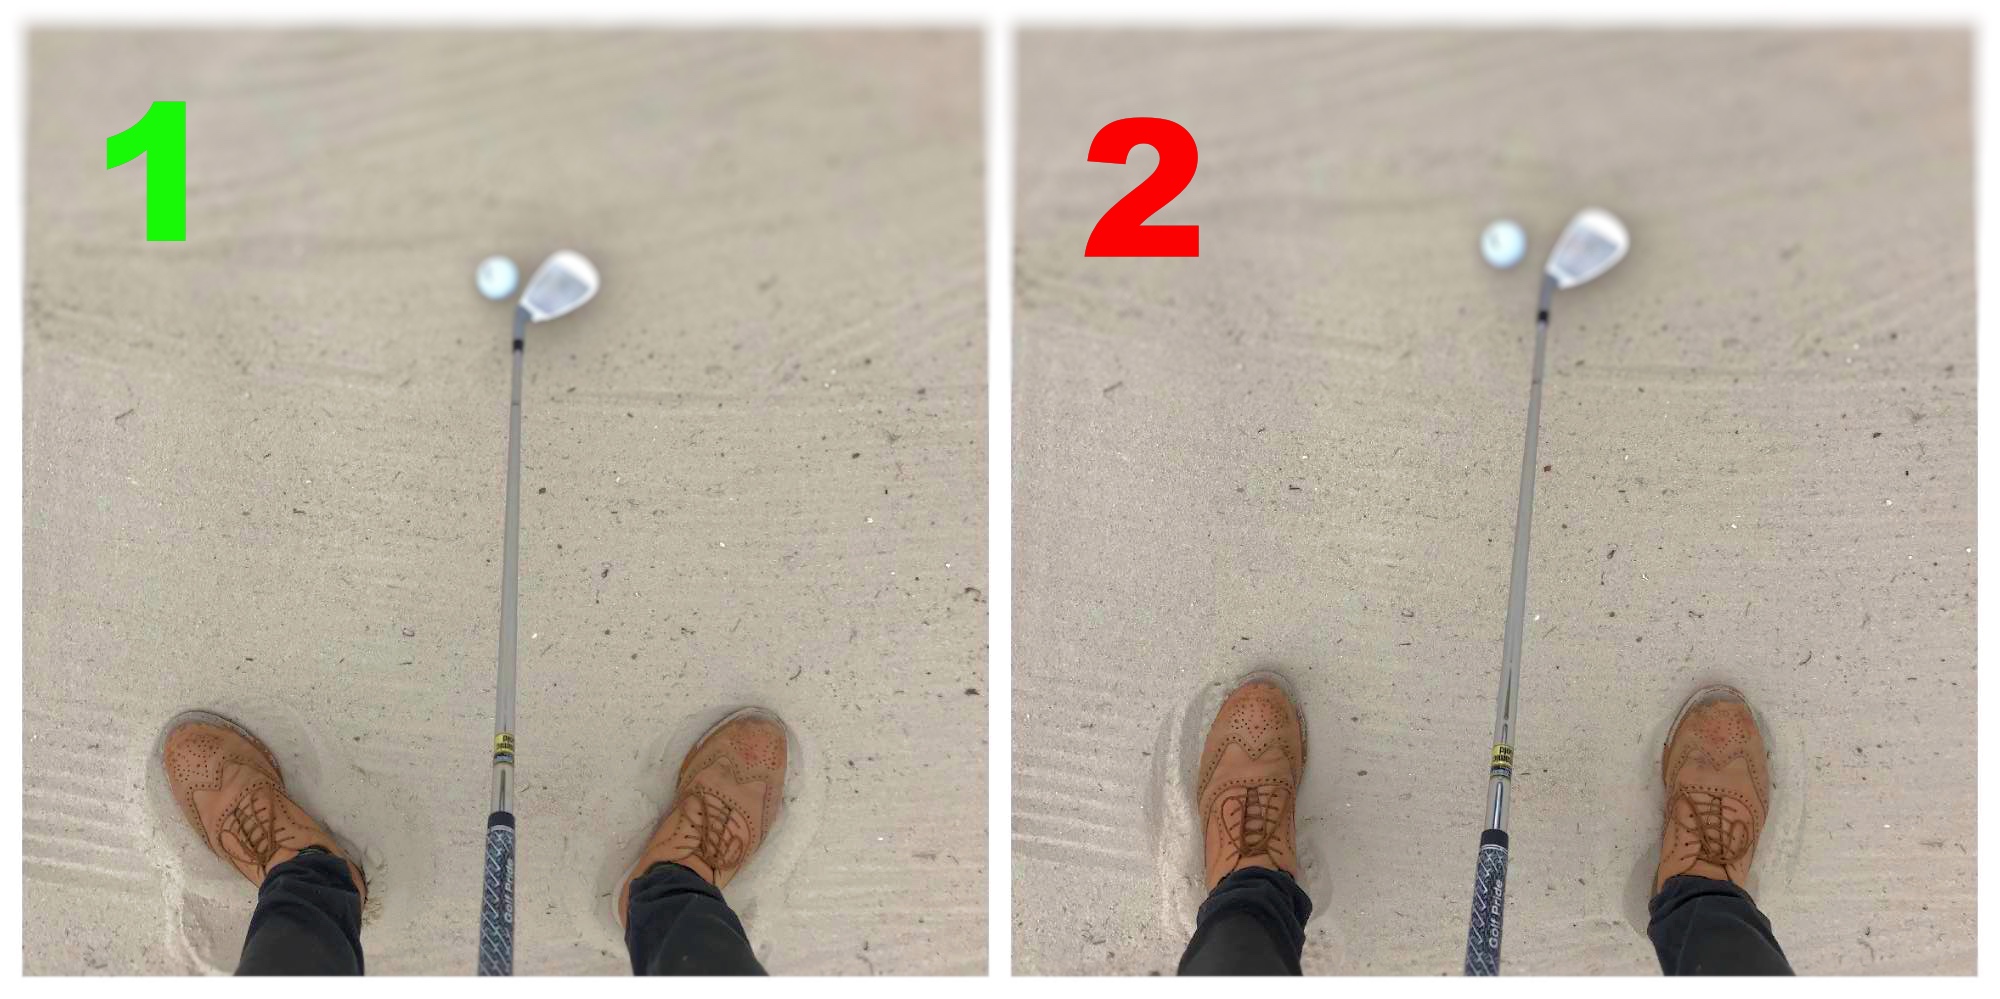
What you need to do in your setup:
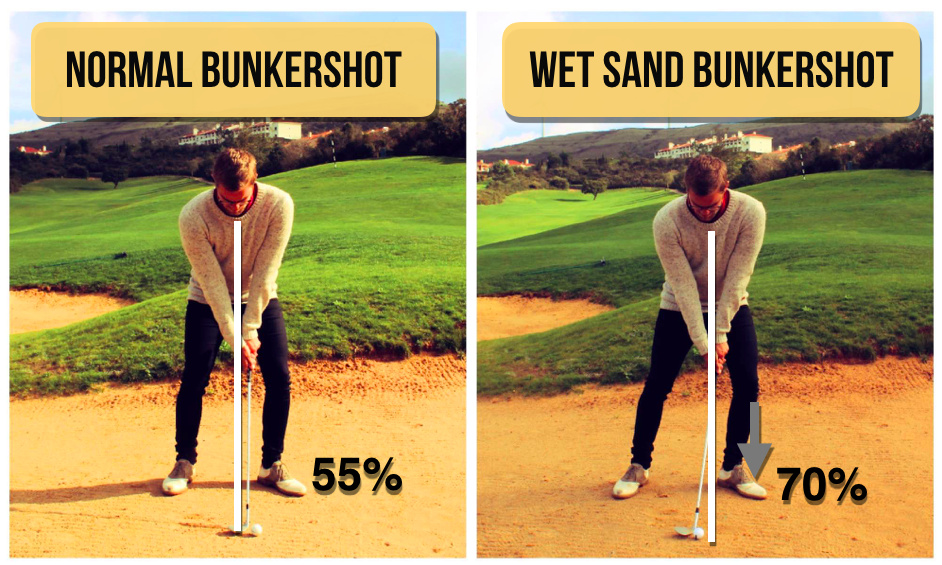
-You need to place the ball a little further back in the stance than you would for a usual greenside bunker shot. It should be placed just underneath or slighty back of the sternum.
-You also need to put a little more weight on the front foot than usual. You sould fell about 65-75% of the weight on the front foot.
Both of these changes will make the club come down to the ball on a steeper angle than usual (the Attack Angle will be steeper). This will dig the club further down under the ball, which we need because of the open clubface (see picture 1 for demonstration). Two more things can be done to ensure this:
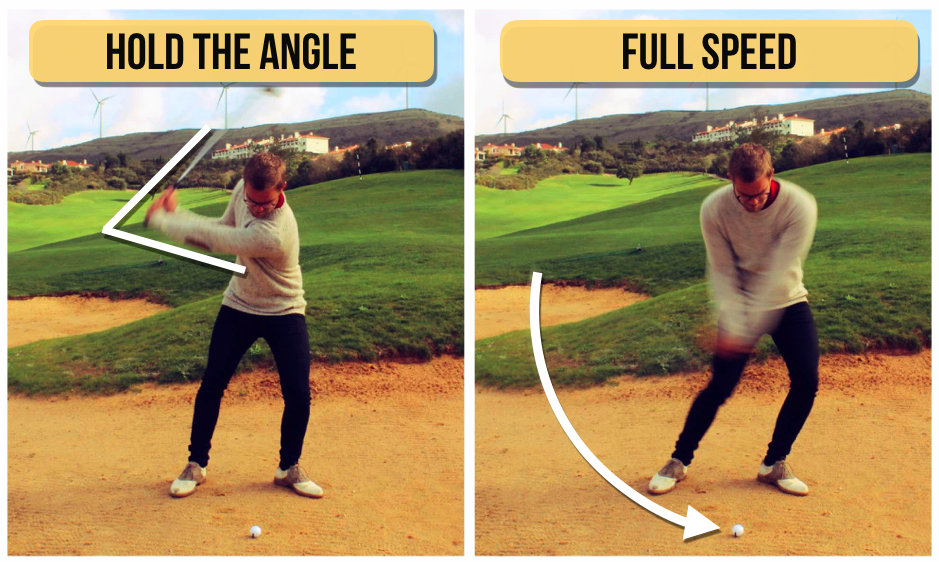
What you can feel in your swing for extra steepness:
-In the downswing, make sure to hold the angle in your wrist a little longer than usual. Feel like you are swinging the club more straight down towards the sand.
-Hit the shot with quite a lot of clubspeed.
These 2 above swing-feelings will add some extra power and steepenes to you swing, and this will again dig the club further down under the ball, even though the clubface is wide open.
2. The easy solution that everyone can do
If the above-mentioned solution sounds a bit to hard to pull of, or if you are facing a shot that doesn’t require a high flight, then you can try out the following technique. As before, his technique does requires wet AND hard/compressed sand. If the sand is wet and fluffy because somebody has raked the wet sand then this solution will do you no good. This solutions will give you a lower and more running / releasing shot.
It’s easier than you’ve imagined!
All you need to do is hit a very basic, mid trajectory chip-shot (check the 9 best chipping tips to learn this shot). If this is done correctly the club should glide under the ball as it would for a normal chip from grass. You do need to deliver the club in the correct impact position and in the right way, otherwise you are not going to be successful.
What you need to do:
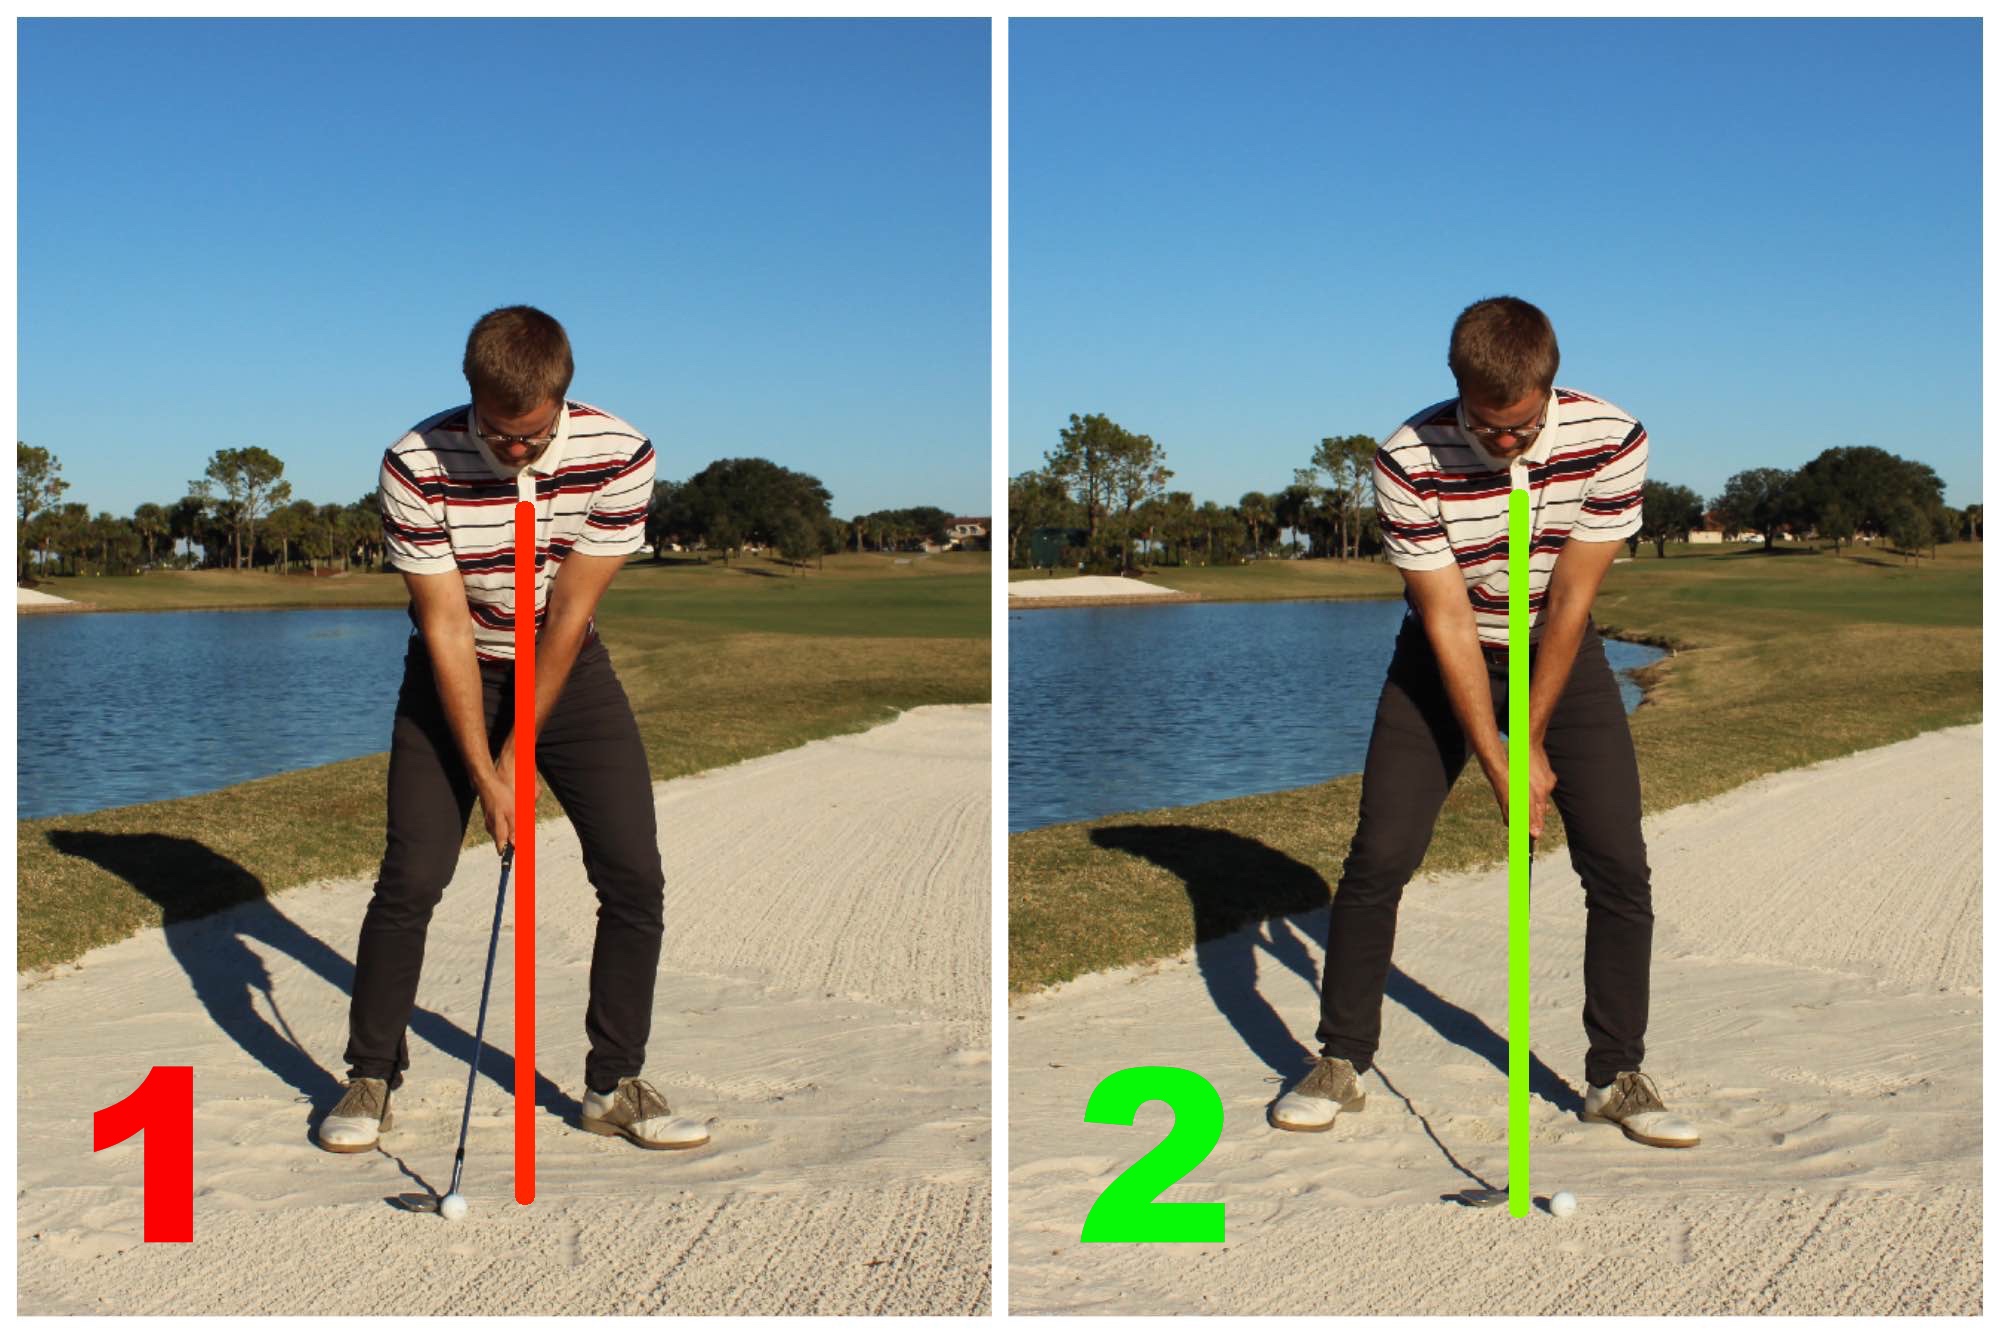
-Place yourself in your normal chipping-setup. The key is the shaft alignment seen from the front view. It should be close to vertical or only be leaning slightly forward (see picture). This will ensure exposure of the bounce.
-Keep the clubface fairly square or just a fraction open.
-Hit a normal chip shot from here. Be sure to deliver the club with minimal shaft-lean at impact.
-Keep you arms and body relax, and make sure to turn and extend you body in the downswing and follow-through.
Why will this work?
A basic chip shot will work very well from the wet and compressed sand, due to two things. Firstly the leading edge is closer the ground with a more square face. This will ensure that the leading edge will make contact with the ball below the equator of the ball (see picture below).

Secondly your wedge is equipped with an angle called the bounce. This angle will help the club glide over the sand instead of digging into the ground. If you struggle with a basic chip shot, I would highly recommend you to read the 9 best chipping tips before you try this technique in a bunker.
How it will look when you pull of the shots
You have now learned 2 techniques on how to hit a bunker shot from wet sand! The following video will show you what the techniques looks like when they are taking them to the golf course.
Well done!
You have now learned two ways to hit bunker shots from wet sand (wet=hard and compressed). Try them out the next time you are at your golfclub and the weather has given the bunkers a bit a water.
If you liked the content above, feel free to share the article through the different social platfroms and spread the word about how this shot can be hit! 🙂

How to Master the Downhill Bunker Shot
How to Master the Downhill Bunker Shot
Imagining yourself in a greenside bunker. Your ball is on a downslope, and the bunker has a lip that the ball needs to fly over in order to hit the green. Would you feel a little scared? If so, keep on reading!
In the following you will learn how to hit a downhill bunker shot that has a decent height in order for it to clear a bunker lip, or land and stop recently fast on the green. There are 3 important steps you must know in order to success with this shot.

You need to understand the challenge
The challenge with a downhill bunker shot that needs some height, is as following:
- It can be really challenging just to make a decent strike on the golf-ball because of the hill. Often players hit the sand way to early because the try to “lift” the ball up.
- The slope works against what we need. The downslope will bring the flight dramatically down, and as written before we need height in order to clear a lip or make the ball stop on the green.
1. What you need to change in your setup
The first thing you have to do is to put yourself in the best position as possible before you start swinging. But what is the best strating-postion for a downhill greenside bunkershot? Here is what to do:
- As for most bunkershots, open up you clubface to create more height and more exposure of the bounce (read about the 15 most important bunker shot basics here)
- Make you stance wider. Not just a little bit wider, but a lot.
- With the wide stance, tilt you upper body so its close to being perpendicular to the slope the ball is placed at.
- Your weight is now a lot on the front foot. Depending on the slope, it can be as much as 90-95% of the weight being on the front foot.
- Last thing you need to do in the setup, is to place your hands forward of the ball so that the shaft is leaning with the slope.
Below is a picture demonstrating the 5 above mentioned setup adjustments. The right picture demonstrates the opposite, but unfortunately very often seen setup for a downhill bunker shot.

2. Keep the tilt during the motion
Now that you have placed yourself in the correct setup position for the downhill bunkershot, its time to talk about what will need to happen during the swing. One very important element in the swing, is to keep the upper body tilt you established at setup. This mens keeping your weight a lot on the front foot, and trying to keep the lead shoulder (left shoulder for a right-handed player) low during the whole swing.
As you can see on the left pictures above, the weight is kept on the front foot, and the lead shoulder is keept down during the downswing. On the right pictures you will see what it looks like if the opposite is done. This is a disaster when hitting downhill bunker shots.
3. Swing downwards for correct contact
The last thing you need to change is more of a feeling than an actually major change. If you do the two above described things you´ve come a long way, but this final piece to the puzzle can be the game changer. Here is what you need to feel:
- In the downswing, you need to have a “narrow” swing-arc. What I mean by that, is that you have to maintain you “lag” for a long time in the downswing. See the picture on the left below.
- In the follow-through you will need to have a “wide” swing-arc. By this I mean that the hands should be traveling away from you body in a longer time than usual, and your wrists should be fully extended for a longer time as well. Look at the picture on the right below for demonstration.
And below is how the opposite would look like. Weight going back, a wide arc in the downswing, and a narrow in the follow-through, almost trying to “lift” the ball in the air, which is a disaster.
Congratulations!
You are now a downhill bunker shot master! But remember: This is a tricky shot to execute! You need to practice it before taking it to the course. I challenge you to use at least 4 x 15 minute of practice in the following month that comes. It might not seem as much, but I’ll bet that its 1 hour more of bunker practice than you otherwise would have done 😉
Place fell free to take 10 seconds to click on one of the share buttons bellow, so that other people can learn to master this tricky shot as well!

How to Put Backspin on a Golf Ball
How to Put Backspin on a Golf Ball
Everybody loves backspin and wants to hit it, but hardly anyone knows how it is done. If you fall into this category you’ve arrived to the right place. The below 3 steps formula will guide you through how to put backspin on a golf ball!

There are many different factors that needs to match before a proper amount of backspin is created on a golf ball. But here is the deal:
Every decent golf shot will cause backspin on the golf ball!
Actually you are already putting backspin on your golf ball. A decent strike with your irons, fairway-woods and even driver will cause backspin. But when most golfers refer to backspin, they mean when the ball lands, and then spins back towards themselves. That is what you will learn to do in the following. Spin Rate is the term used to described the amount of backspin on the ball.
The 3 step formula
At first you need to understand how spin on the golf ball is created. It comes down to a very simple, yet extremely complicated equation:

Backspin = Club head speed * Spin Loft * Friction
For the everyday amateur player these 3 components might seem a bit overwhelming. But don’t worry, I will break down each of the 3 factors that determines the amount of spin on the golf ball.
1. Club Head Speed
This is the simple one of the 3 factors that creates spin on a golf ball. The Club Head Speed is the speed that the clubhead travels with the moment it hits the ball. The higher the clubhead speed, the higher the spin rate will be.
Because of this it is almost impossible to hit actual backspin on a small chip, because the clubhead speed is very low. But on a 80-100 yards wedge shot, the clubhead speed is higher, and therefore you can generate a lot more spin on the ball.
What’s the bottom line:
The best chances for hitting actual backspin is on longer wedge shots. On theses shots the clubhead speed is relative high compared to a chip, and the loft of the club creates good conditions for spin to be created.

2. Spin Loft
The second factor in generating enough spin on the golf ball in order for it to spin back towards you after landing on the green, is something called the Spin Loft. The spin loft is an angle created between the Angle of Attack, and the Dynamic Loft. This will for most sound a bit complicated, but look at the pictures below.
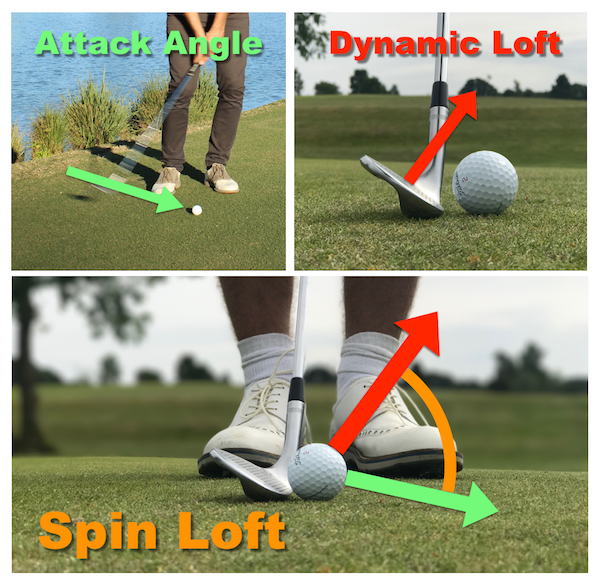
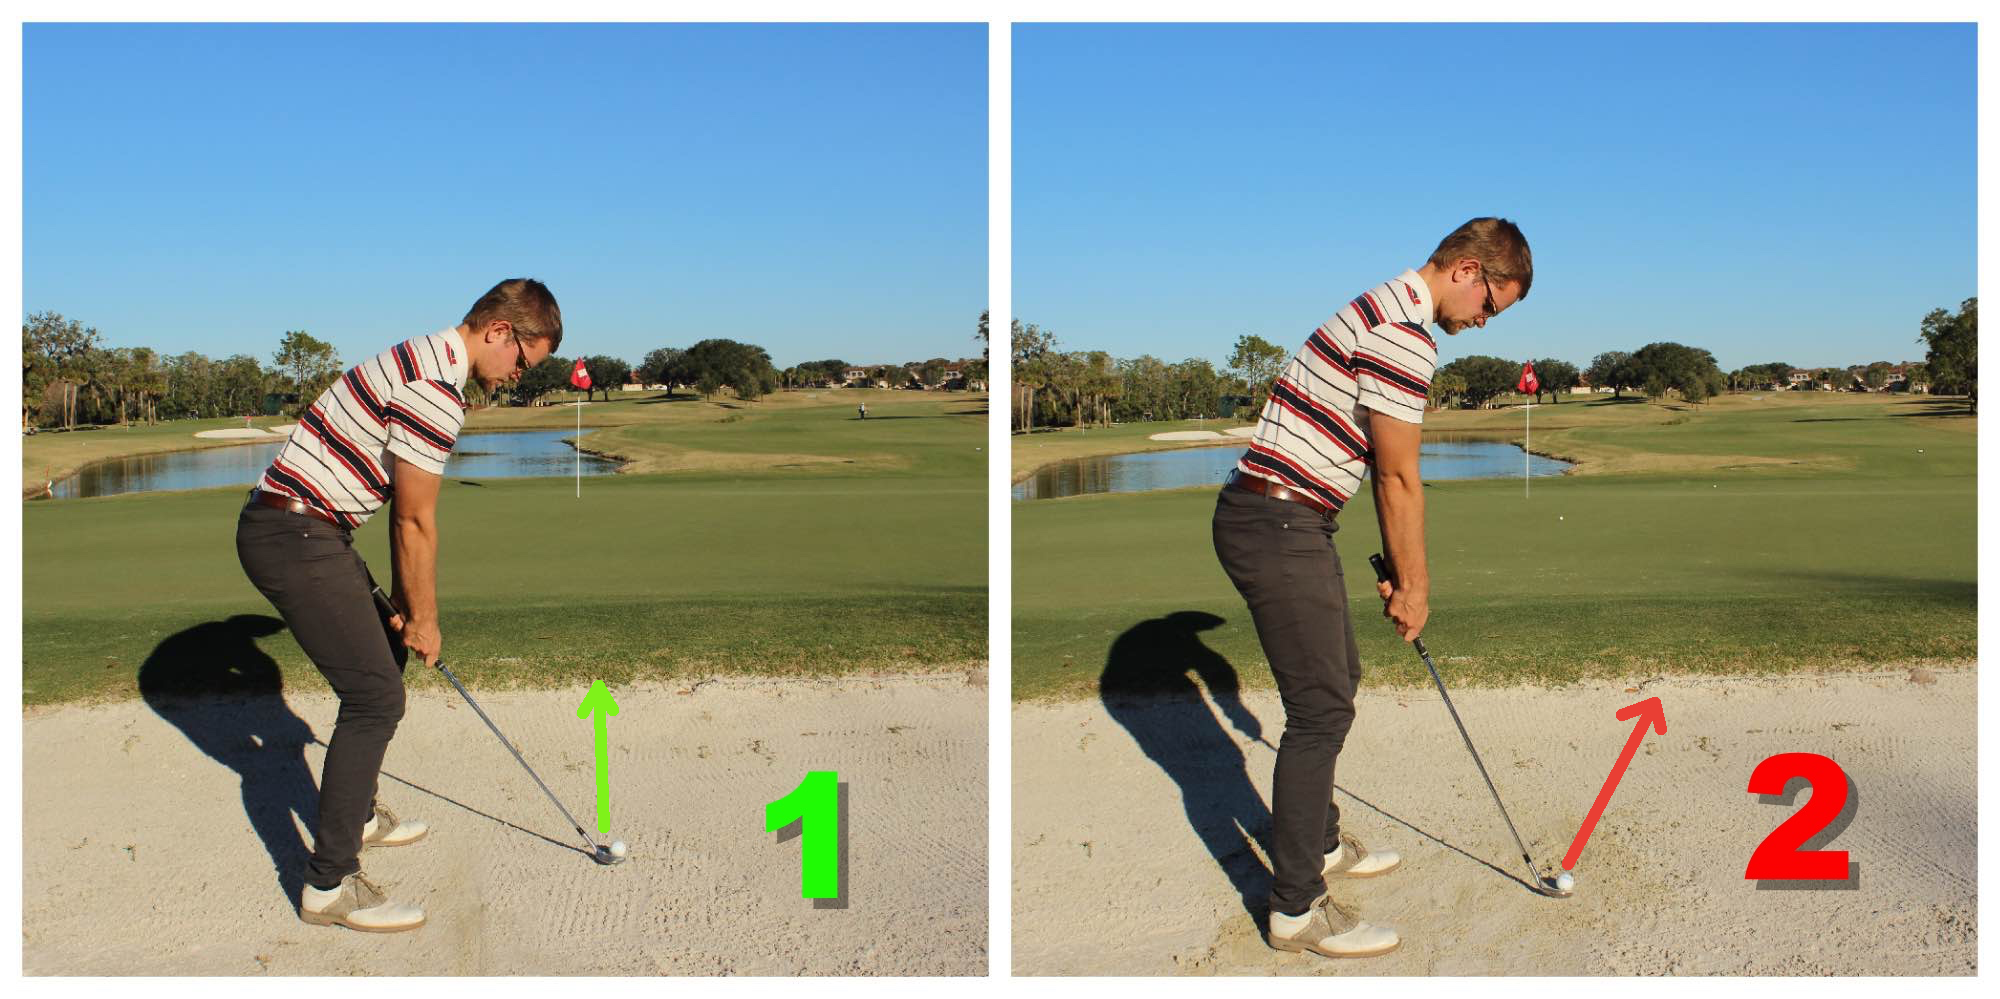
The Attack Angle is the angle which the clubhead is travling on when it hits the ball. This is, and should usually be around -7 degree on pitch-shot, which mens the clubhead is traveling downwards with 7 degrees when it hits the ball.
The Dynamic loft is the angle the clubface has a impact. This angle is determined mostly by which club you hit, and how the shaft is aligned at impact.
The spin loft is the angle between the to above described factors. With a driver you usually wants to decrease the spin loft, to lower the spin rate, which will make the ball fly further. But in this case, we want to increase the spinloft, to create as much spin as possible. For this you will need a wedge with a good amount of loft, and the Angle of Attack to be downwards.
But here is the deal:
The spin loft can get too high! If the spinloft gets too high, relative to the conditions the shot is played from, no friction will be created, and without friction there is only minimal backspin on the ball. So a fully open clubface with a very steep Angle of Attack that produces a spinloft of 70 degrees is way to high to ever create any friction. But what is friction? Read on:
3. Friction
I like to explain friction as the glue between to golf ball, and the surface of the club face. The stronger the glue is, which means a higher amount of friction, the more the ball will spin. So, if you want to make the ball spin backwards when it lands, you need to ensure a high amount of friction between golf ball and clubface.
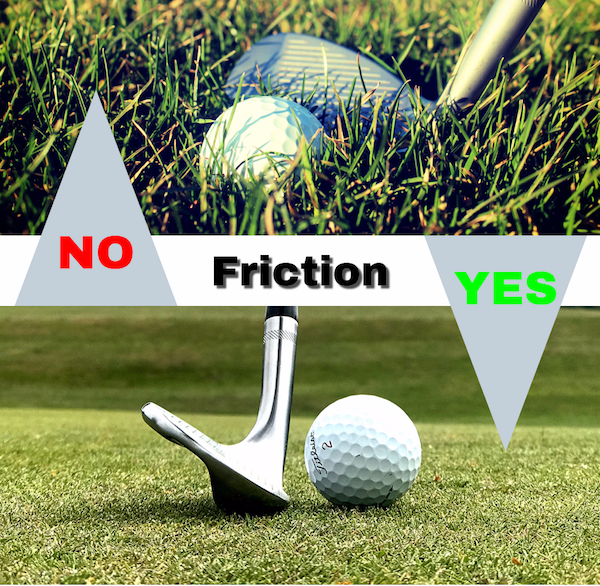
But how is friction created?
First, you need a dead solid strike. If you don’t hit the ball well, the spin-rate will never be high. So make sure your technique is good, and if you struggle with the contact, make sure to check these 9 best chipping tips.
Most of it comes down to the having the right conditions. The better the conditions are, the more friction you can create, and the more backspin you can make. Here are 4 conditions that has a MAJOR effect on the friction and by that also the spinrate:
• You need as fresh grooves on your wedge as possible (most tour pros changes their lob-wedge more than 4 times a year)
• You need a premium golf ball (usually a higher price means more spin)
• You need a DRY ball, a DRY clubface, and DRY grass
• You need as little grass as possible to get caught in between the ball and the clubface. A very tight lie, or a driving range mat, minimizes this amount of grass whereas a rough lie will create no friction and by that spin.
If these 4 conditions are right, you have a much better chance of increasing the spin-rate.
Now you might be wondering
I can’t control all of theses conditions. And that is 100% true. You can control which shape your wedge is in and you can control which ball you are playing with. But if you play on a rainy day, or if the ball is in the rough, the spin-rate is NEVER gonna be high enough to see actual backspin when the ball lands.
The other end of equation
Okay, that was a lot of information. I know it might seem a little overwhelming, but we are not done yet. All the above information was on how to maximize the Spin Rate on the ball. A really high spinrate does not guarantee backspin when the ball lands on the green. The following 3 factors will help you hit that backspina you´ve always wanted:
• A soft and fast green
• A green sloping towards you
• Headwind
If you hit a extremely high spinning wedge shot, onto a super firm and fast green, sloping away from you, in tailwind, the ball is not goanna spin back towards you. So pick a shot that has the above 3 mentioned factors right.
Lets put it all together
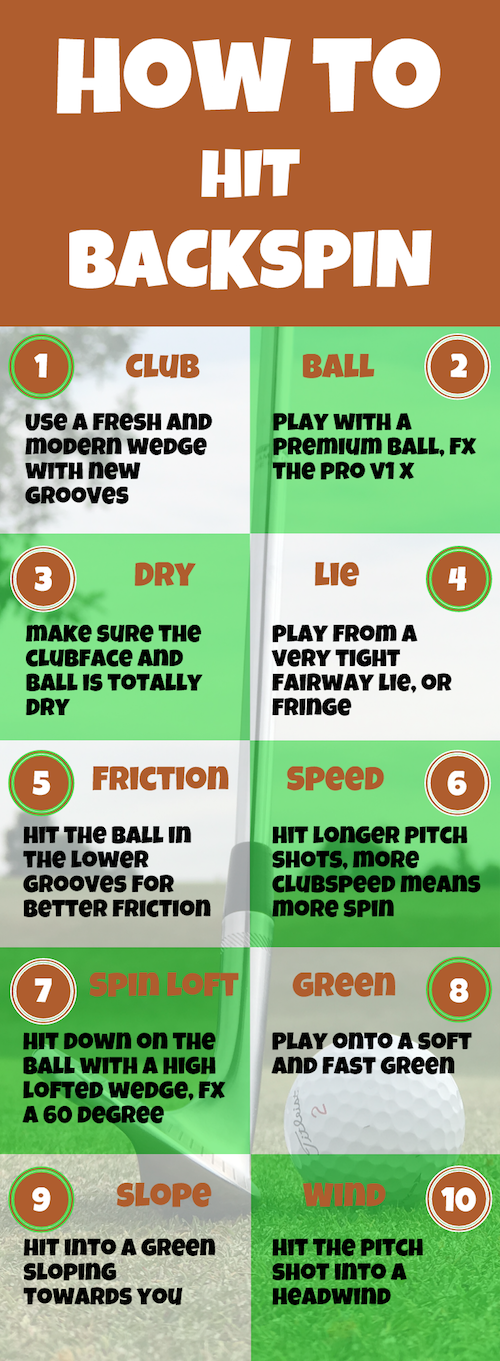
I’ve made you a list with 10 factors to give you better chances of hitting that backspin:
Good luck!
You are now a backspin-master! You’ve learned how backspin is created and in which conditions you will need to play if you want to hit backspin. Now it is time for you to go test it out in the real life! Before you leave, take a minute to share this article with one of your friends who would love to learn how to hit backspin. Click on one of the buttons below to do so 🙂

5 Reasons Why You Are Shanking Chip Shots
5 Reasons Why You Are Shanking Chip Shots
(And how to fix it)
I think most golfers will agree, when I say that a shanked chip is a terrible shot to hit. In the following I will teach you the 5 most common reasons why you are shanking chip shots, and in the end I will reveal the best and most simple way to fix this issue. Lets get started.
What is a shank at all?
The simplest way to explain why you are shanking chips shots is that the clubhead has been moved closer towards the ball than were it started to be. This will cause the strike point on the clubhead to be on the hosel (learn what the hosel is here) of the wedge, and that is a shank.
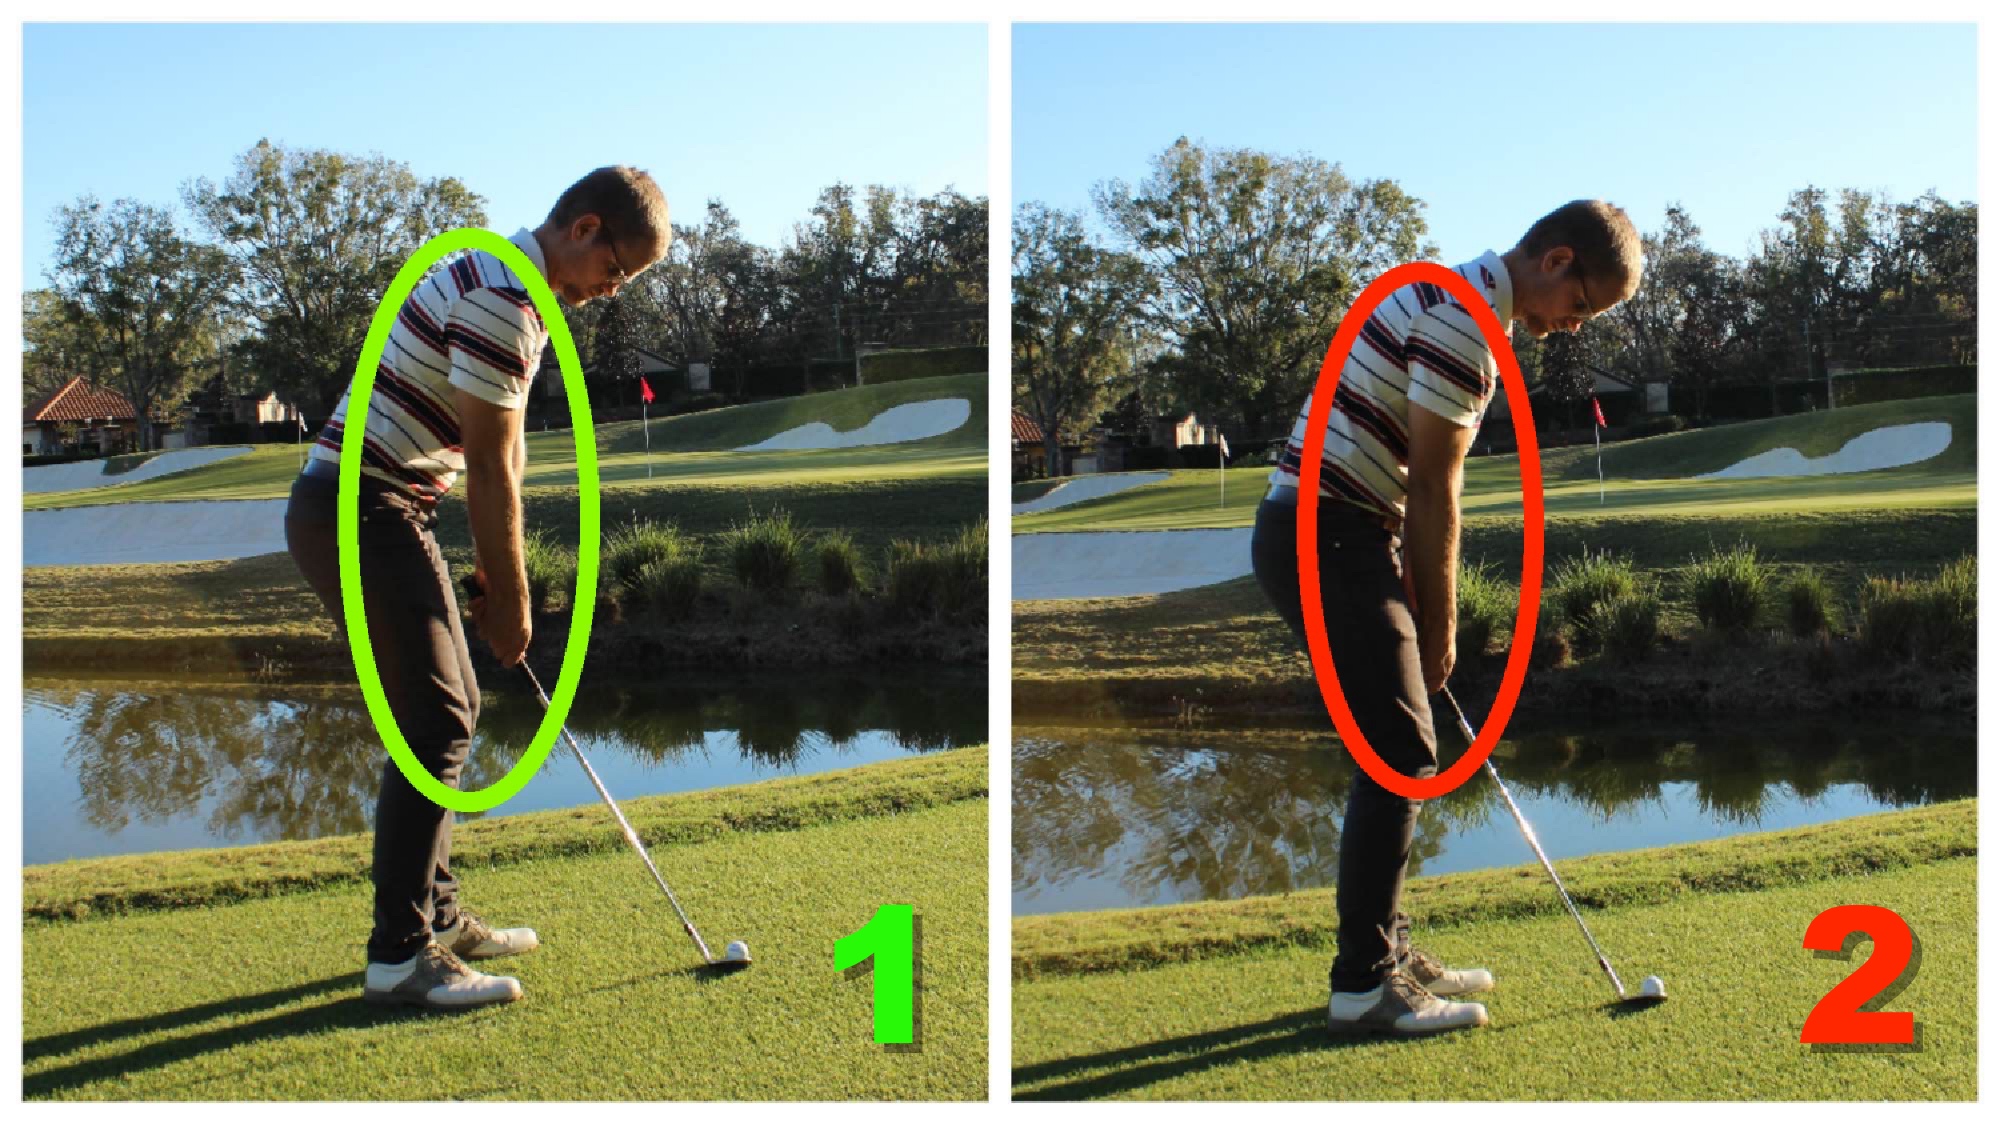
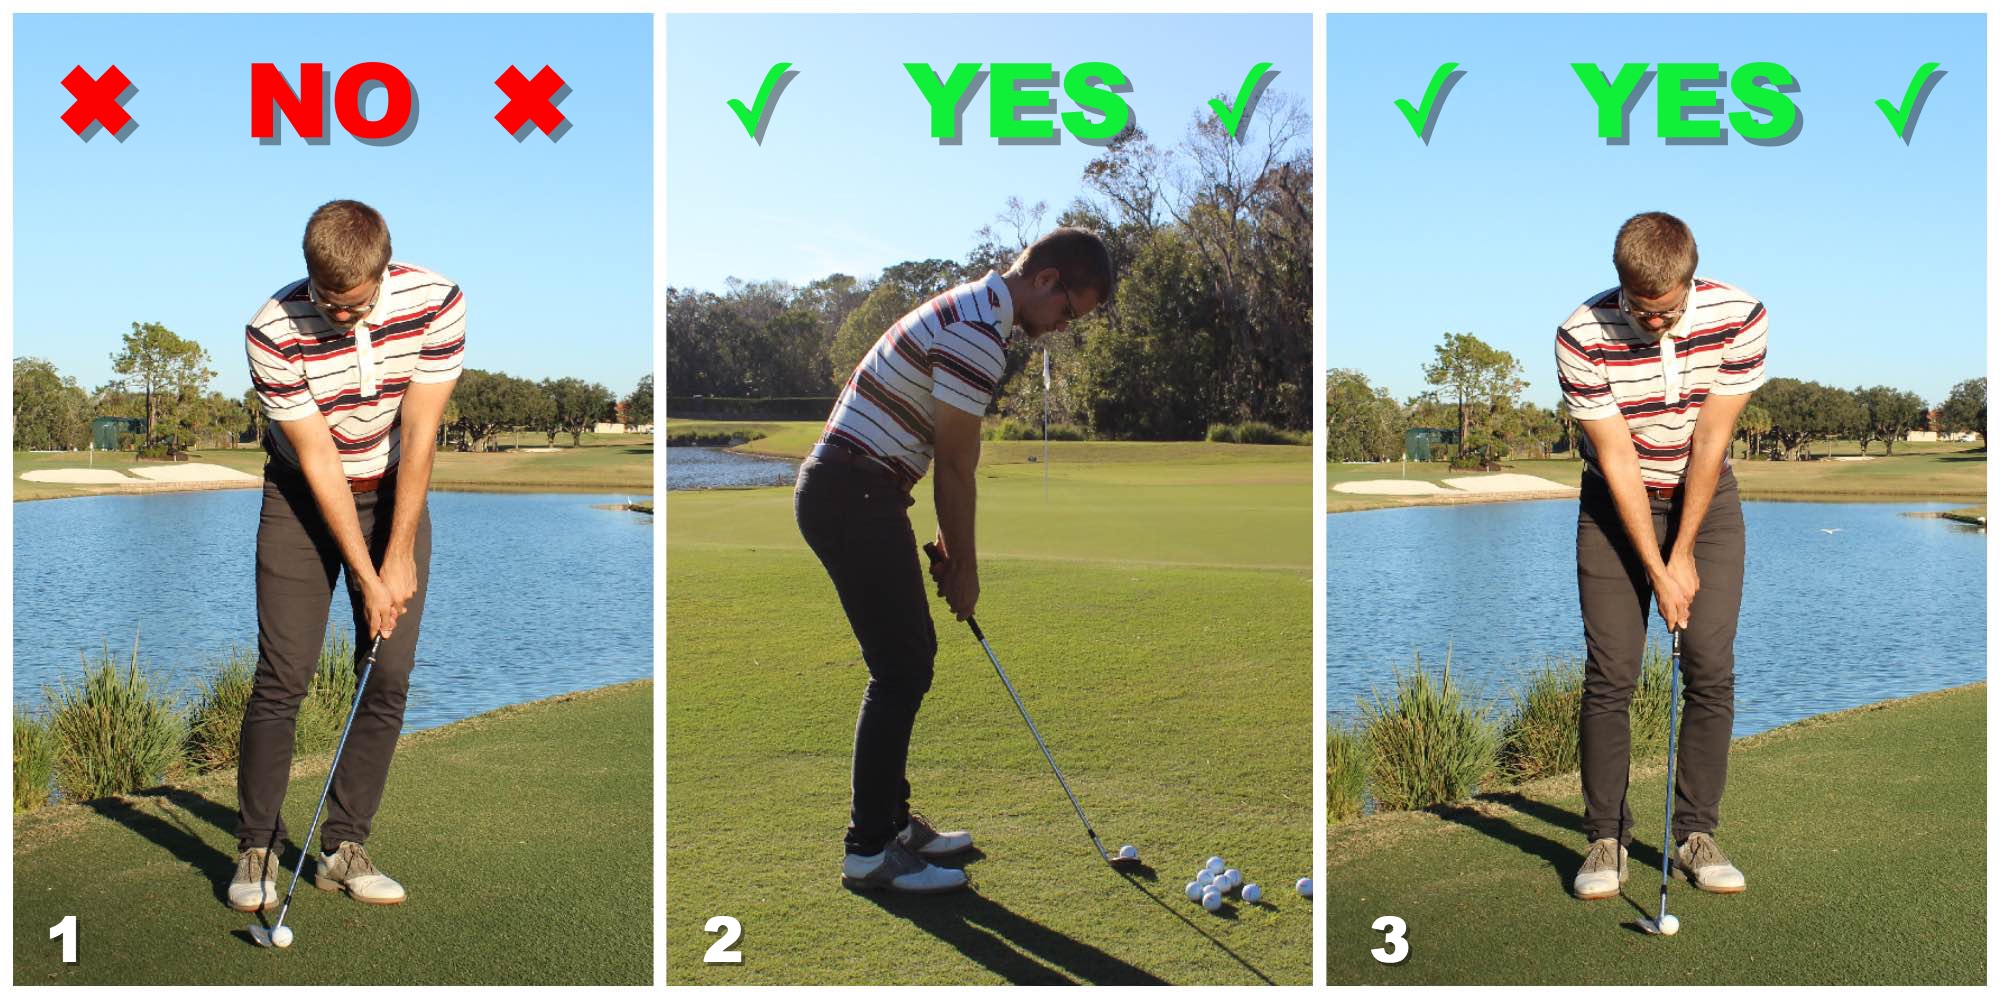
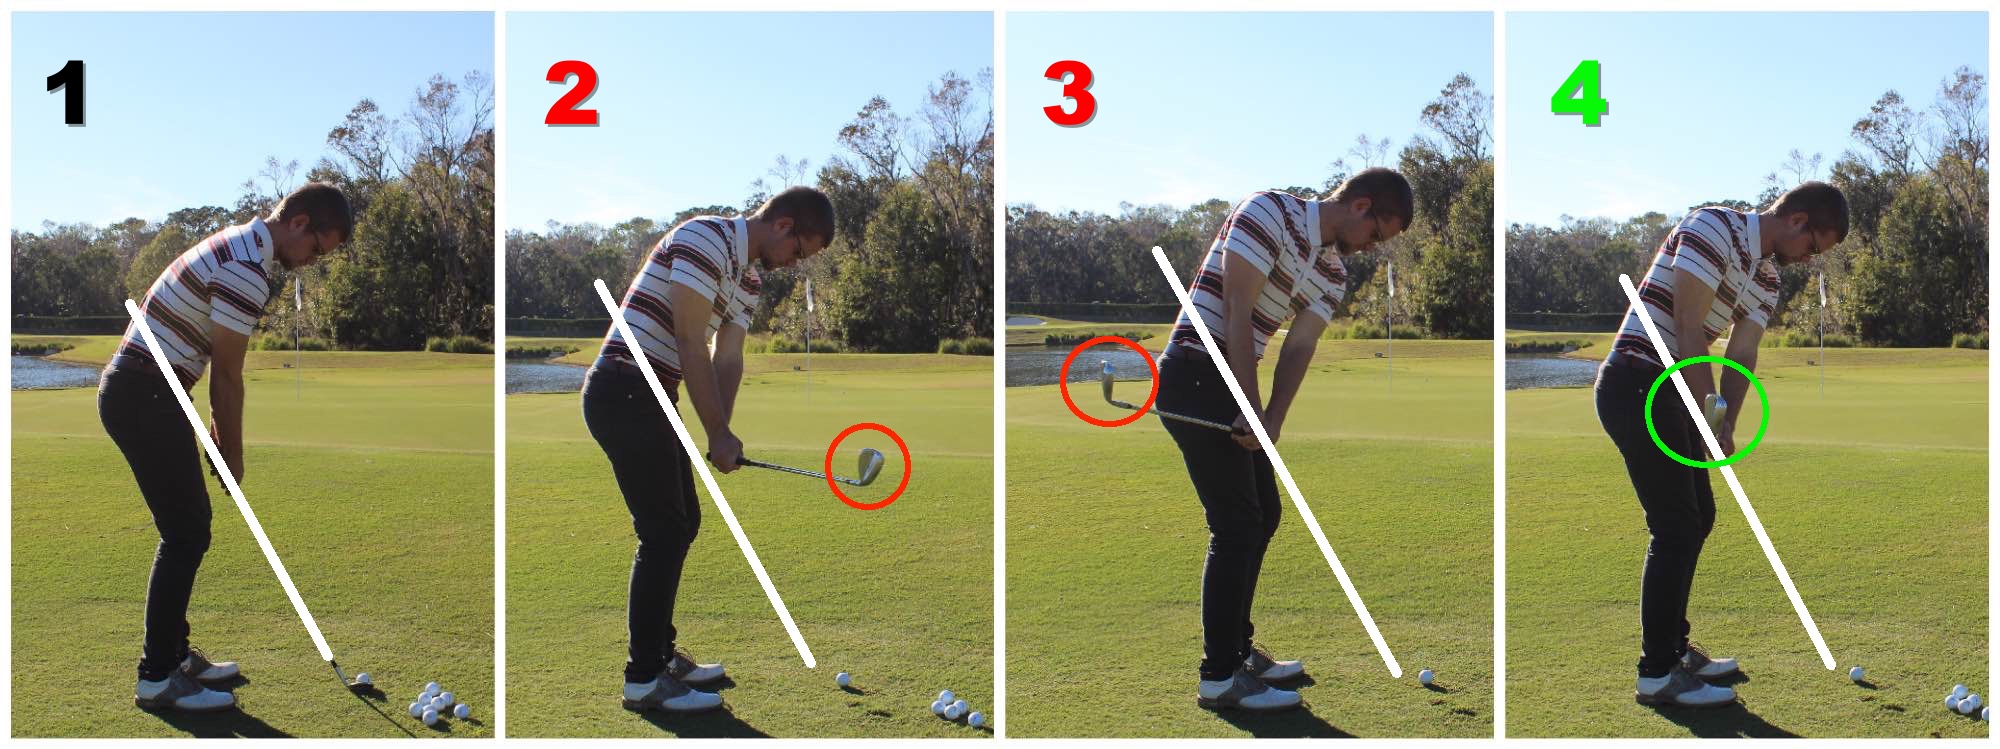
1. Check your Setup!
A very common reason to a shank starts already at setup. If you are to close to the ball before starting your motion, there is a great chance of the club moving away from the body due to the lack of space through the impact zone.
A good guideline for most players is that from a relaxed, bend forward position, the arms should be hanging straight down from the shoulders.
Use a mirror or your smartphone to check your setup position.
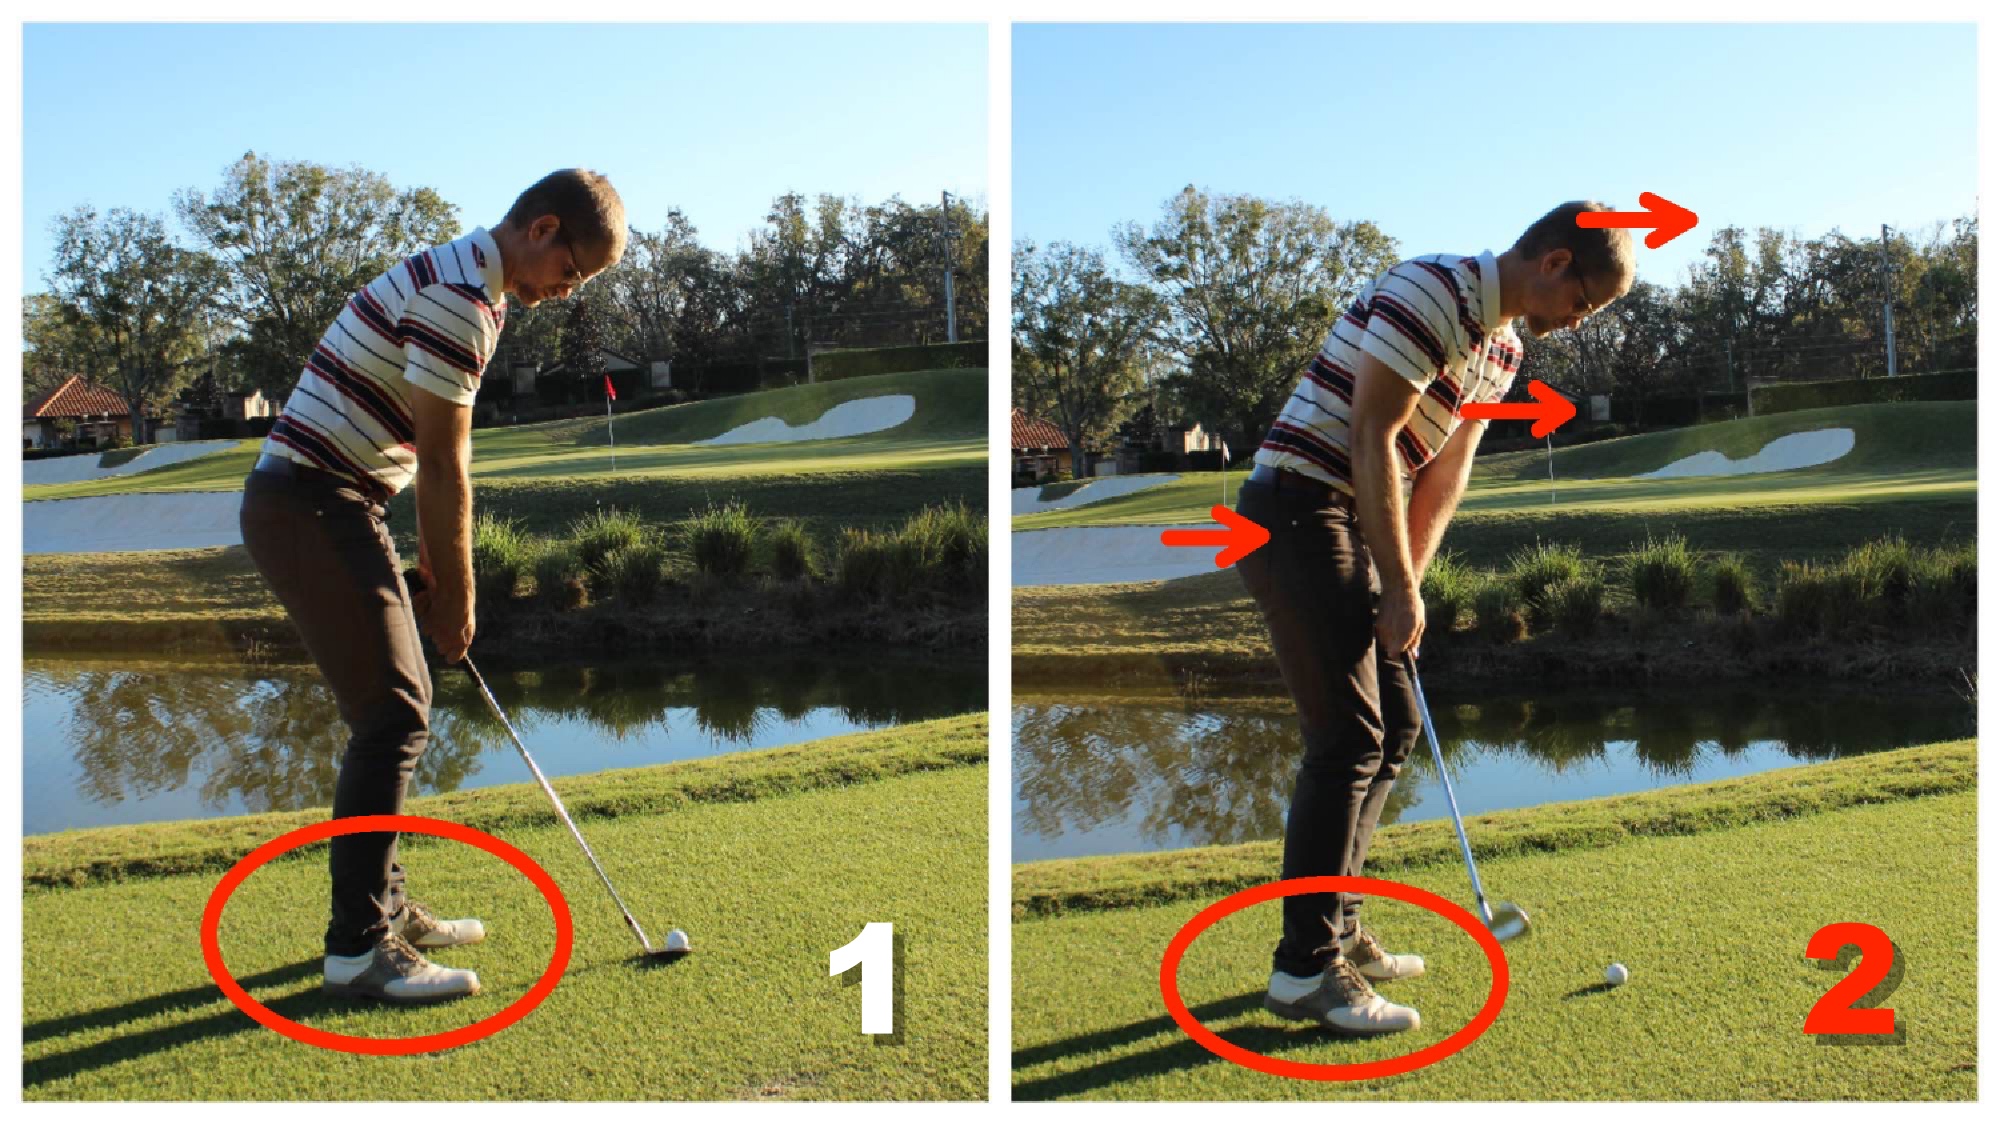
2. Where is your weight going?
The second very common reasons why you are shanking chip shots, is that the weight of your body moves towards the ball during the chipping motion. Often this can be felt in the shoes, where the weight will move towards the toes.
In order to prevent this, try chipping with your toes pressed up towards to inside top of your shoes.
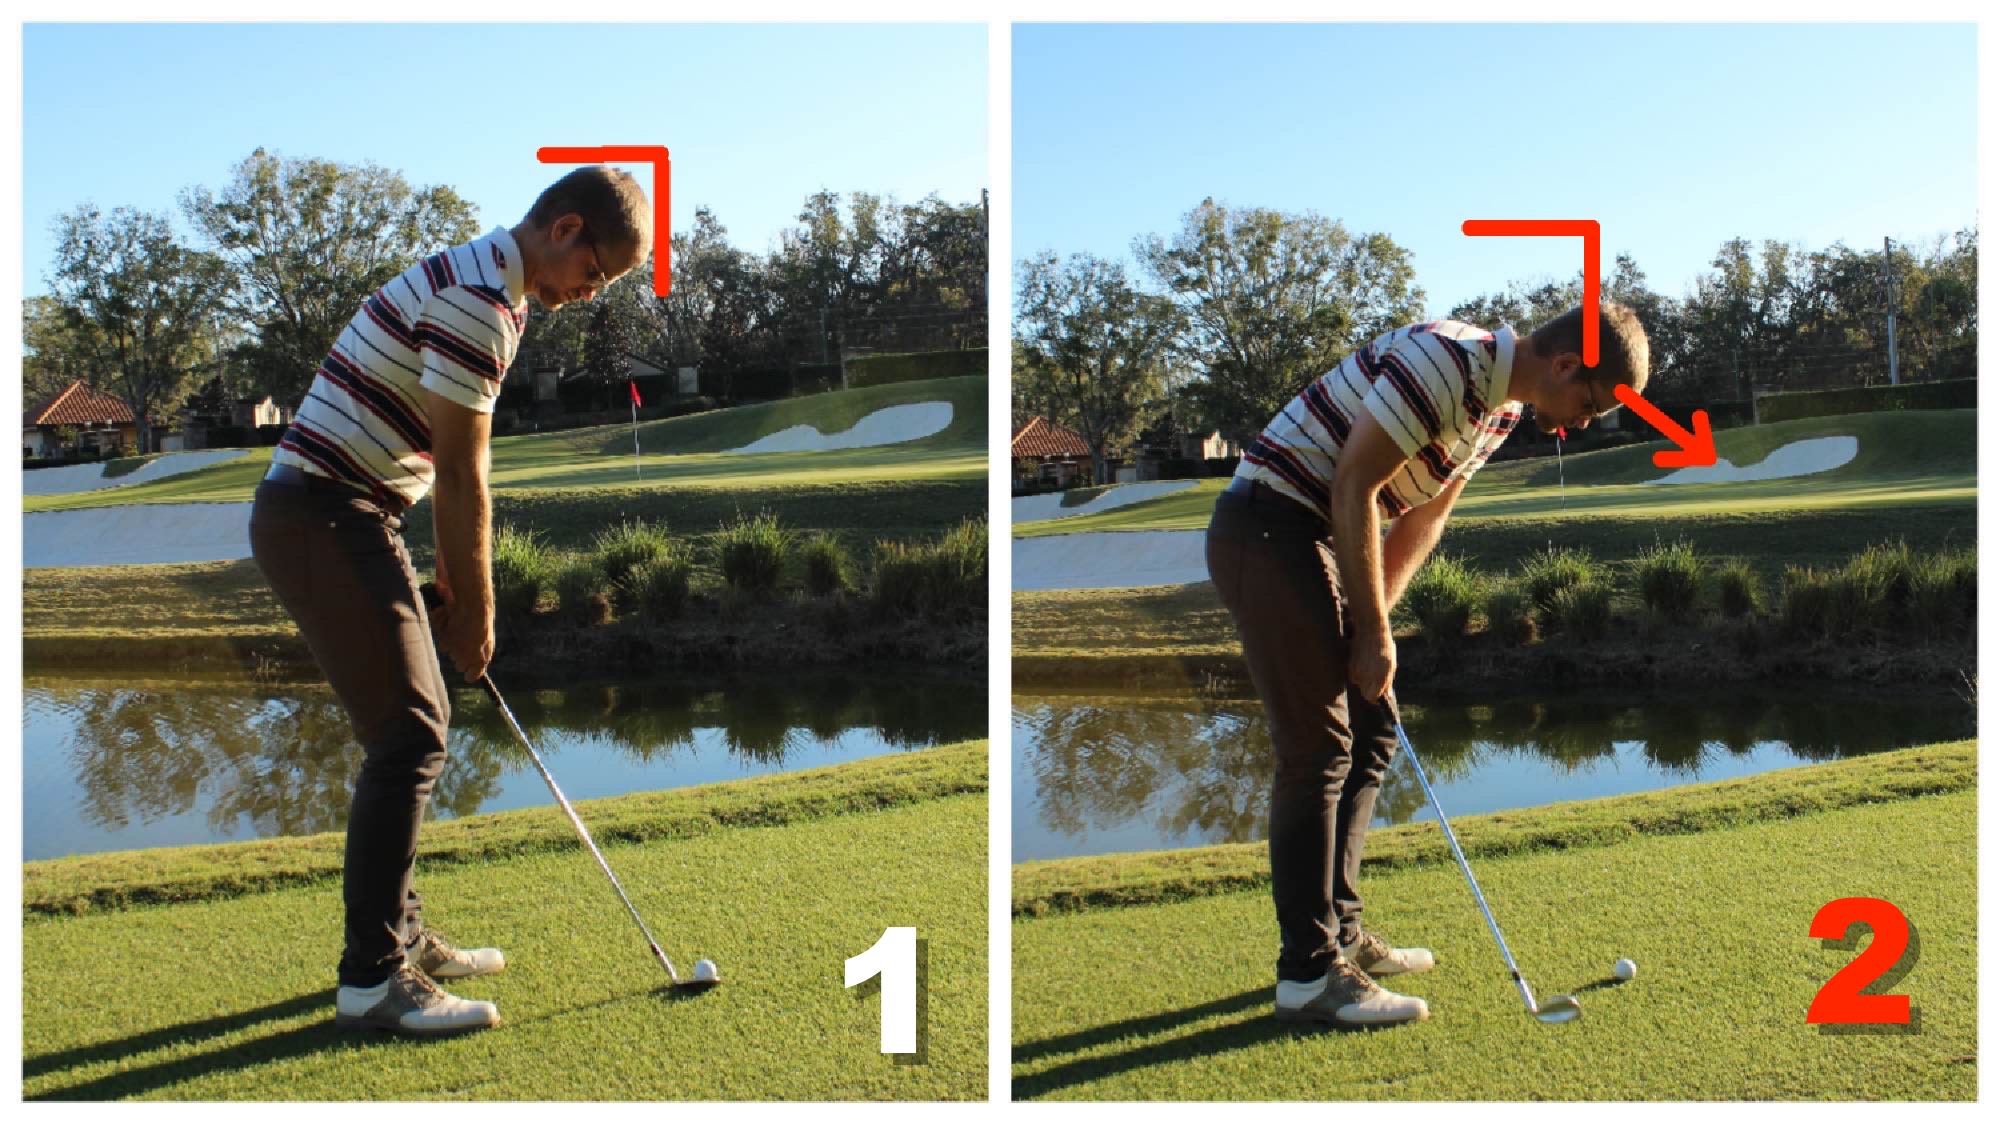
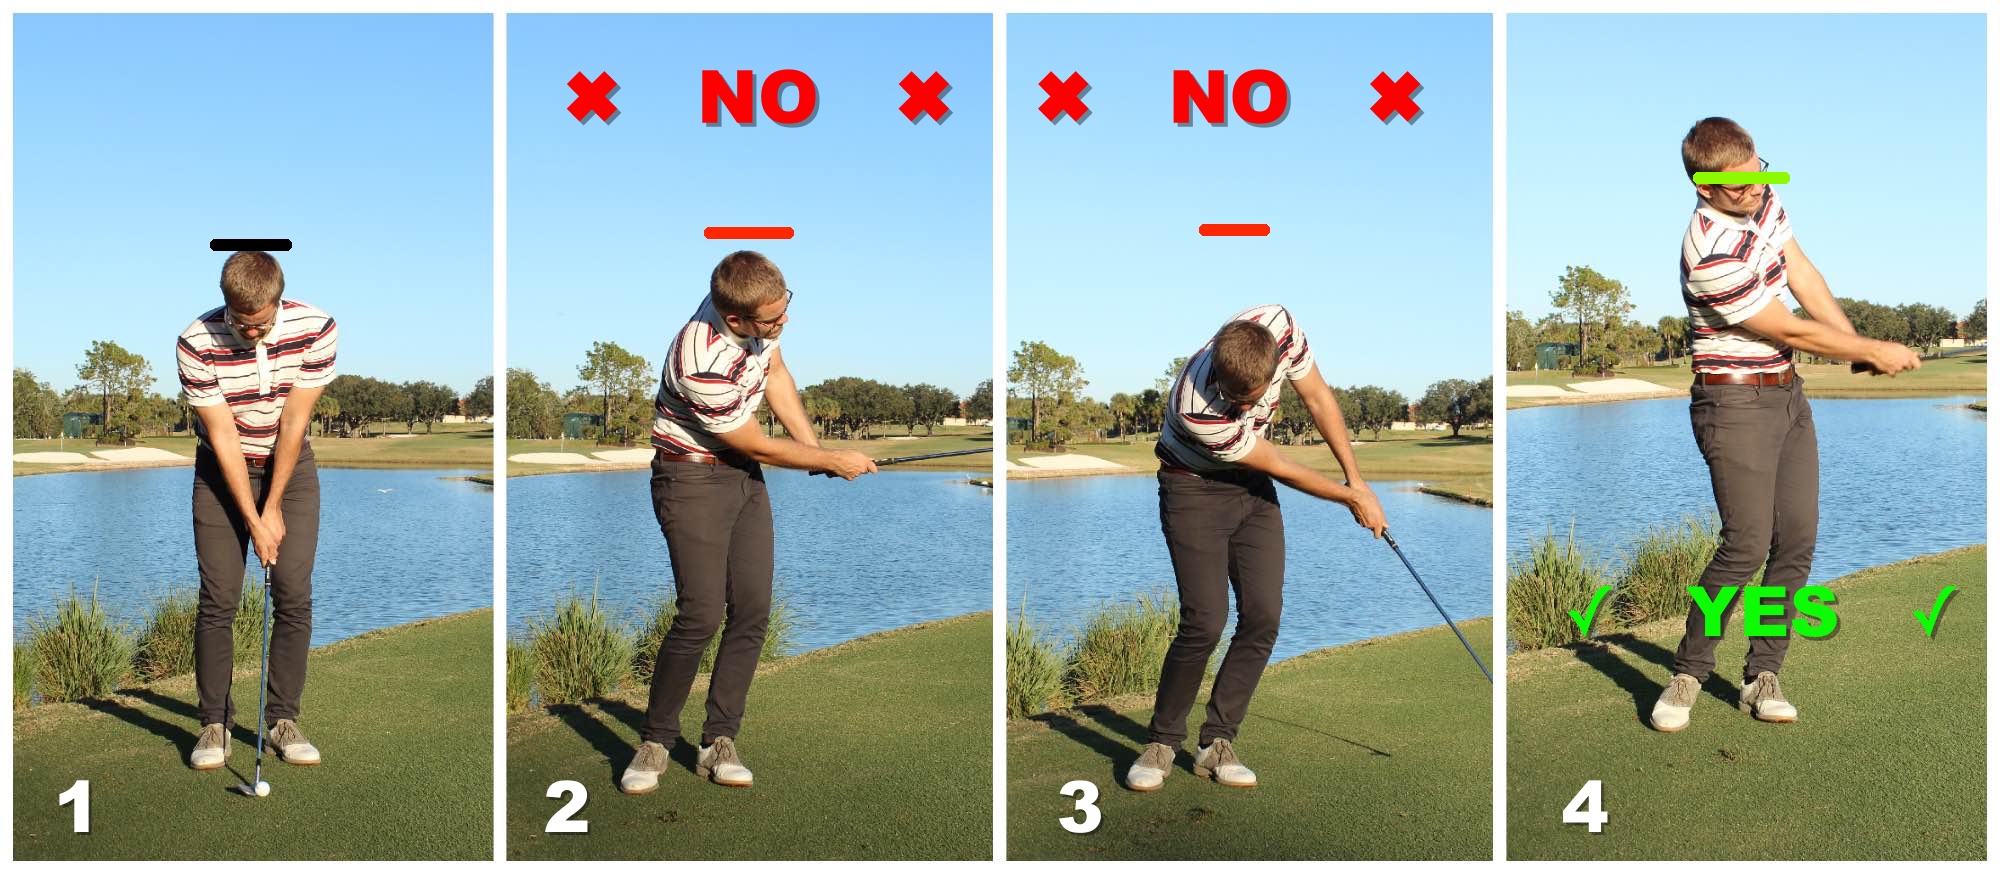
3. Is you head going the wrong way?
A third very common reason to a shank is when the head moves towards to ball during the chipping motion. The head is the center of the swing and when the head moves in a certain direction, there is a great chance of the clubhead following. Therefore, make sure to keep the head still during the motion.
This might surprise you:
If the head should move anywhere, it should move up, and away from the ball a little bit. This is actually movements you will see many of the best chippers in the world perform. These head movements start already during the downswing.
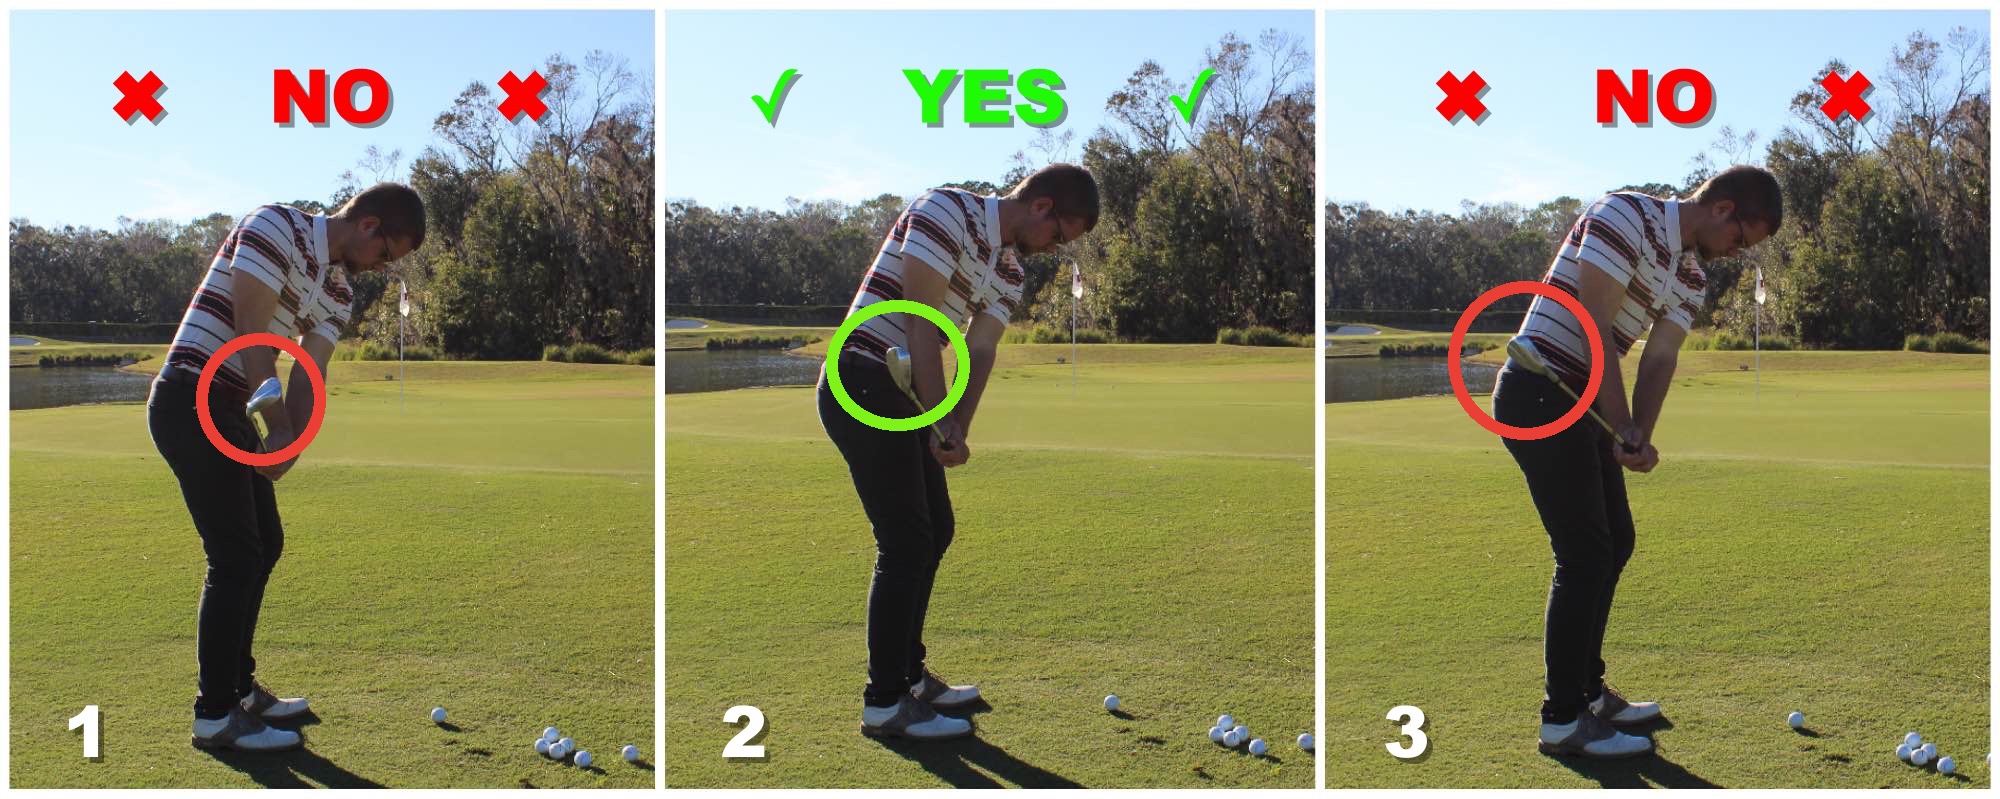
4. Keep your arms close!
The fourth often seen mistake that causes shanking, is that the arms moves further away form the body during the motion. When this happens, the shaft of the club is moved closer towards the ball, and it will in many cases cause a shank. Make sure that you arms and hands is the same distance away from your body at impact, as they where at setup.
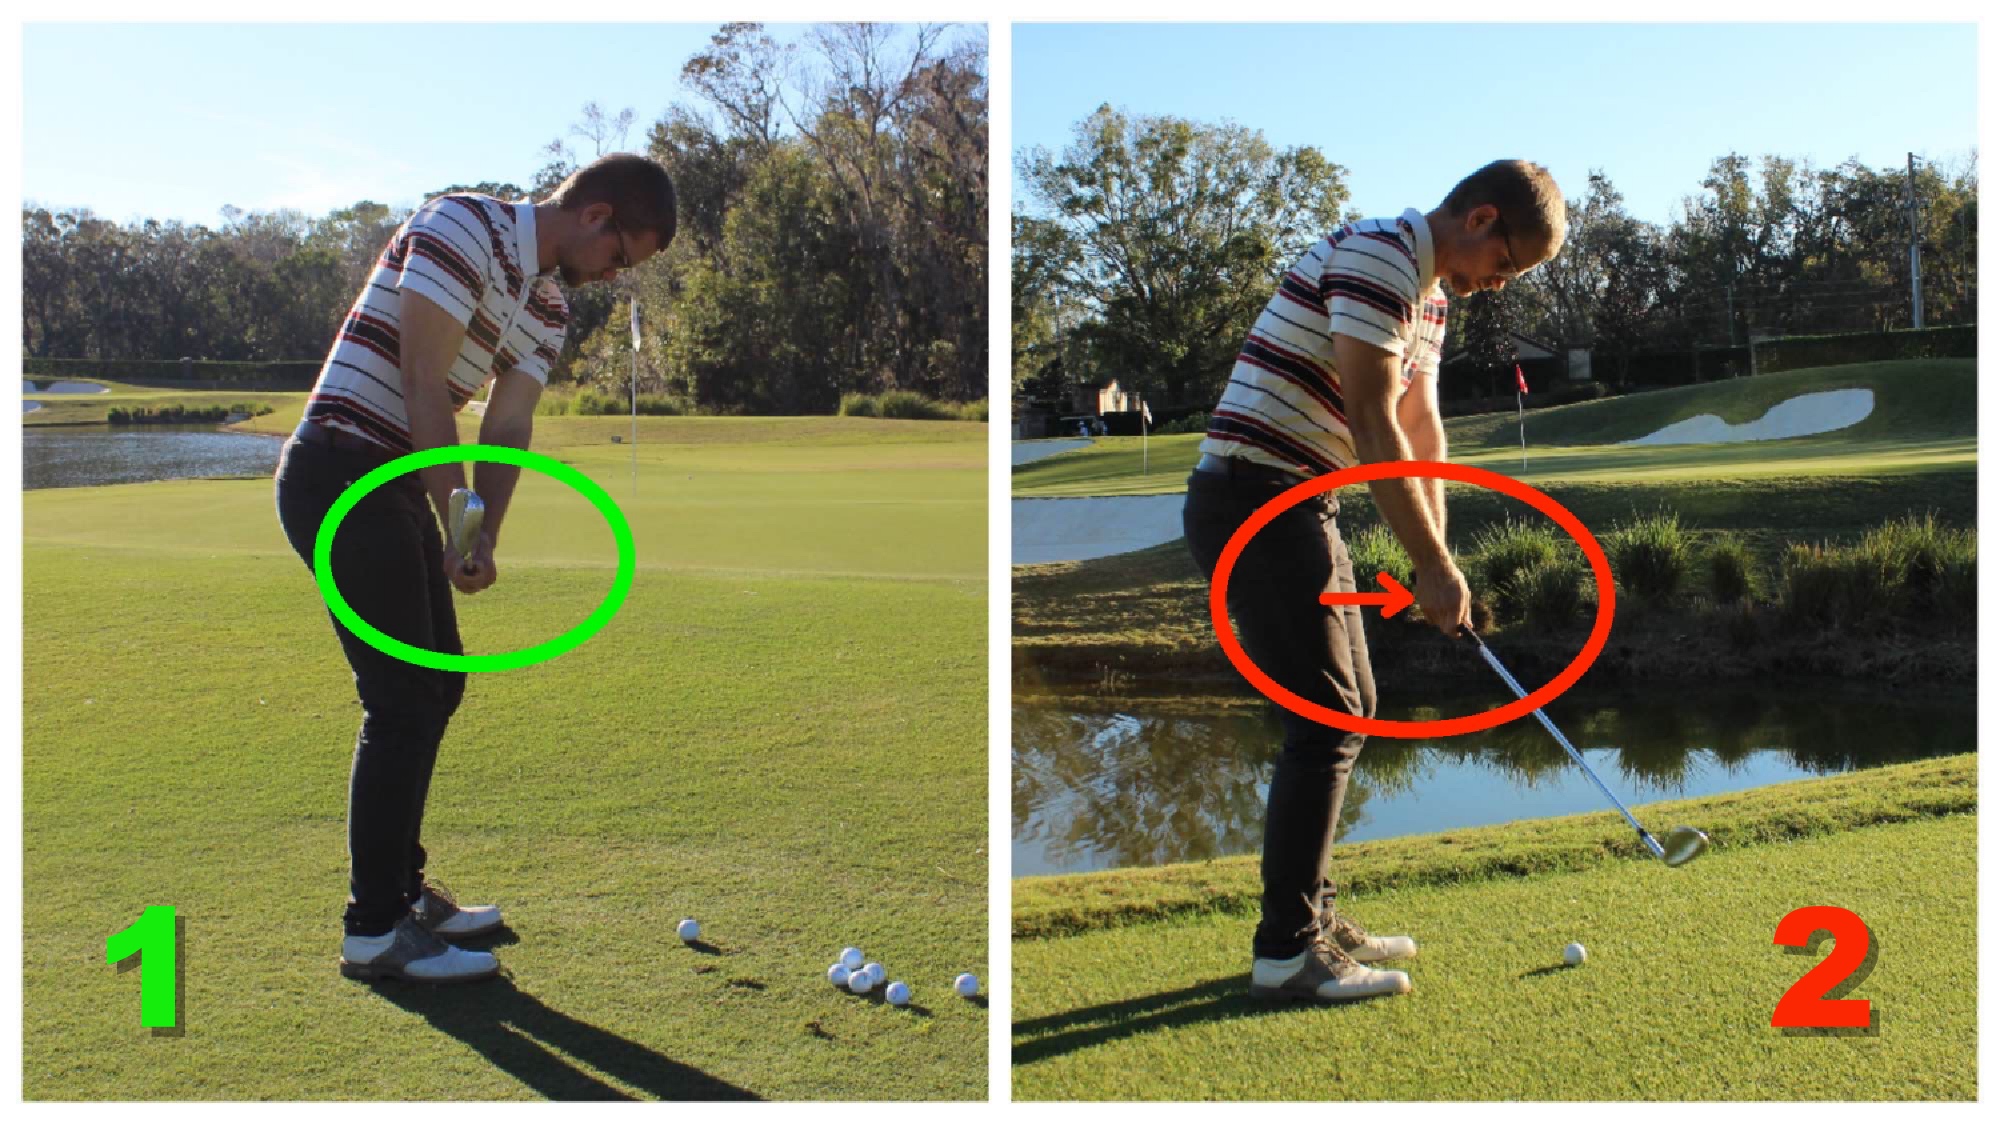
This can be hard to fell for the player. A good way to check this is by using the camera in you smartphone. When watching the video of the motion, it will be quite clear, if the hands and arms have moved further away form the body at impact relative to their position at setup.
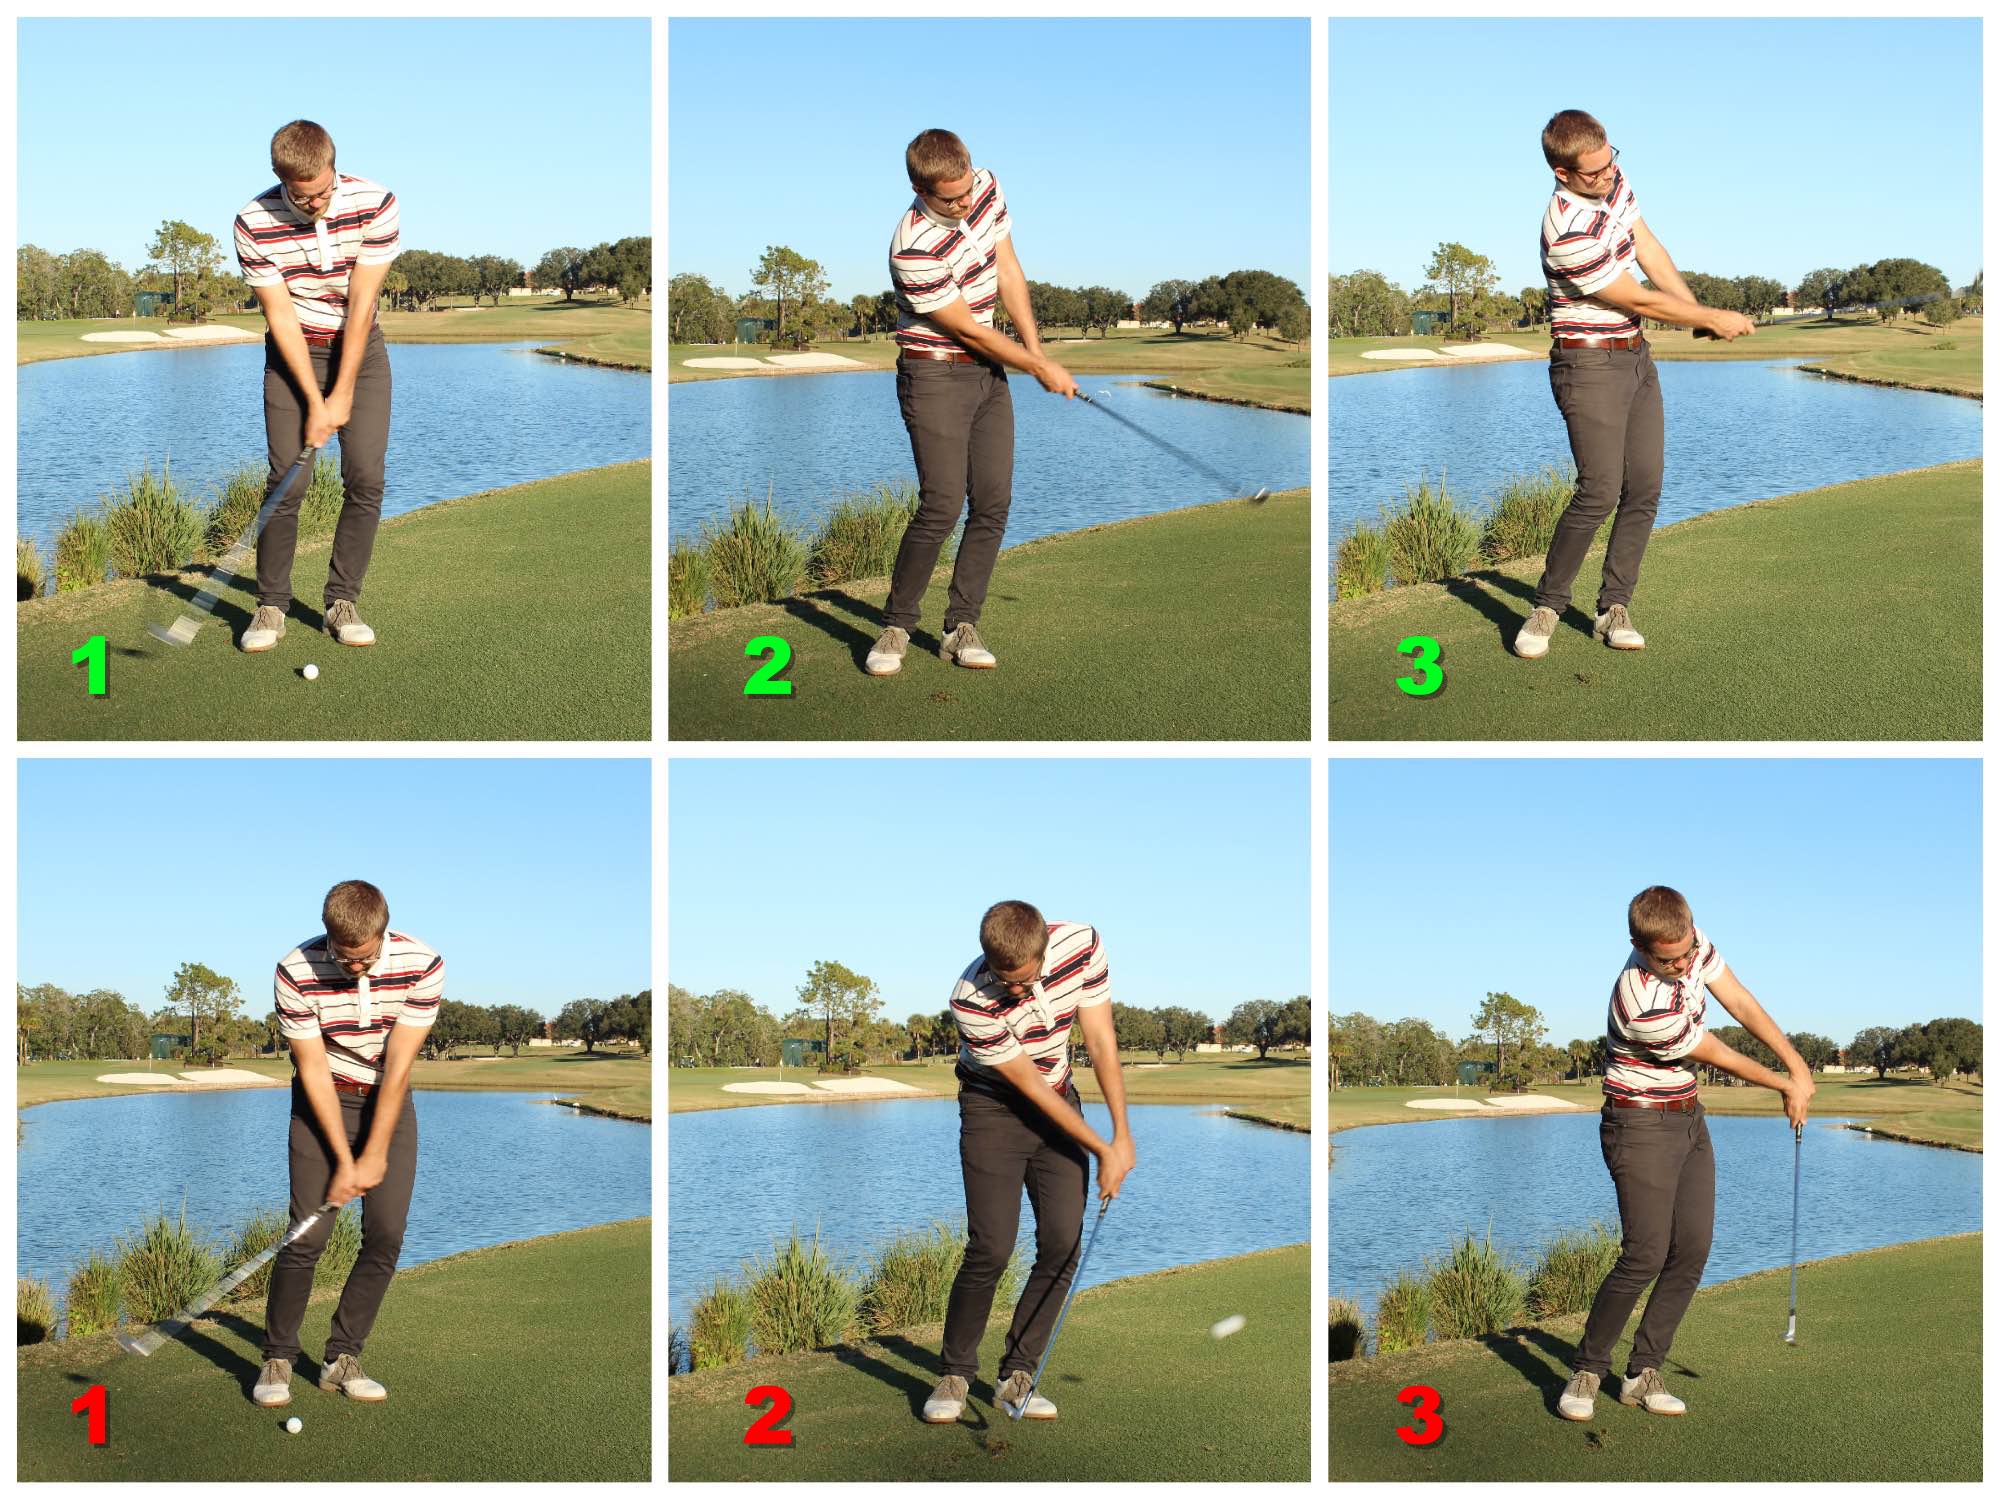
5. Check your handpath
The last common reason for a shank is a bit more complicated than the first 4. We are now talking about a path, more specific the path that the hands travel on during the impact zone. If this path is moving too much to the right, for too long time, there is a great risk of hitting a shank.

To illustrate this hand-path, watch the video below, it is the 5th reason presented in the video.
Watch a video demonstrating the 5 reasons
The easiest way to fix a shank
The absolute easiest way to fix a shank, is by doing the following drill:
Place two golfballs, with a little less than a golfball size in-between, as shown on the left picture below. The goal is to hit the front ball, and DONT hit the rear ball during the shot. This will insure the clubhead is not moving away from the player which is what causes the shank.
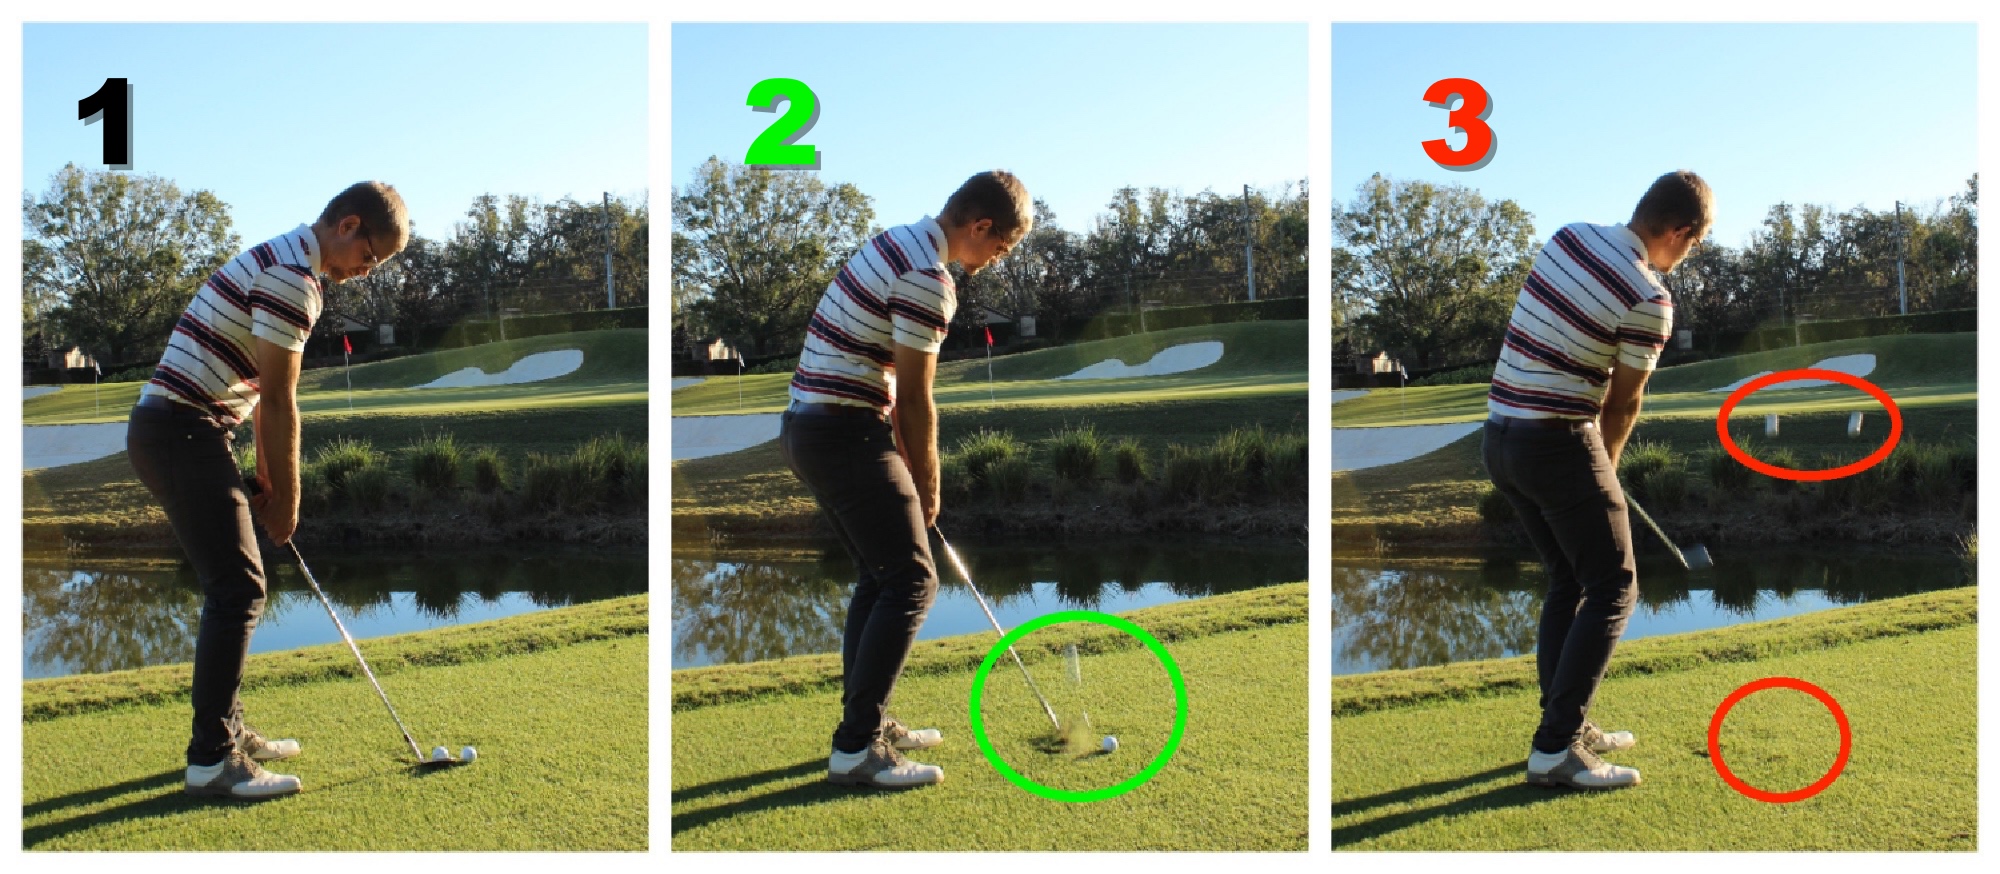
Dont forget!
You’ve now been through the 5 most common reasons why you are shanking chip shots. Other reasons do exists, and if your interested in knowing more about the basis technique of a chip shot, I would highly recommend studying the 9 Best Chipping Tips For Instant Better Performance Around the Green.

15 Most Important Bunker Shot Basics You Must Know
15 Most Important Bunker Shot Basics You Must Know
Do you know that nervous felling when standing over the ball in a bunker? Praying to god that you wont blade it, shank it or chunk it. Let me tell you at once, that you are not alone.
In this post I am going to teach you the 15 most important bunker shot basics, that will show you how to get the ball nicely out of the bunker, every single time. Read it closely and carefully because all of the bunker shot basics have the potential to change your bunker play forever.
1. Let the clubface shine
The first basic in the bunker, is how you hold the clubface at setup. A bunkershot is about making the club glide over the sand. In order for that to happen you need the club to hit the sand with the widest part of the clubhead. This part is what is called the sole of the club (read this article if you want to learn what the sole is). If you open up the clubface at setup the sole will be exposed a lot more, and by that there is a greater chance of this part of the club to hit the sand first. Other advantages of an open clubface is:
• This allows you to hit the ball with higher club speed, and it is easier to make the club glide over the sand with a higher club speed.
• An open clubface adds a lot of height to the bunkershot which is usually a good thing from a greenside bunker.
• More spin is created with an open clubface
Picture 1 shows how the clubface should NOT be aligned at setup in a bunker. Picture 2 shows the correct way, with a clubface that has been opened.
2. Stand like Charlie Chaplin
In the setup you also need to flare out the front foot (left foot for a right-handed player). This will give you the best chances of turning your body in the follow-through, and also to move and keep most of the weight on this foot during the swing.
Picture 1 shows the correct positioning of the feet for a bunkershot. Notice how the toes has been turned out. Picture 2 shows the WRONG way to place your feet.
3. Build a solid foundation.
Your stance needs to be wider in the bunker. This will lower the body a bit towards the sand which is good, and it adds stability to you lower body which is also a thing you see with good bunker-players.

Picture 1 shows a very narrow stance, which is definitely not to prefer for a bunkershot. Picture 2 shows a wider stance which creates a solid foundation in the sand.
4. Adjust the scope
With the open clubface as described in #1 basic, the club will actually be aiming to the right of the target. We need to compensate for that. Some people aim way left with their body to do this. I am not a huge fan of that. You will be swinging way across the ball and by that you will direct the energy in a different direction than where the ball should go. Distance control will be tough from here.
Here is what to do instead:
I want you to lower your hands. This was already done a little by the wider stance, but you need to flex in your knees more than on a full swing. This will lower the upper body closer towards the ground, and thereby also the hands, and wola, the clubface is now aiming the right way. The reason? Look at the pictures below. The height of the shaft has a direct correlation to the aim of the clubface.
Picture 1 shows a shaft plane that is low, caused by the hands being closer to the ground. This will change the aim of the clubface from aiming to the right, to be aiming more left towards the target. Picture 2 shows a higher shaft plane, caused by the hands being higher. The clubface will ba aiming way right of the target.
5. Create room enough for everyone
With the hands closer to the ground and more flexed knees, we need some room for the hands be able to swing. Your hands and knees will probably hit each other during the swing if we don’t do a little change.
You need to move further away from the ball. This will create a lot of space so your hands can move freely during the shot.
Make sure to move a little away from the ball so that the hands will not touch your legs during the swing.
6. Place the little white one at the right place
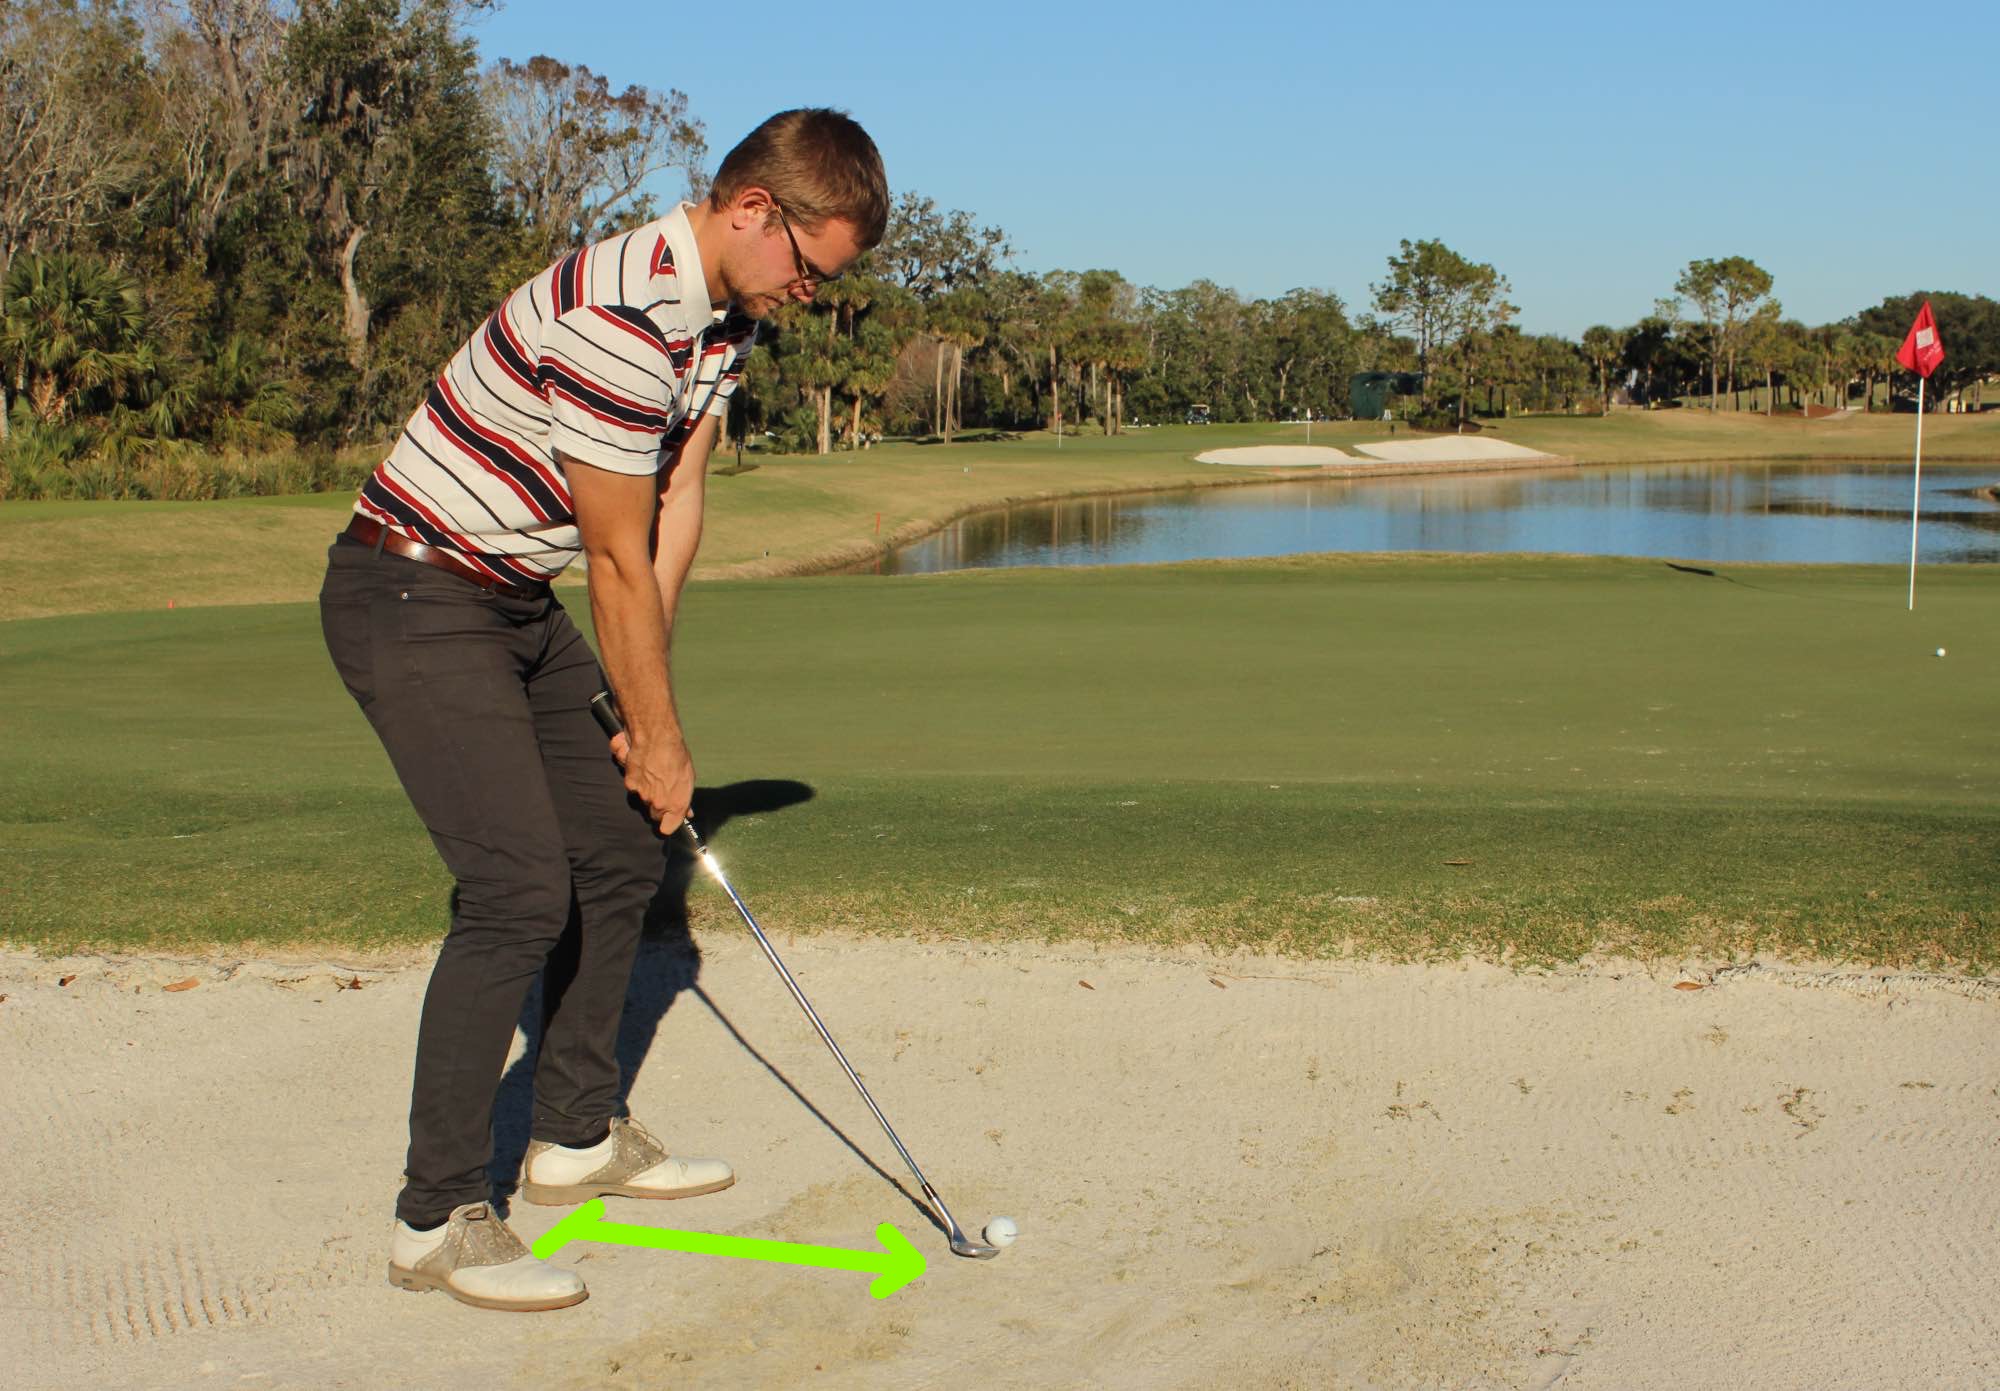
The last piece of the setup puzzle is the ball location. It needs to be located 1-2 balls in front of your sternum. This will give you the best chances of hitting the sand the right place, and also controlling the depth of the “turf” in the sand.
 In picture 1 you will see the ball being located behind the sternum, which is NOT to prefer. The Attack Angle will probably be quite steep, and you will have a hard time making the club glide probably over the sand. In picture 2 you will see the ball just in front of the sternum which is ideal for a standart bunker shot.
7. Swing back and forth on the right track
As you go back and forth, it is very important to swing to club in the right direction. But what is the right direction for the back – and downswing in a bunker shot? Look at the pictures below:
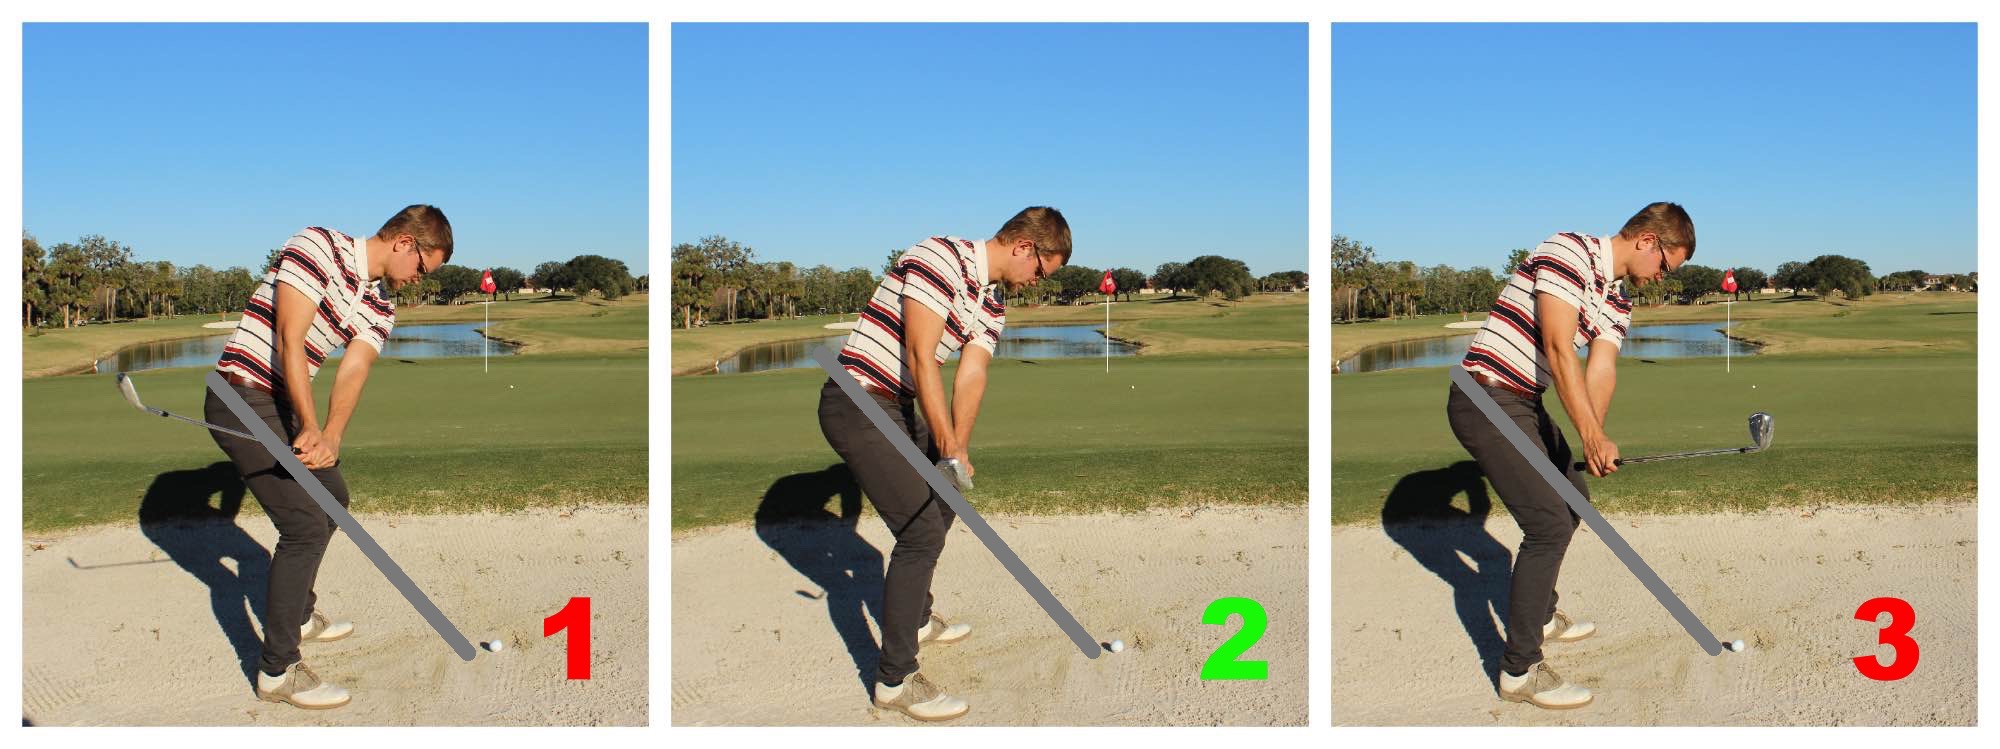
The line drawn from the shaft at setup is what we call the swing plane line. The clubhead should NEVER be below this line in the bunker! If it were to be below you would probably hit the sand way to early and then you would have to compensate for that in different ways. Picture 2 shows a swing where the clubhead swings along the plane line which is to prefer, and in picture 3 the clubhead is too far away from the player end therefor above the plane line. For many people it will fell like the clubhead is swinging away and up in the backswing , instead of a full swing movements which will be more around the body.
8. Cock that wrist
Another important element in the bunker is the wrist movement in the backswing. The wrist should be “cocking” in the backswing, creating an angle between the left forearm and the club shaft. The advantage for this is a little steeper Angle Of Attack coming into the ball and more clubhead speed.
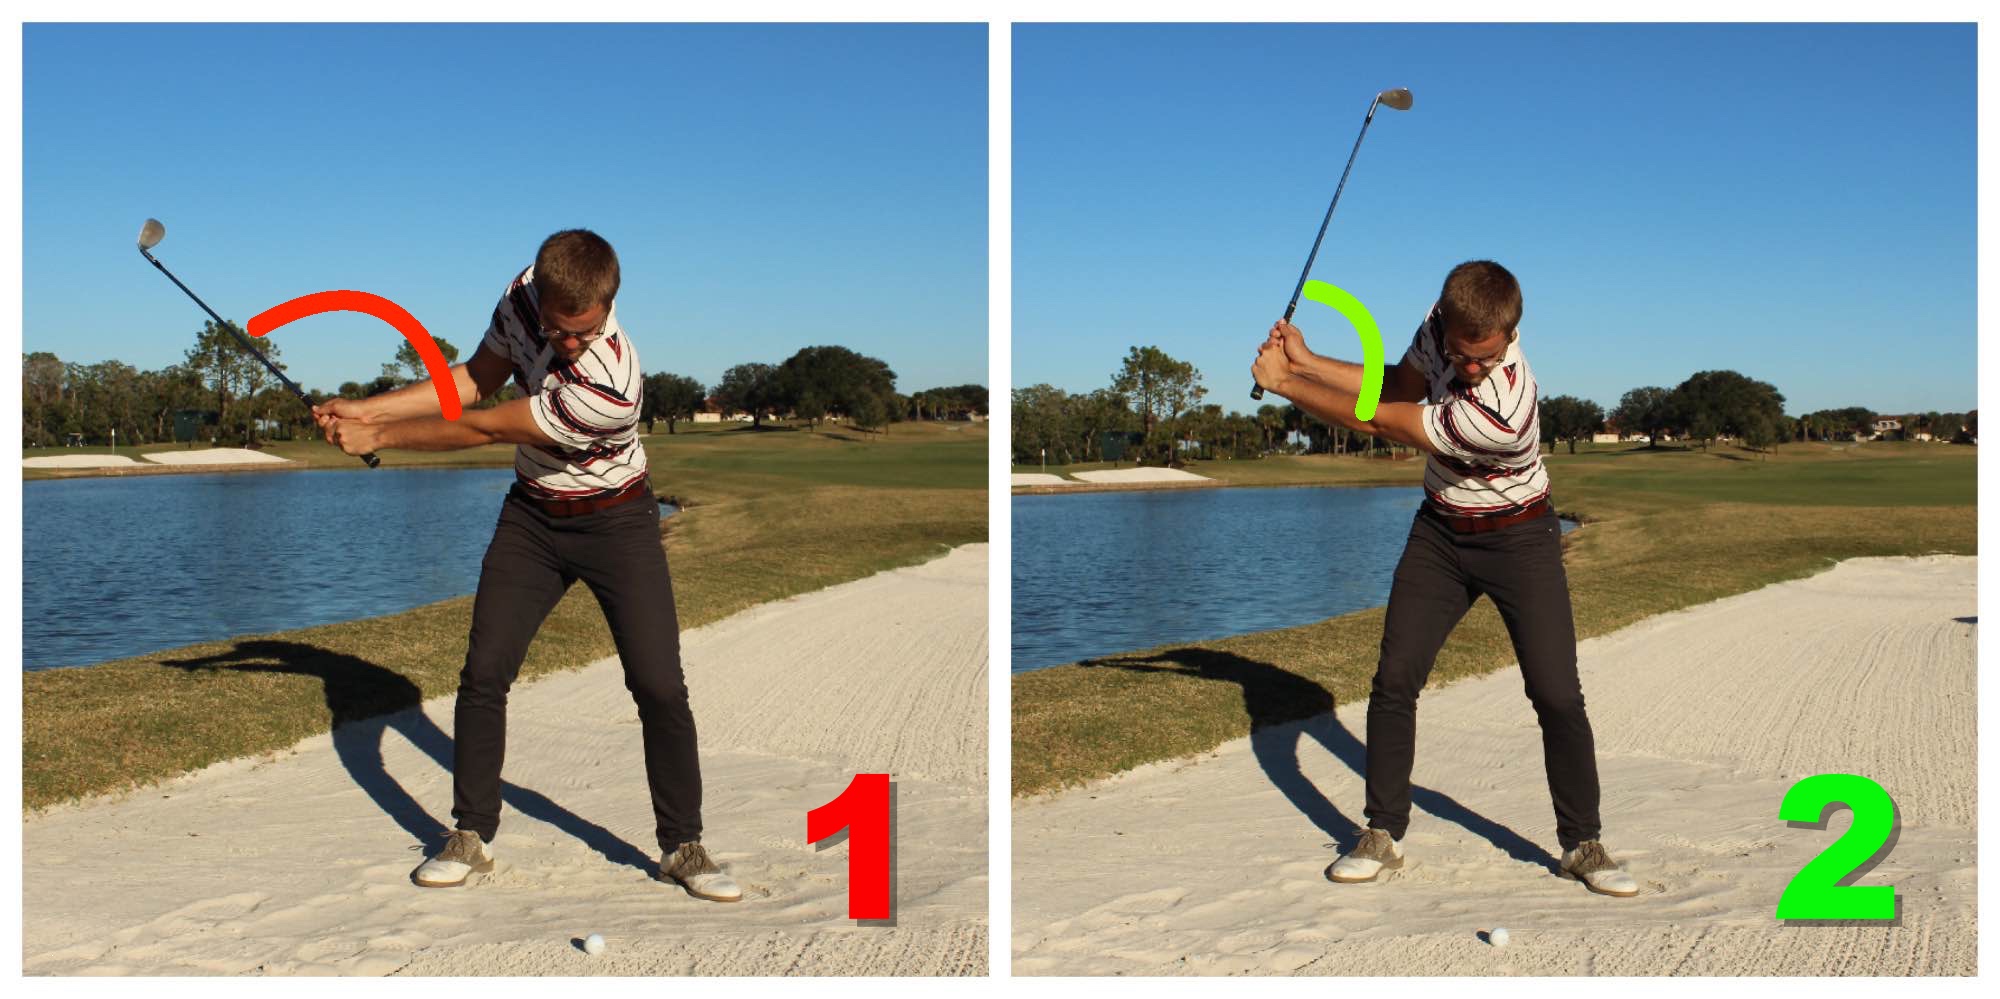 Picture 1 shows a backswing with no wrist cock. Picture 2 shows a backswing with a lot more wrist cock, which is to prefer in a bunker shot.
9. An open club face means a smiling players face
From setup we opened up the clubface. During the swing, it is one of our most important jobs, to KEEP it open. Both in the backswing, in the downswing, and in the follow through. The best way to do so is to keep the left wrist cupped during the whole motion, and let the left forearm rotate clickwise. Watch the pictures below, and notice the left wrist and the clubface alignments.
 In picture 1 you will see a very closed clubface in the backswing, which usually will cause the club to dig into the sand. In picture 2 the clubface is a bit more open which is better, and in picture 3 the clubface is wide open which is very good for green-side bunkershots.
10. Speed it up solider!
With the open clubface during the swing, you can now swing the club with quite a lot of speed, without sending the ball way over the green. Actually a good amount of club speed in the bunker brings along a few advantages:
• It creates a higher trajectory on the ball-flight.
• It creates more backspin on the ball.
• It makes it easier to have the club glide over the sand instead of digging into it.
 Dont be afraid to put a lot of speed on the club in the bunker. Speed is your friend!
11. Don’t tip back!
During the swing, it is really important to keep your head still. With that I mean that the head shouldn’t be moving to much away from the target. The head is the center of the swing, and moving your head will have a HUGE effect on where and how the club hits the sand.
Don’t mistake this with looking down all the time! The head should be turning with the balls as it is hit.
 In picture 1 you will se me tipping back during the downswing, with my weight placed mainly on the back foot. This is no good. In picture 2 the weight has moved forward and is placed mainly over the lead / front foot which if to prefer!
12. Extend my friend
During the downswing and impact zone, the body should start extending. This ensures the hands moving upwards during impact, which will give the best club/sand interaction. Imagining a full swing, how the hips and upper body is extending towards the ball, during impact and in the follow-through. The same motions should happen in a bunkershot.
 Picture 1 shows a bunkershot with no extension in the body. This is a no go! Picture 2 shows a shot where the player look down for way to long time, this limits the extension and rotation in the body. Picture 3 shows a shot where the head and body has turned and the body is in extension which is how it should be.
13. Control entry point in the sand
Where the club makes contact with the sand at first is extremely important, and has a major effect on the trajectory of the shot. The distance the sand is hit before the ball can vary a lot depending on the intended flight, but for a basic bunkershot the club should hit the sand about 1-2 inches before the ball.
14. Control the depth in the sand
An extremely underrated factor in bunker shots is the depth, which the clubhead reaches in the sand. If the entry point is good, but the depth is way to deep, you are never going to hit crisp bunker shots.
How do you control the depth then?
It is combination of many of the above-descripted principles. Keeping the head (centrum of swing) stable, keeping the clubface open, and extending through the impact zone are some of the most important elements in controlling the depth.

By controlling the depth of the club in the sand you will in most cases also be controlling the exit point of the club in the sand. It is important to control where the club exits the sand, because it has a major influence on the amount of sand hit during the motion, which will affect the speed of the ball and a few other factors. The length of the “turf” in the sand should be about a dollar-bill long.
15. Keep it relaxed and smooth
Lastly, all the above-mentioned concepts need to be done in a very relaxed and smooth motion. You don’t see any good bunker players being very pumped up, swinging in a out of sync motion. A bunkershot is a delicate precision maneuver, and this requires a smooth, rhythmic, and relaxed swing.

Congratulations!
You have now learned all of the 15 most important bunker shot basics, and you are ready to try out the techniques in real life! If you want to see how it looks on video, study the 2 videos below. Brett Rumford is a master from the sand, and he is demonstrating all of the above mentioned bunker shot basics.
Do you want more learning?
If you liked the principles described above, I would highly recommend you to check out 5 simple bunker setup fundamentals with Brett Rumford . Its a player analysis video where I walk you through 5 simple setup checkpoints in a bunker shot, with Brett Rumford as a model.
Feel free to share this article with your friends or family if you found it helpfull 🙂

9 Best Chipping Tips For Instant Better Performance Around the Green
9 Best Chipping Tips For Instant Better Performance Around the Green
I think you will agree with me when I tell you…
That when chipping, you will never hit the ball as close to the hole as you want, if you don’t have 100% control over the contact with the ball. With these simple, yet enormous effective 9 best chipping tips, your contact with the ball will be better than ever, and you will knock the ball closer to the hole as you’ve always dreamed of!
One thing to remember: This technique is for a very “standard/basic” mid height trajectory chip shot. Endless variations of the following 9 components of this shot will and should be made in the short game in order to fit the shot to the situation.
All 9 best chipping tips are equally important, so keep on reading to the bottom!
1. Build the right foundation.
With a setup that matches the intended shot, you will have the greatest chance of hitting a solid chip, and why wouldn’t you give yourself the best odds.
Lets look at the pictures below.
On the 2 pictures to the right, you will se how a proper setup for a basic mid-trajectory shot should look like. A few things is to notice here:
• The ball is located just underneath the sternum of the player.
• The hands are located just inside the left thigh of the player
• The weight is distributed 55% on the left foot and 45% on the right foot.
But why are those 3 things important?
These 3 things combined will create the proper shaft lean (shaft angle) at setup, which will create the right conditions for the club to glide over the ground at impact. This is what its all about. Picture nr. 1 is the WRONG way to setup if you try to achieve this gliding motion of the club.
Other things to notice at the setup are:
• Hells about a clubface wide apart, left toe turned out about 30 degrees.
• Very relaxed arms and hands
• Body is in a relax position.
2. Which way are you swinging?
With the right setup established, lets move on to nr. 1 out of 2 key elements in the backswing. If you don’t swing the club back along the swing plane, you’re making it a lot harder than necessary.
You might be wondering:
What is the swing plane? The swing plane is the angle that the shaft of the club creates at setup, seen from what we call ”down the line” view. Look at picture nr. 1 below:
This line drawn on picture nr.1 is the swing plane. This is the line that the clubhead should travel up along in the backswing.
In order to swing the club the right way back, as shown on picture nr.4 , here is what to do:
• The wrist can move in 3 different ways, and these 3 different directions must be coordinated on order to swing the club back along the swing plane.
• The amount of rotation in the body must match those wrist movements.
But how is that done?
Good question! It can be hard for the player alone to practice this. But 2 things can be done:
• Use a camera (smartphone) to record your swing from DTL view.
• Use the drill shown below
3. An open face is a happy face
The second key element in the backswing of a chip is the clubface. More specific, how the leading edge of the club is aligned compared to the ground. You NEED to allow the clubface to open up during the backswing. Here is why:
• An open clubface creates the right conditions for the sole of the club to glide over the ground at impact, instead of the leading edge digging.
• An open clubface allows you to release the club properly.
Now you know why you must do it. Now you just need to know how. This can be a little bit trickier, because the opening of the clubface can happen in different ways. Here are the 2 most common ways to do it:
1. Open the clubface already at setup.
2. During the backswing, let the left forearm rotate clockwise.
Both of techniques will open up the clubface, and make the leading edge of the club point more up in the air, as shown on picture nr. 2. Picture number 1. shows a very closed clubface, which is a disaster. Picture nr. 2 shows a very open clubface, which will make the club glide over the ground, but it will also launch the ball extremely high.
4. Let it go, let it go!
Now that we’ve made a proper backswing, lets move on to the downswing. A common thing that people have been told to do when chipping, is to keep the wrists totally still. I strongly disagree. You need to allow some freedom in your wrist, to enable a release of the club, in order to deliver the club in the right way at impact. Therefor, make sure of the following in the downswing:
• Let your hands and wrist move freely in the downswing.
• Don’t force the club anywhere, it should move in its own natural flow.
• Don’t be afraid of the movement feeling a little “wristy” if your are used to keeping your wrists totally stiff.
The below pictures shows a very stiff and non-releasing movement in the bottom of the picture, and on the top line you’ll see a more free release of the club through the ball.
5. Your Release needs Backup
As stated above, a release of the club is necessary in order to deliver the club in the right way. But a chipping motion only consisting of the wrist moving, is not to prefer.
Here is the deal:
You need to support the release of the club with a rotation of the upper body.
In the follow-thruogh the upper and lover body should be moving towards a position where they aim at the target. They may not turn that much, depending on the distance of the shot, but they certainly should be turning towards that. Picture 1 shows a correct turning of the upper and lower body. Picture 2 shows how it looks when neither upper og lower body turns in the follow-through.

6. Up up up
When I say up, I mean that certain parts of your body should be moving upwards in the motion. This is one of many misunderstood concepts in chipping.
Many people believe that the club should be moving downwards at impact, and that is also correct. But WHICH part of the club should be moving downward is something they dont think about.
Here is the kicker:
It is only the CLUBHEAD that should be moving downwards. The grip of the club should actually move upwards through the impact zone. If the grip also moves downward, the club will dig into the ground, and a lot of other compensations must be done. Therefore you must do the following to make sure that the grip of the club moves upwards:
• Your head should actually move up a little in the later parts of the downswing and through the impact zone.
• Your body should be slightly extending in the impact zone.
• Your shoulders should be turning which will help the left shoulder to rise through the impact zone.
If you do these things correctly, you will have a lot greater chance of having the club to glide over the ground at impact, instead of digging.
7. You’ve got to go forward!
You’ve made it through most of the motion, and we are now in the finish position. We’ve already been through a couple of the important elements in the finish, but we’re still missing one. The weight distribution.
• Your weight should be about 90% on the front foot (lead foot) in the finish position. (see picture 2)
• This serves to improve the control over where the club hits the ground.
Way to many amateurs falls back on the back foot (trail foot) during the motion (see picture 1) , and this ruins their low point and contact point control.

8. How far are you going?
A final component to add to the motion of a basic, mid-trajectory chip shot, is the swing length. Both in the backswing and in the follow-through. If you’re swing-length control is off it can cause problems for both lowpoint control, as well as distance control. Therefore:
• Your backswing and follow-through should be about the same length. (Picture 3)
• A much shorter backswing than follow-through will force you to add a lot of energy to the club coming down towards the ball, which will lead to a lot of inconsistency in both contact and distance control. (Picture 1)
• A much shorter follow-through than backswing will force you to decelerate the club coming down to the ball, which will lead to the same issues as above. (Picture 2)
9. Please don’t kill the bird!
We have made it to the last extremely important factor when chipping. You’ve might not have thought about it, but grip pressure can be a major reason for bad chippers. A strong grip pressure will usually lead to:
• No release of the club, and therefore poor impact conditions.
• The club trajectory being manipulated during the swing.
• The grip of the club moving downwards for too long time.

It can be hard to tell anybody to have a certain grip pressure, because it is a very individual ting. You can try the following drill to find your perfect grip pressure:
Your grip pressure is rated on a scale from 1 to 10. 10 is as tight as you can hold, 1 is as gently you can hold and not loose the club.
1. Hit 5 standard chip shots with a grip pressure of 10.
2. Hit 5 standard chip shots with a grip pressure of 1.
3. Hit 5 standard chip shots with a grip pressure of 5.
Now you should be able to fell which grip pressure is the best for you!
A good example of the motion described above: Henrik Stenson
You can watch many more examples on the techniques described above by going to the Swing Library
You’ve made it!
We’ve been through all of the 9 Best Chipping Tips! I hope some new information have been presented to you, and that you are ready to go out and test everyone of them!
Remember, if you need help to identify some of the techniques presented above, you can always book an online lesson! I will point the most important factors for YOUR Short Game to work on, that will improve your performance around the green!
For more content that can improve your Short Game performance, follow World Of Short Game on Facebook!

Better contact in the bunker with this simple drill
Better contact in the bunker with this simple drill
Try this simple yet very effective bunker-drill. All you need is 4 golfballs, and a bunker. After doing this drill a few times you should have a better felling of where the club should enter the sand, in order to give you the wanted contact.
Good luck! 🙂
Video also available in danish, click here

Chipping drill: Landingzone game
Chipping drill: Hit your landingspot
The importance of being able to hit your landingspot when chipping is HUGE! If you cannot control where you land the ball when chipping into the green, you have no chance of hitting the ball close to the hole repeatedly.
The following drill / game improves your ability to hit your landingspot. You can do it alone, compete 1-vs-1 with your partner, or compete in larger groups.
How to do it
Make 9 holes/shots around a green. The shots/holes must be in different lengths, from different surfaces with different lies. The landing zones may also vary according to the length of the hole. (see picture below)
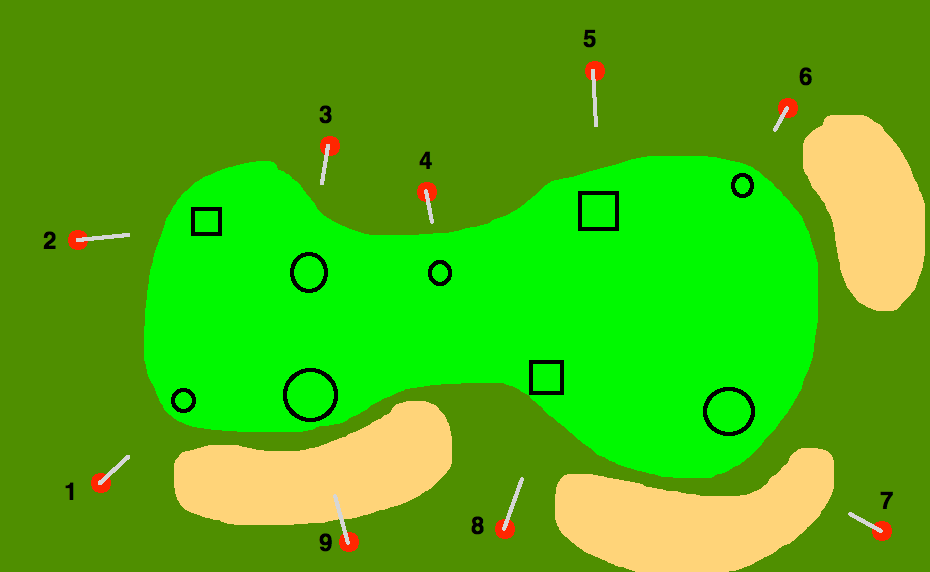
You can use clubs, lines, tees, flagsticks etc. to create the landingszone.
The chipping drill
If you play against a partner, hit 1 shot each, on each hole. Landing the ball within the zone (in carry, the ball doesn’t have stay in the zone, just hit the ground for the first time within the zone) you get 1 point. The player with the most points when the game is over is the winner. You can either just play 1 or 2 rounds (9 or 18 holes) or you can play as following:
In round 1 you must use whatever club you want on each shot.
In round 2 you must bring along 3 different clubs (ex. 50, 55 and 60 degrees wedge). Before each hole you have to roll a dice. If you hit 1 or 2 with the dice, use the lowest lofted club (50 degrees). If you hit a 3 or 4, you must use the club with the middle amount of degrees (55 degrees). If you hit a 5 or 6 with the dice, use the club with the most degrees (60 degrees).
In round 3 you must choose one club, only one, that you use for all the holes.
The player who has scored the most points (hit most zones) in all three rounds has won.
Enjoy your practice, and let the best man win! 😉