- +4527976587
- mail@worldofshortgame.com


Tag Archive tips

9 Best Chipping Tips For Instant Better Performance Around the Green
9 Best Chipping Tips For Instant Better Performance Around the Green
I think you will agree with me when I tell you…
That when chipping, you will never hit the ball as close to the hole as you want, if you don’t have 100% control over the contact with the ball. With these simple, yet enormous effective 9 best chipping tips, your contact with the ball will be better than ever, and you will knock the ball closer to the hole as you’ve always dreamed of!
One thing to remember: This technique is for a very “standard/basic” mid height trajectory chip shot. Endless variations of the following 9 components of this shot will and should be made in the short game in order to fit the shot to the situation.
All 9 best chipping tips are equally important, so keep on reading to the bottom!
1. Build the right foundation.
With a setup that matches the intended shot, you will have the greatest chance of hitting a solid chip, and why wouldn’t you give yourself the best odds.
Lets look at the pictures below.
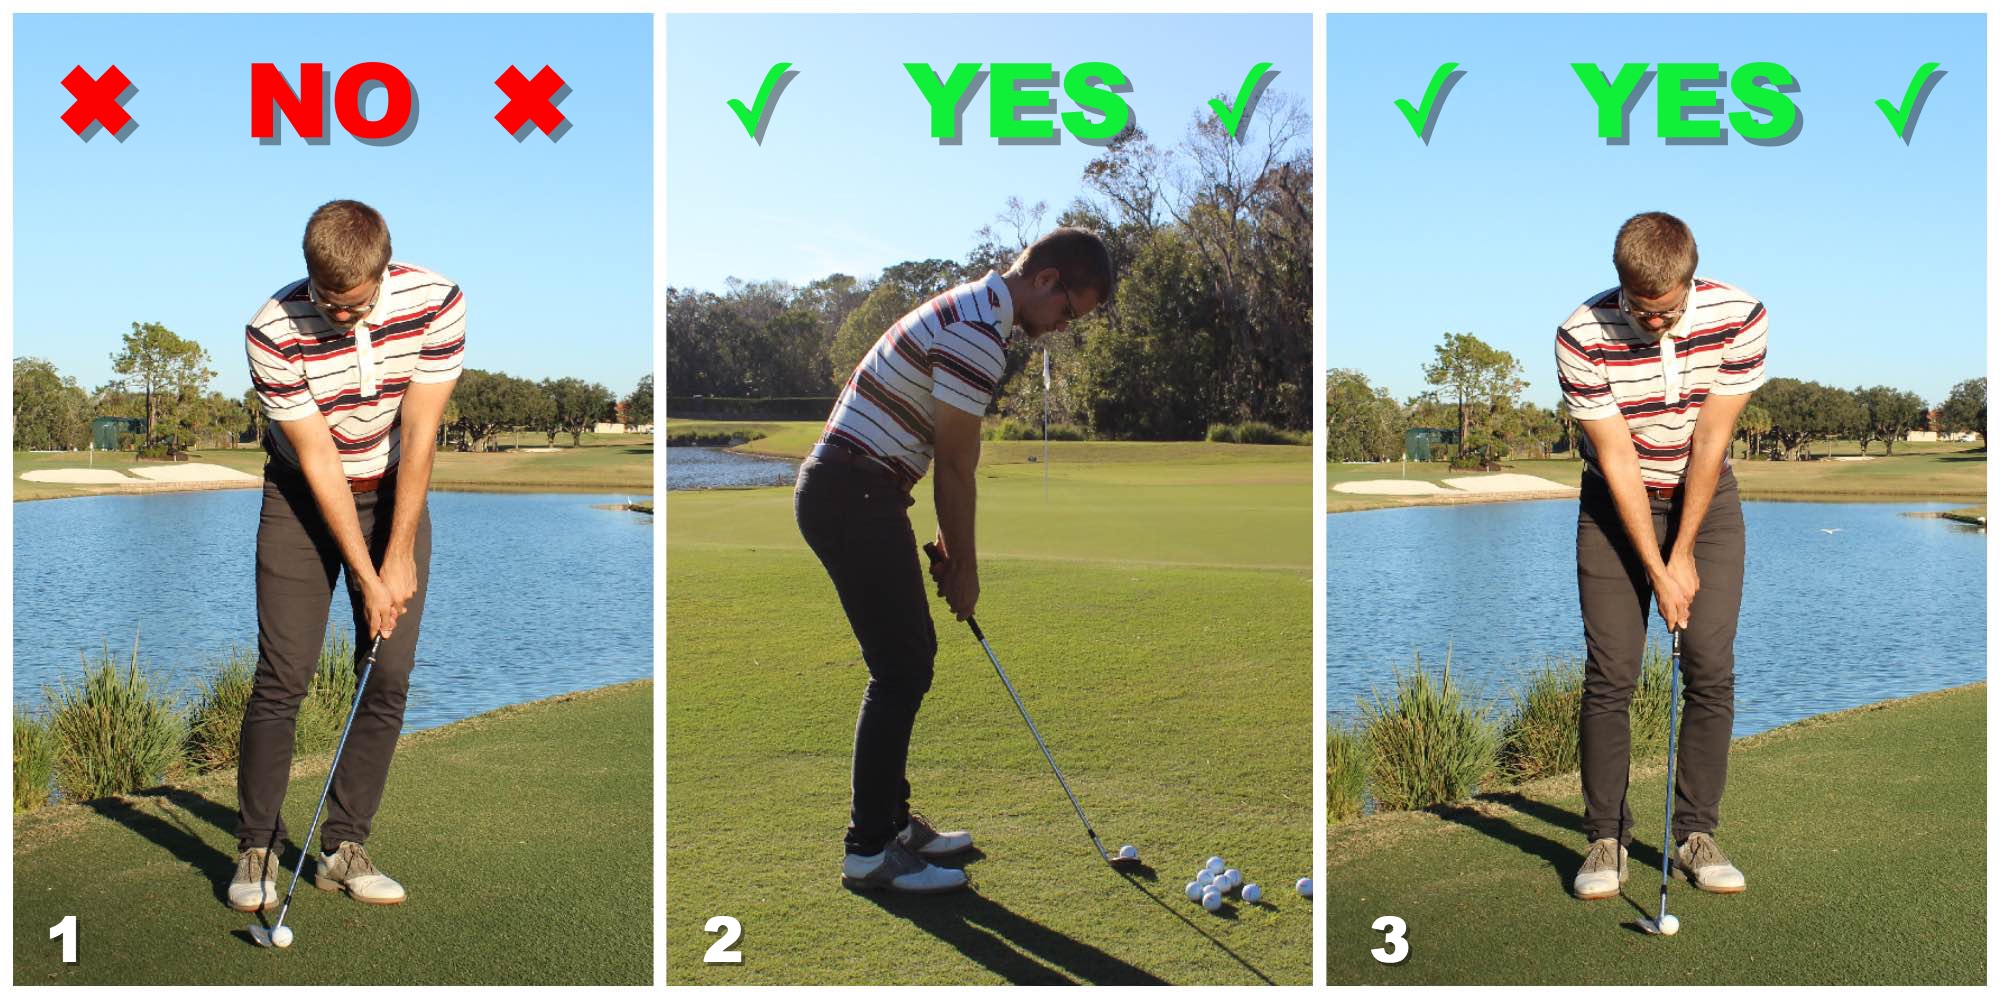
On the 2 pictures to the right, you will se how a proper setup for a basic mid-trajectory shot should look like. A few things is to notice here:
• The ball is located just underneath the sternum of the player.
• The hands are located just inside the left thigh of the player
• The weight is distributed 55% on the left foot and 45% on the right foot.
But why are those 3 things important?
These 3 things combined will create the proper shaft lean (shaft angle) at setup, which will create the right conditions for the club to glide over the ground at impact. This is what its all about. Picture nr. 1 is the WRONG way to setup if you try to achieve this gliding motion of the club.
Other things to notice at the setup are:
• Hells about a clubface wide apart, left toe turned out about 30 degrees.
• Very relaxed arms and hands
• Body is in a relax position.

2. Which way are you swinging?
With the right setup established, lets move on to nr. 1 out of 2 key elements in the backswing. If you don’t swing the club back along the swing plane, you’re making it a lot harder than necessary.
You might be wondering:
What is the swing plane? The swing plane is the angle that the shaft of the club creates at setup, seen from what we call ”down the line” view. Look at picture nr. 1 below:
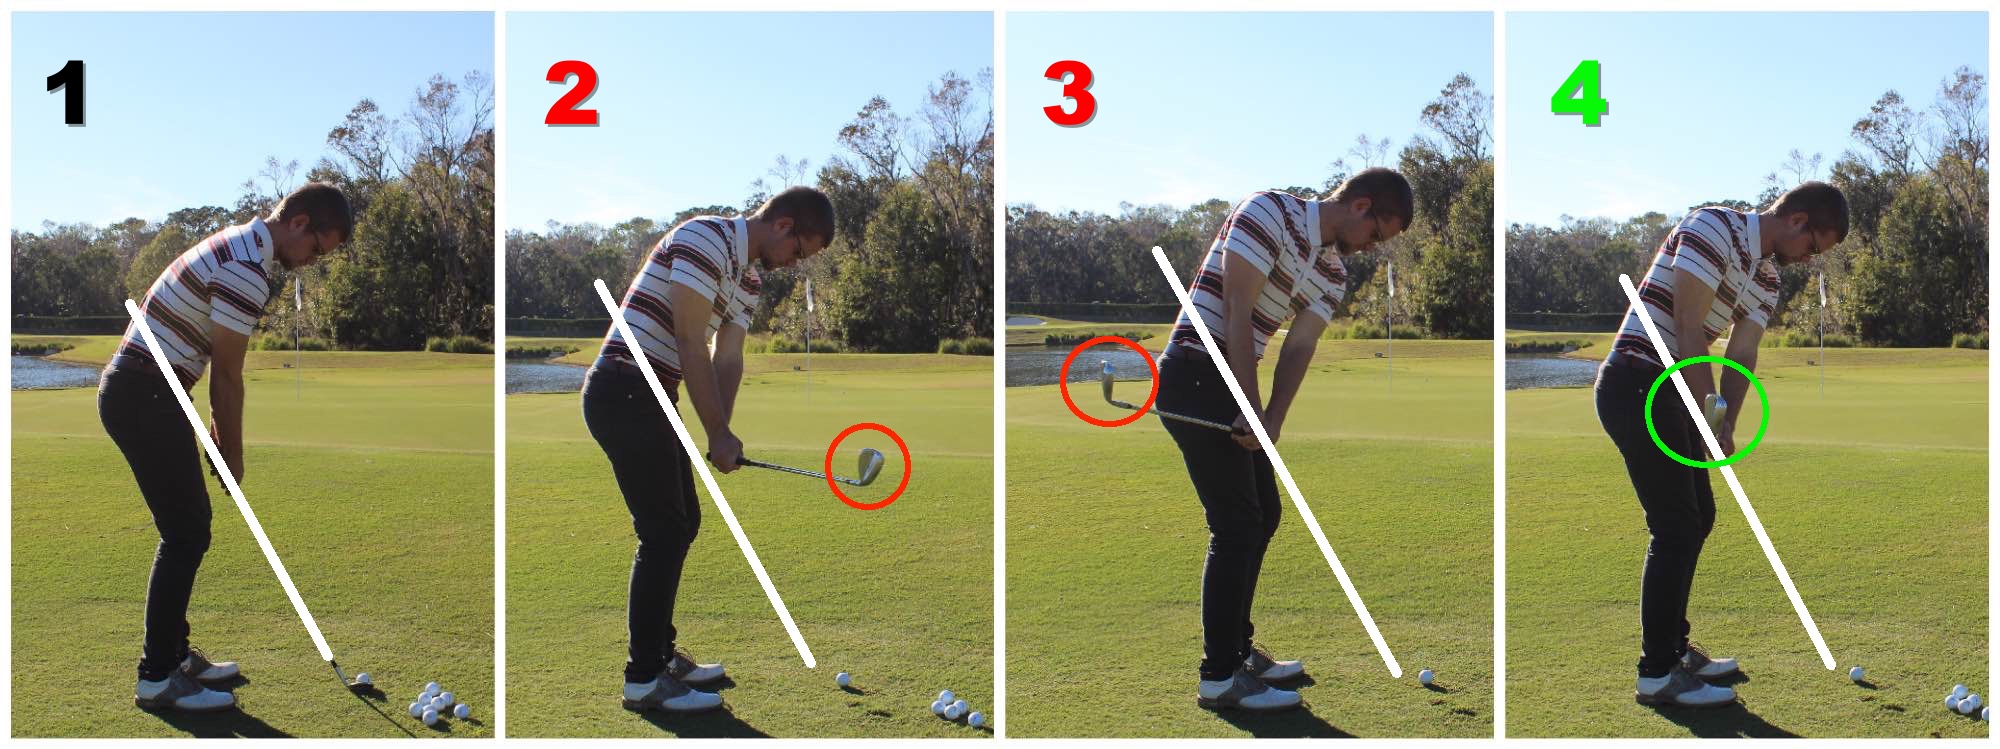
This line drawn on picture nr.1 is the swing plane. This is the line that the clubhead should travel up along in the backswing.
In order to swing the club the right way back, as shown on picture nr.4 , here is what to do:
• The wrist can move in 3 different ways, and these 3 different directions must be coordinated on order to swing the club back along the swing plane.
• The amount of rotation in the body must match those wrist movements.
But how is that done?
Good question! It can be hard for the player alone to practice this. But 2 things can be done:
• Use a camera (smartphone) to record your swing from DTL view.
• Use the drill shown below
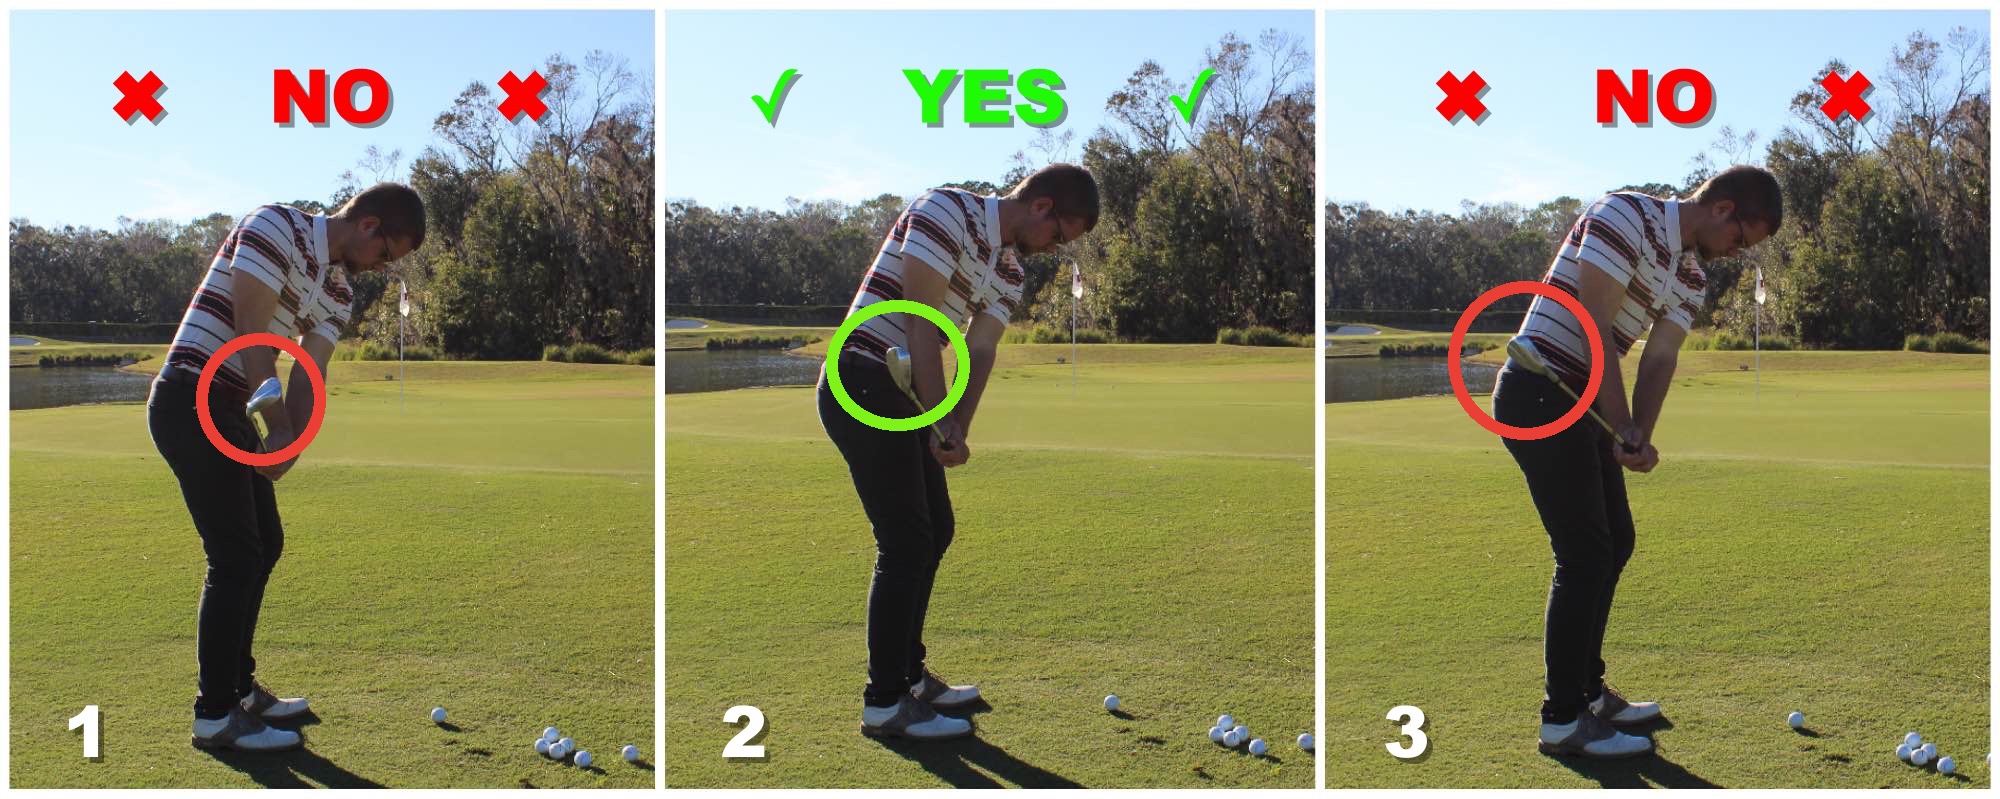
3. An open face is a happy face
The second key element in the backswing of a chip is the clubface. More specific, how the leading edge of the club is aligned compared to the ground. You NEED to allow the clubface to open up during the backswing. Here is why:
• An open clubface creates the right conditions for the sole of the club to glide over the ground at impact, instead of the leading edge digging.
• An open clubface allows you to release the club properly.
Now you know why you must do it. Now you just need to know how. This can be a little bit trickier, because the opening of the clubface can happen in different ways. Here are the 2 most common ways to do it:
1. Open the clubface already at setup.
2. During the backswing, let the left forearm rotate clockwise.
Both of techniques will open up the clubface, and make the leading edge of the club point more up in the air, as shown on picture nr. 2. Picture number 1. shows a very closed clubface, which is a disaster. Picture nr. 2 shows a very open clubface, which will make the club glide over the ground, but it will also launch the ball extremely high.
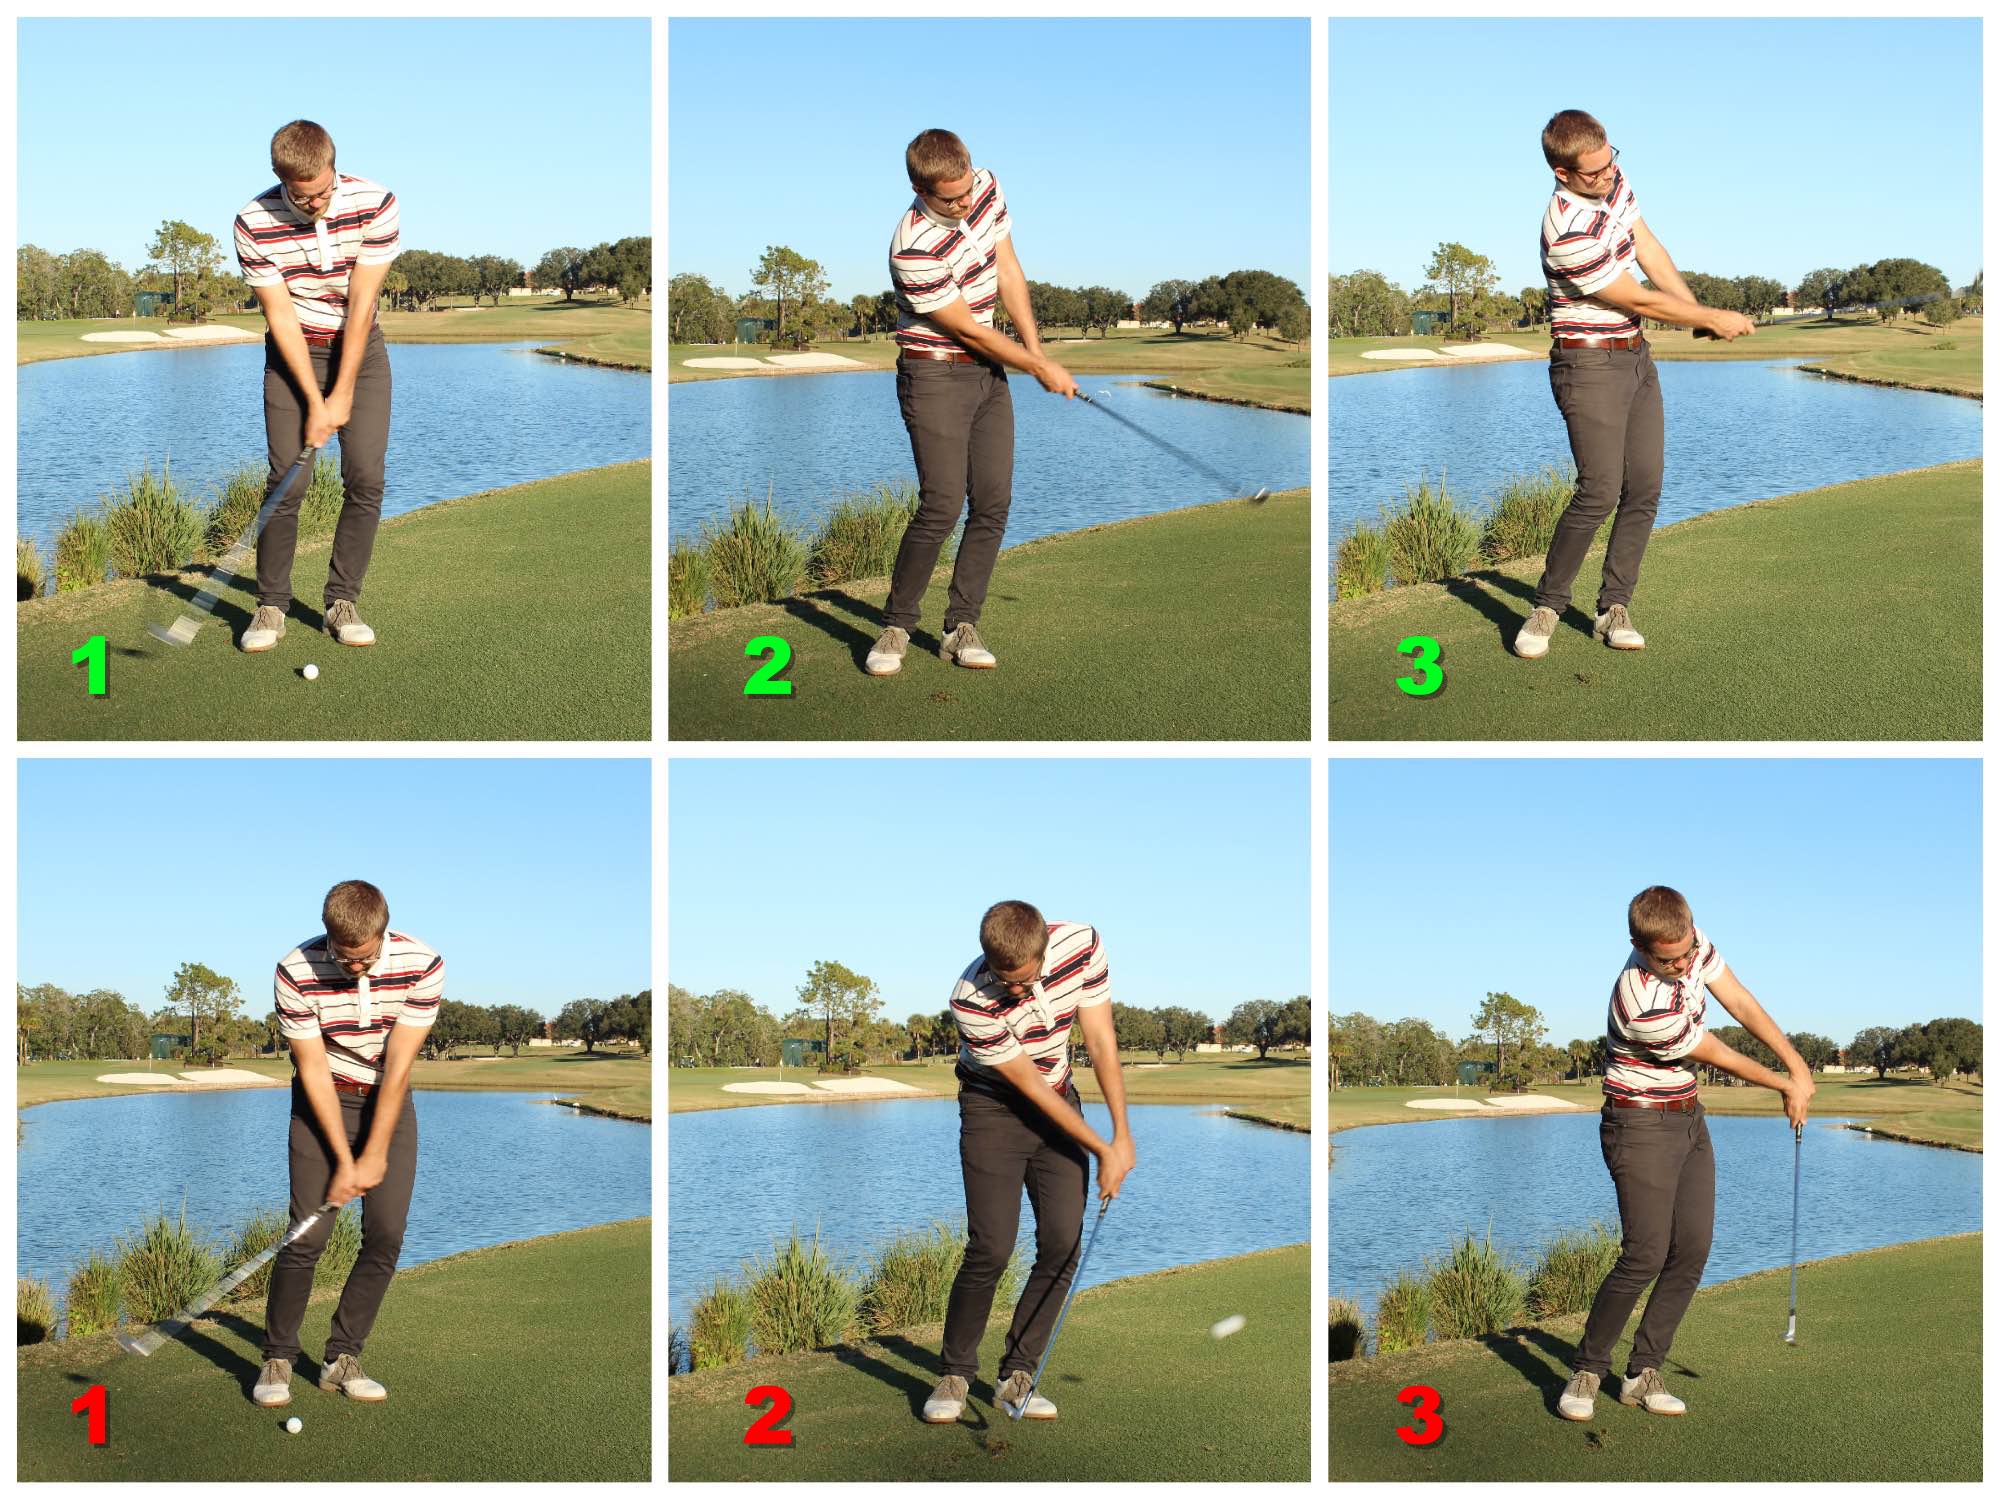
4. Let it go, let it go!
Now that we’ve made a proper backswing, lets move on to the downswing. A common thing that people have been told to do when chipping, is to keep the wrists totally still. I strongly disagree. You need to allow some freedom in your wrist, to enable a release of the club, in order to deliver the club in the right way at impact. Therefor, make sure of the following in the downswing:
• Let your hands and wrist move freely in the downswing.
• Don’t force the club anywhere, it should move in its own natural flow.
• Don’t be afraid of the movement feeling a little “wristy” if your are used to keeping your wrists totally stiff.
The below pictures shows a very stiff and non-releasing movement in the bottom of the picture, and on the top line you’ll see a more free release of the club through the ball.
5. Your Release needs Backup
As stated above, a release of the club is necessary in order to deliver the club in the right way. But a chipping motion only consisting of the wrist moving, is not to prefer.
Here is the deal:
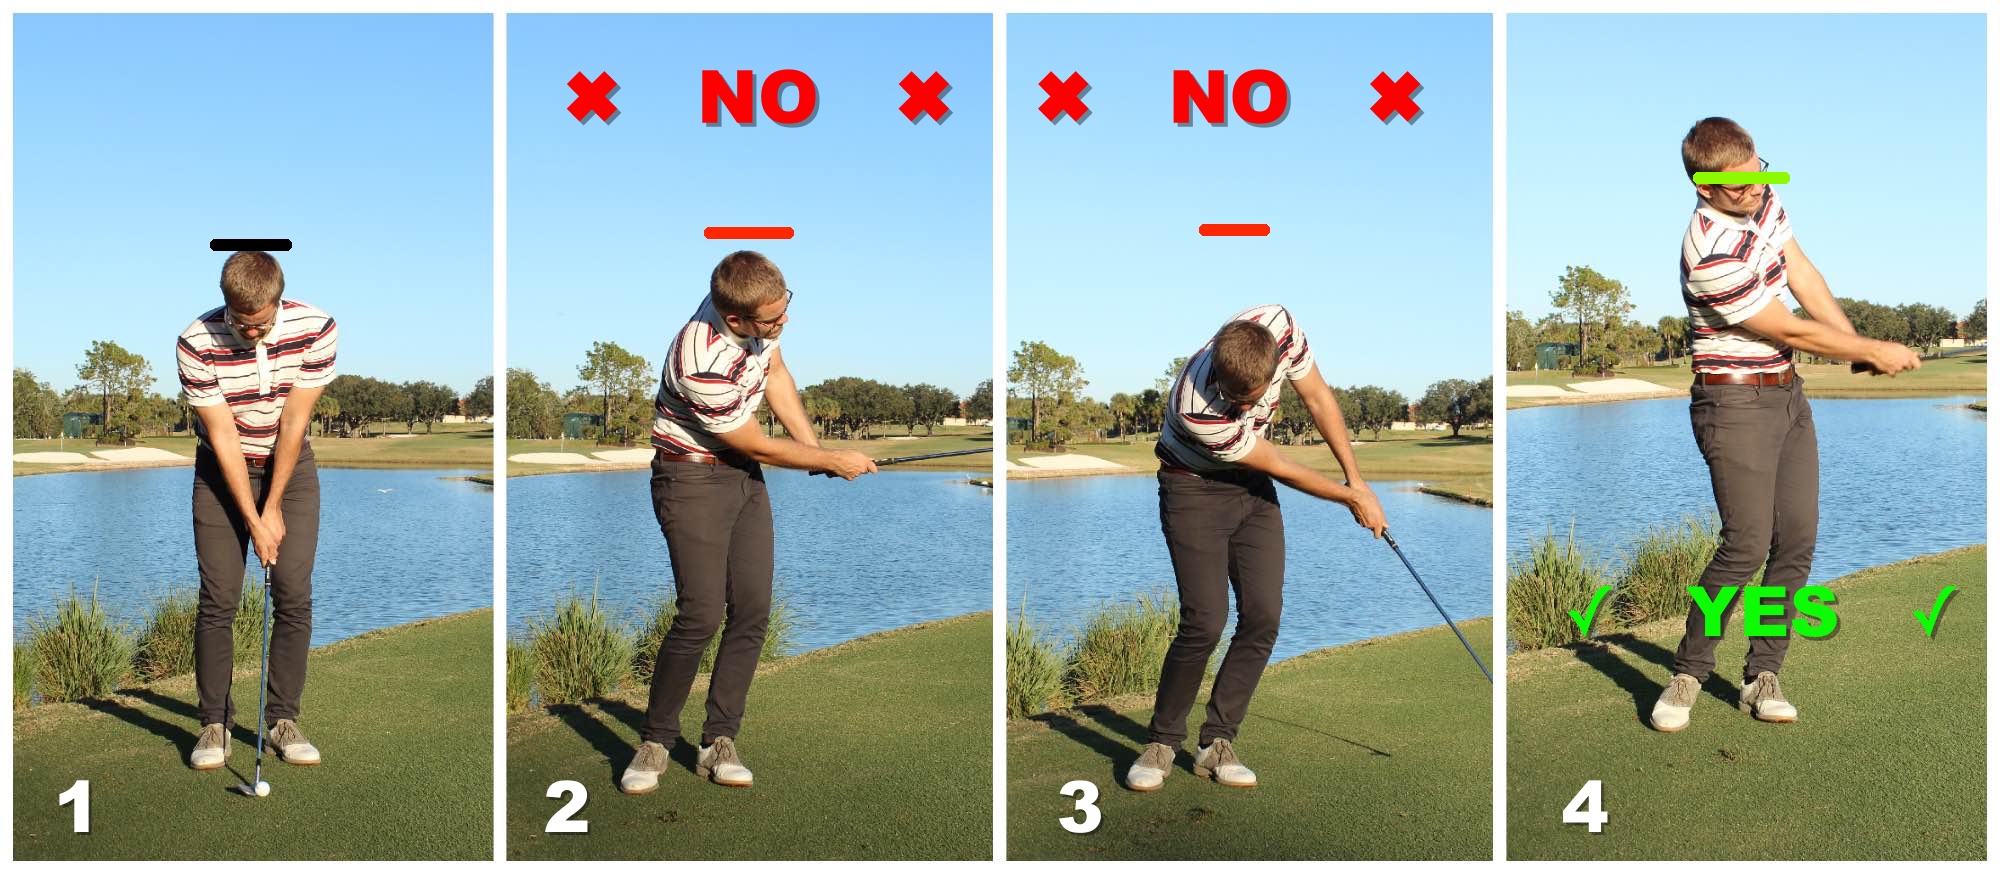
You need to support the release of the club with a rotation of the upper body.
In the follow-thruogh the upper and lover body should be moving towards a position where they aim at the target. They may not turn that much, depending on the distance of the shot, but they certainly should be turning towards that. Picture 1 shows a correct turning of the upper and lower body. Picture 2 shows how it looks when neither upper og lower body turns in the follow-through.

6. Up up up
When I say up, I mean that certain parts of your body should be moving upwards in the motion. This is one of many misunderstood concepts in chipping.
Many people believe that the club should be moving downwards at impact, and that is also correct. But WHICH part of the club should be moving downward is something they dont think about.
Here is the kicker:
It is only the CLUBHEAD that should be moving downwards. The grip of the club should actually move upwards through the impact zone. If the grip also moves downward, the club will dig into the ground, and a lot of other compensations must be done. Therefore you must do the following to make sure that the grip of the club moves upwards:
• Your head should actually move up a little in the later parts of the downswing and through the impact zone.
• Your body should be slightly extending in the impact zone.
• Your shoulders should be turning which will help the left shoulder to rise through the impact zone.
If you do these things correctly, you will have a lot greater chance of having the club to glide over the ground at impact, instead of digging.
7. You’ve got to go forward!
You’ve made it through most of the motion, and we are now in the finish position. We’ve already been through a couple of the important elements in the finish, but we’re still missing one. The weight distribution.
• Your weight should be about 90% on the front foot (lead foot) in the finish position. (see picture 2)
• This serves to improve the control over where the club hits the ground.
Way to many amateurs falls back on the back foot (trail foot) during the motion (see picture 1) , and this ruins their low point and contact point control.

8. How far are you going?
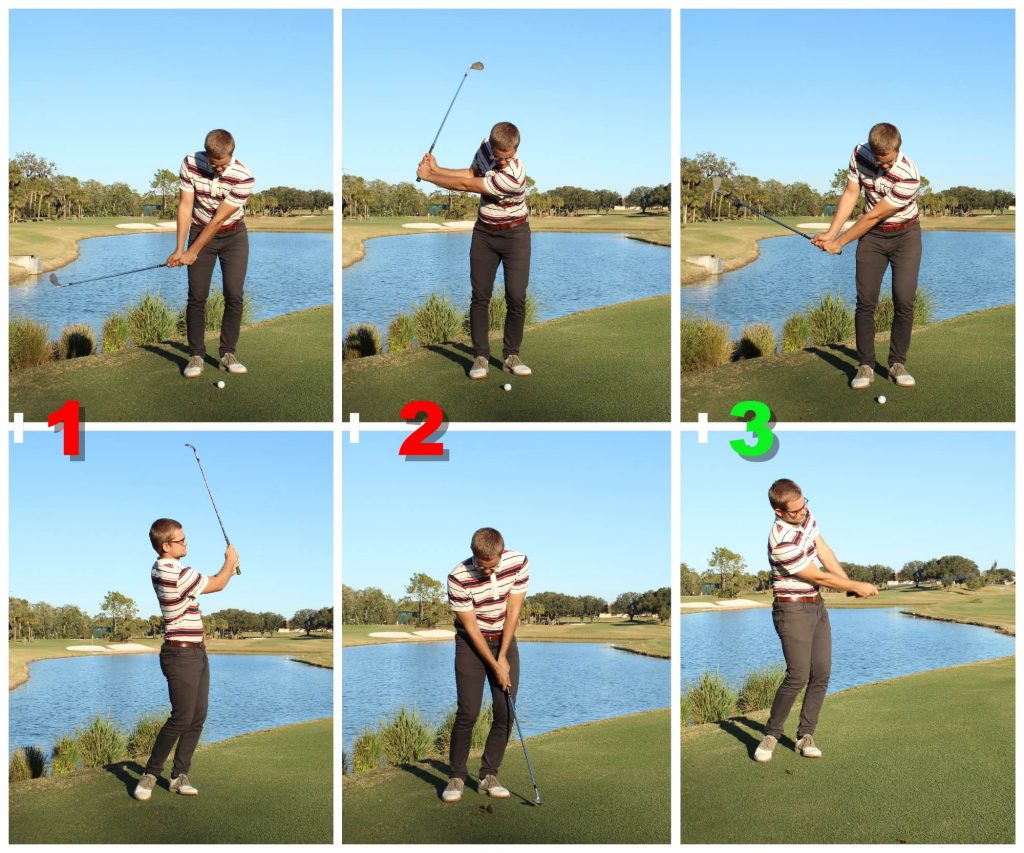
A final component to add to the motion of a basic, mid-trajectory chip shot, is the swing length. Both in the backswing and in the follow-through. If you’re swing-length control is off it can cause problems for both lowpoint control, as well as distance control. Therefore:
• Your backswing and follow-through should be about the same length. (Picture 3)
• A much shorter backswing than follow-through will force you to add a lot of energy to the club coming down towards the ball, which will lead to a lot of inconsistency in both contact and distance control. (Picture 1)
• A much shorter follow-through than backswing will force you to decelerate the club coming down to the ball, which will lead to the same issues as above. (Picture 2)
9. Please don’t kill the bird!
We have made it to the last extremely important factor when chipping. You’ve might not have thought about it, but grip pressure can be a major reason for bad chippers. A strong grip pressure will usually lead to:
• No release of the club, and therefore poor impact conditions.
• The club trajectory being manipulated during the swing.
• The grip of the club moving downwards for too long time.

It can be hard to tell anybody to have a certain grip pressure, because it is a very individual ting. You can try the following drill to find your perfect grip pressure:
Your grip pressure is rated on a scale from 1 to 10. 10 is as tight as you can hold, 1 is as gently you can hold and not loose the club.
1. Hit 5 standard chip shots with a grip pressure of 10.
2. Hit 5 standard chip shots with a grip pressure of 1.
3. Hit 5 standard chip shots with a grip pressure of 5.
Now you should be able to fell which grip pressure is the best for you!
A good example of the motion described above: Henrik Stenson
You can watch many more examples on the techniques described above by going to the Swing Library
You’ve made it!
We’ve been through all of the 9 Best Chipping Tips! I hope some new information have been presented to you, and that you are ready to go out and test everyone of them!
Remember, if you need help to identify some of the techniques presented above, you can always book an online lesson! I will point the most important factors for YOUR Short Game to work on, that will improve your performance around the green!
For more content that can improve your Short Game performance, follow World Of Short Game on Facebook!